Well, this should lift the mood of owners of shiny new Asus Zenfone 2 — the ClockworkMod recovery, aka CWM, is now available for their device, though, not as permanent installation. You’ll boot into CWM recovery right after installation, but once you’re out of recovery, it will be automatically removed from phone. But anyway, that brings the ability to root your Zenfone 2 pretty easily, whichever firmware your are on, without the need of installing a given pre-rooted firmware.
And guess what, installation of the CWM recovery is super-damn-easy too. You just have to download the required stuff and have to run just one file and follow two little steps and you’ll in CWM recovery mode soon.
You have to thank 29y6145 user over at XDA for this, who broght this to Zenfone 2 using the original work of another user, social-design-concepts, on Intel powered phones with locked bootloaders. And of course, Chainfire, for the SuperSU file.
With the CWM recovery on your Zenfone 2, you can also create nandroid backup, something we depend on very much. It’s a lifesaver feature of custom recoveries, be it CWM or TWRP. While there is no news of TWRP for Zenfone 2 yet, we really hope it should come to the device. No ETA, though!
There are apparently lots of benefits of installing a CWM recovery on Zenfone 2, and root is chief of them. Apart from pre-rooted firmware, which are region specific, no good root solution is available. But with the availability of CWM recovery, you can flash Chainfire’s SuperSU root package on your Zenfone 2 to root it, and that makes up for the best root solution too, thanks to ClockworkMod recovery.
Let’s see how to install Zenfone 2 CWM recovery.
Supported devices
- Asus Zenfone 2, model no. ZE550ML and ZE551ML
- Don’t try on any other Android device
Downloads
- ClockworkMod (CWM) recovery (13.2 MB) | Filename: CWM_Asus_intell.zip
- Root package (3.83 MB) | Filename: UPDATE-SuperSU-v2.46.zip
Installation Instructions
WARNING: Warranty may be void of your device if you follow the procedures given on this page. You only are responsible for your device. We won’t be liable if any damage occurs to your device and/or its components.
Important Note: Backup important files (music, photos, documents, videos, etc.) stored on your device before proceeding with the steps below. There are chances that everything on your phone might get deleted, hence the need for appropriate backup of files and contacts.
- If you don’t have ADB drivers installed already, do so now by following our ADB installation guide. Come back to this guide after installing ADB.
- Also, you need to have Asus drivers installed. Download from here and install them if you haven’t got them already.
- Make sure your Zenfone 2 is powered ON, and connected to PC.
- Transfer the Root package file, UPDATE-SuperSU-v2.46.zip, to your Zenfone 2. (Remember its location, we will need this in step 10 below).
- Extract the CWM recovery file you downloaded from above to a folder, using a free software like 7-zip. You should get files as seen in the image right below.
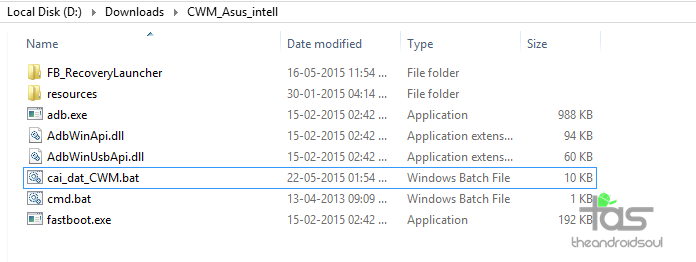
- Double click on cai_dat_CWM.bat file to run recovery installer tool to start installing the CWM recovery on Zenfone 2.
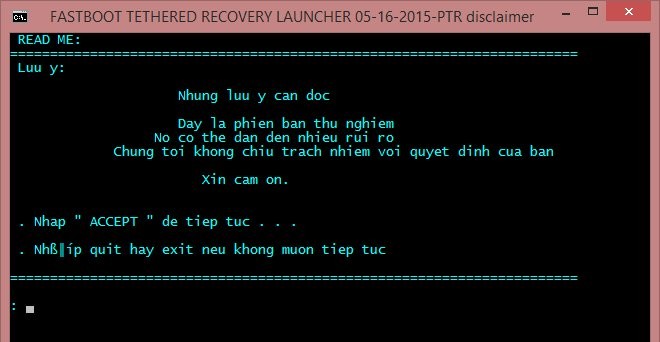
- Type ACCEPT and then hit enter key in the command prompt window that comes up, and you will be presented with various options.
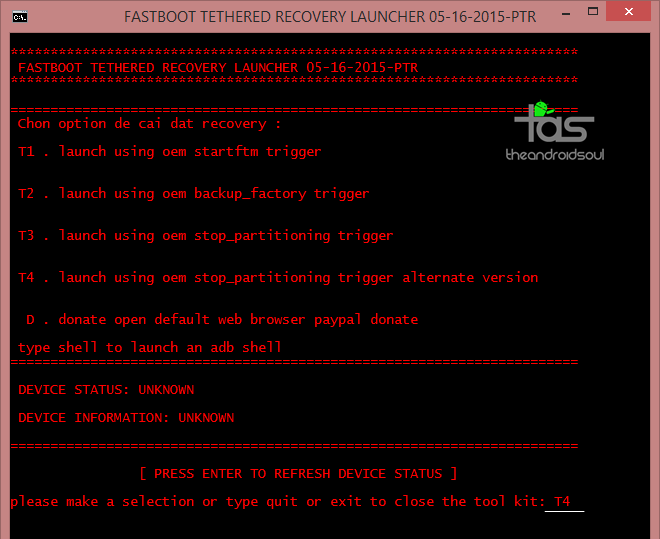
- Type T4 and then hit enter key to begin flashing of CWM recovery.
- After flashing of CWM recovery on Zenfone 2 is done by the tool, you’ll boot into CWM recovery automatically.
- Choose Install zip from sdcard option and then select the root package file UPDATE-SuperSU-v2.46.zip (from step 4).
- Select Yes on next screen to confirm flashing of root.
- When done, go back and select reboot system now to restart the Zenfone 2.
- [Optional] Download an app like Root Checker to confirm root access on your Zenfone 2.
That’s it.
Enjoy root access and root apps.
If you need any help regarding this, sure let us know via comments below. We’ll be try our best to help you out.



After step 8, the FastBoot Tethered Recovery Launcher gave me the following message:
“ERROR ! ! ! ERROR PLEASE CHECK YOUR DEVICE ERROR ! ! ! ERROR
FAILED TO COMMUNICATE WITH DEVICE [ UNKNOWN ] HIT ANY KEY TO RETURN:”
It also said:
DEVICE STATUS: UNKNOWN
DEVICE INFORMATION: UNKNOWN
I tried pressing ENTER to refresh, but nothing changed.
My ZenFone 2 was connected to my computer, running Win10. I could access the ZenFone 2 via Windows Explorer and had copied UPDATE-SuperSU-v2.46.zip to the root of my SD card in the ZenFone 2.
I’ll appreciate any help you can give me. Thanks.
Comigo aconteceu a mesma coisa. quem puder ajudar, Obrigado.
CHECK YOUR CABLE OR IF THE DRIVERS ARE NOT INSTALLED INSTALL IT AND TRY
WHY IT SAYS TMP/RECOVERY.LAUNCHER FLASH FAILED AND ETC ? FUUUUUUUUUUUUUCK.
WHY IT SAYS TMP/RECOVERY.LAUNCHER FLASH FAILED AND ETC ? FUUUUUUUUUUUUUCK.