Security cameras are a great way to bring some sense of security to your home or workplace. In addition to providing you with the footage of any incidents, these devices can also act as a visible deterrent to potential intruders or criminals.
Not only can you catch a thief or spot something going wrong in your premises, but you can also be notified when someone unfamiliar has been found trespassing through your compound. The following guide will help you set up your phone so that you can get alerts whenever someone is entering your property without your permission. On doing so, you can catch them with legit evidence and report them to the authorities concerned.
Tools you’ll need to buy
Before you set up the security camera system needed for alerting you of trespassers, you’ll need to buy the following hardware.
Outdoor security camera(s): Since you’ll need a camera that notifies you of trespassers in your compound, you’ll need an outdoor security camera with a person detection feature. With person detection, the camera will be able to detect movements of any human in the vicinity and track them throughout its visible area. Some cameras offer custom motion detection zones, face recognition, and automatic zoom in on detecting humans.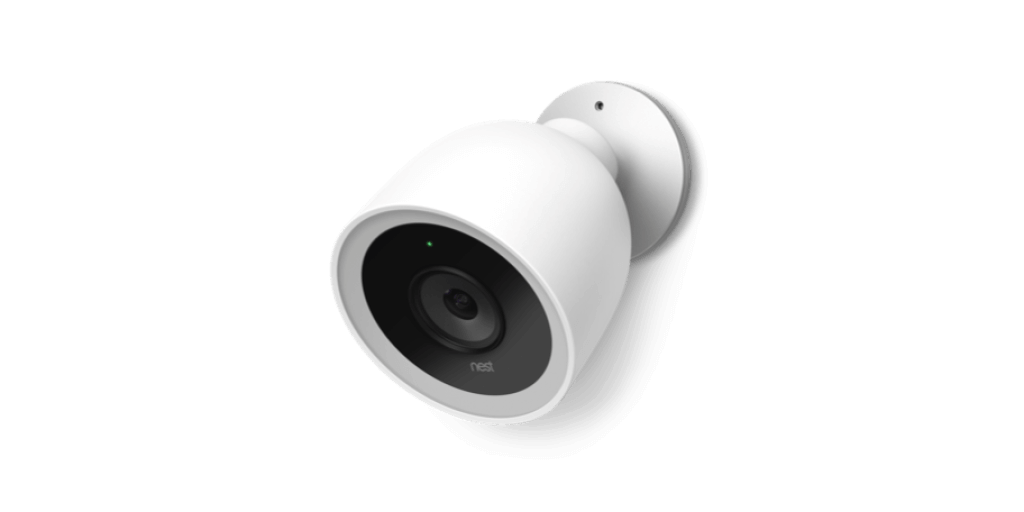
For a larger area, you can either buy more than one camera or buy one with a wider field of view. Another thing to consider when buying an outdoor camera is how much it can withstand the weather conditions in your neighborhood and if it can record in low light conditions. You can buy them based on how well they can protect the camera against vandalism, rains, and direct sunlight.
Wall plate: No matter what camera you buy, it will be accompanied by a wall plate but in case you don’t you might need to buy one that will be able to mount your security camera onto the walls of your house.
Screws and anchors: To attach the wall plate to the wall and mount the camera on to the plate, you’ll need screws to get them in place and wall anchors to create a firm mount anywhere on the wall. Anchors are used to create mount-points at places you don’t have a wall stud.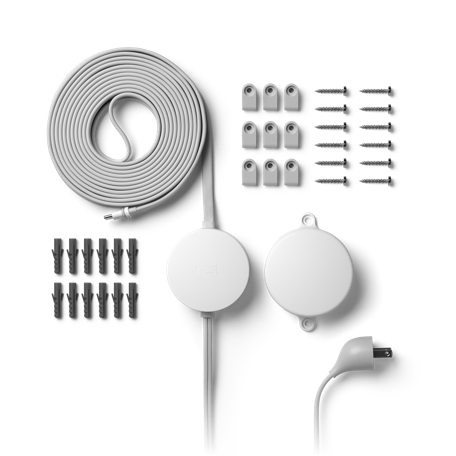
Power adapter, cable, and cable clips: If you’re buying a wired camera, you will need to power it through its power adapter. In order to connect the camera to the adapter, you’ll need the power cable and then cable clips to keep the wires in place.
Screwdriver or drill: You’ll need a drill to make a hole on your wall and to push the screen inside the wall anchor, you can use the screwdriver.
- Best battery powered wireless security cameras for outdoor installation
- Top 4 apps to monitor your baby and get wake up alerts
Installing the hardware
Now that you have bought all the things you need to buy, it’s time for moving on to the next step which is to install all the necessary hardware.
Finding the right location
While you might have already had an idea of where to install the security camera you just bought, you should still reconsider your options based on the following points.
Consider the view: If your camera has a wider field of view and zoom-in capabilities, then you can mount them way further inside the compound. The camera should be placed so that it can look over a large area of your property like your front entrance, backdoor, garden, yard, or driveway.
Required height: An important aspect when installing the security cam outdoors is setting it at a proper height. You’ll want to install your camera above the head height which is generally 7-10 feet (or 2-3 meters) above the ground. The camera should be located high enough to let you see people’s faces but shouldn’t be too high if your camera has a speaker and microphone combo to let your visitors speak to you.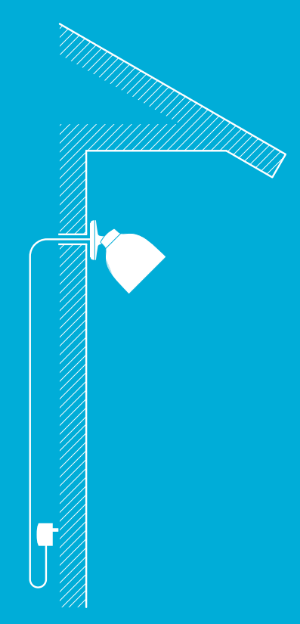
Do NOT point it at the sun: Since sunlight can prevent the camera from capturing your premises by blowing out the exposure of the video, you must avoid pointing it directly at the sun. The best practice is to angle the camera down so that the sun doesn’t shine into the lens and the horizon is out of the view for when the sun is low in the sky during sunrise or sunset.
Place it under the shade: While most outdoor cameras are weatherproof, it’s best left if the camera has an additional layer of protection through the shade that it’s placed under. You can place the security camera under eaves or in another semi-protected area so that sunlight and rain don’t directly affect it.
Keep it in close proximity to a power outlet: If you’re using a wired camera, then it’s important that you place the camera unit in a place that’s close to a power source. That’s because the power cables that these cameras come with aren’t long enough and the longer the wire is, the higher are the chances of it getting exploited by intruders.
Mapping the cable path
For wired cameras, you will need to plan the cable path and map it in such a way that no piece of wire is left exposed.
Indoor power sources are the safest: When mapping the cable path, you should know that keeping the power source of the camera indoors will be safer than keeping it out, although an outside power outlet will be more convenient.
Avoid having exposed cable: While you cannot avoid setting up cables for your camera, you should make do with the shortest cable and keep it away from eye contact. An exposed cable will mean your security can be exploited by just cutting the power source off of the camera.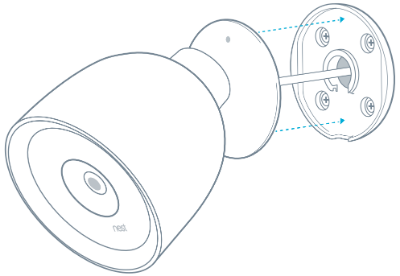
Create and drill holes close to the indoor power source: Another way to reduce cable visibility is to drill and create holes on the wall that’s in close proximity to the power source inside your home.
Use cable clips to keep your words secure and tight: To avoid it from hanging carelessly over your wall, you should secure the wires with cable clips. Loose cables will increase the chances of exposing your security system.
Measure the cable length: Before mounting the camera, you will need to measure the cable along the route that you’ll be installing.
Mounting the wall plate and camera
The last hurdle when it comes to setting up the hardware part of your security system is mounting the camera on to the wall.
Installing the wall plate: Place the wall plate at the location you decided to place the camera and drill the necessary holes. When the holes are drilled, push wall anchors on all of them, place the wall plate over them and drill the screws inside to firmly fix the wall plate to the wall.
Run the cable through the wall plate’s center hole: After you’ve installed the wall plate, run the power cable from the power source to the camera through the center hole available on the wall plate. This will reduce any chance of tampering as the cable will not be exposed on the outside.
Mount the camera: Once the wall plate is installed, it’s time to mount your camera onto the wall plate. Some cameras will come with additional screws to maintain the camera in place while others will just slide in with a click. Before pushing the camera base onto the wall plate, connect it to the cable, tuck in the extra wire and then slide the camera.
If you wish to remove the camera from the wall plate, you can use the hex key that’s available for the type of camera you choose to unlock the camera from its resting place.
Adjust the view: Once installed, adjust the angle at which your camera is pointing on the view and also change the area of viewing.
Plug the power cable to a power source: Once the camera is mounted, it’s time to switch it on by powering it up. Connect the cable to a power source and switch it ON.
You’ve now finished setting up the hardware you might need to monitor your house/office.
Setting up your camera software
Your work isn’t finished if you’ve completed setting up your security system hardware. For the system to work, you need to link the camera hardware to its relevant software.
Requirements
Android or iOS device running the latest software: Most security cameras have their individual apps on smartphones that run on Android or iOS. Make sure you’ve updated to the latest software by checking for a system update on your phone.
High-speed home WiFi network: For the camera to transmit video footage to your phone and notify you if something is wrong, it needs to be connected to the internet. A high-speed WiFi network is thus necessary.
Installing the security camera app
Popular security cameras come with their respective apps on Android through Google Play. You can download and install the app by searching for the app’s name that will be mentioned on your device’s manual. In some of the device boxes, you will also be able to scan the QR code to help you directly install the app.
If you’re finding it hard to search for the particular app, just open Google Play, type the name of the camera’s manufacturer and hit search. This way, you will be displayed all the apps that are available for the company’s different products.
Connecting the camera to the app
Once you’ve installed the app for your security camera, you will need to connect it to the camera you just installed.
Create an account: Open the security camera app on your device and once you do, you’ll be asked to create an account for setting up your camera. Register using your primary mobile number and email address, where you’ll receive push notifications every time your camera detects an irregular activity in your compound.
Locate and connect to your new camera: Once your account is created, you can now connect the app to the security camera. Most cameras use Bluetooth for pairing it for the first time. Switch ON Bluetooth on your smartphone and use the app to scan and locate the camera.
Complete setup: If you’ve located the camera on your smartphone, connect to it and complete the setup. After a successful connection, connect the camera to your home WiFi network. You can also set a name for the camera based on the room or location it is in. You will be able to view your camera’s video stream on the mobile app.
Update firmware: When your camera has been successfully connected to the internet, you can check for the latest software update on the app. If there’s a new firmware, you should install it to upgrade the device stability and get new features.
Creating camera alerts when someone’s trespasses
Now that you’ve set up your security camera and connected it to your smartphone app, it’s time to tweak it to receive alerts every time someone’s seen trespassing on your property. Alerts let you know when your camera has spotted important activity that you might be unaware of.
How to get alerts
To get to the alerts page for your camera, open your security camera app and head over to the app settings. The methods will differ from app to app but you can generally find it inside the hamburger menu on the left side of the app’s home screen.
When inside the Settings page, search for something that has ‘Notifications’ or ‘Alerts’ in the name. Here you will be able to view notifications for everything your camera detects and can choose the ones that you want to be activated.
Choosing when to be alerted
When it detects people: If your camera supports it, you can tweak it to alert you whenever it sees a person in the vicinity. You can get alerts when it spots a person at which point it will send a ‘person seen’ alert with a snapshot of the person to your smartphone, email and phone number.
When there is movement in your premises: If your camera is enabled with motion detection, it will be able to detect movement in the area and send an alert when it detects activity.
When the camera hears a sound: Most security cameras have microphones embedded onto their exterior to pick up sound from near the camera system. You can tweak the settings in the security camera app to receive alerts when the system hears someone talking or dogs barking. You can also install sensors to listen out for the sound of glass breaking in case of burglary.
When losing connection to the home network: You can configure your security camera app to alert you on the occasion of losing its Wi-Fi connection to the camera unit.
When the camera is removed: You can get alerts on your phone whenever the camera is detected to have been removed from its base.
Configuring your alerts
Getting alerts all the time: If you’re someone who’s using a security camera for the first time, your camera will send you alerts to your phone and email all the time, by default. You will get notification of irregularities even when you’re present in the house or office.
When you’re not at home: You can change how often you get alerts by enabling notifications for when you’re not at home. The camera will then only send notifications after you step out of the house.
Selecting how you want your notifications
Since you’ll be using the security camera’s app for most of the time, all notifications will be available on your smartphone as part of that app’s alerts. There are also other ways to receive alerts in case of a major incident or when you’re not around the premises.
Push notifications through the app: This is the most basic form of notification where the security camera app prompts you about any incident minor or major unless you’ve manually opted out it. You’ll receive notifications on your phone, just like notifications from other apps and will continue to do so even if the app isn’t open on the screen.
Email alerts: Since you have already registered on to the security camera app using it, alerts will also be sent to your email address as well. This will act as a primary way of receiving notifications if you’re someone who’s notification area is always crowded.
SMS/text messages: Some security apps also ask for your phone number and as a backup measure, also send notifications to your phone via text messages. Once you receive an alert through text, you can open your security app to get more details and take action on the matter.
Do you use a security camera at your home or office to receive alerts on your smartphone? Let us know in the comments below.
RELATED:




Hi Ajaay,
This article that you have written on wireless cameras has very useful content information contained, and the beautiful and clear style that you have written, which is very easy to read, by reading this article, wireless security cameras. My information has been greatly enhanced about wireless cameras, thanks for posting this informative article.
Kristopher