Originally created as a business video conferencing application, Zoom has found its way into virtually all industries. As not just companies, but educational institutes, as well as private individuals, turn to video conferencing apps to continue their business, Zoom has had to tweak its original idea, to accommodate them all.
This article covers how to tweak Zoom audio settings specifically for a music environment. Read on to learn more about how Zoom enhances your audio, and why that’s not the best thing.
How to Play Background music in Zoom

We all know that Zoom allows you to share your screen during a Zoom meeting. This enables every on the call to view your screen. But what if you wanted to share your audio only? Fitness classes amongst others, require users to be able to see what is being done on camera, in addition to hearing the instructor, as well as having some motivational music going on in the background.
Now we know that you could simply play music through a speaker in the background and keep talking on the call. However, Zoom’s audio enhancements will cause not only your music but also your voice to clip to a great extent because of the background music.
These three aspects of the call can be managed using Zoom’s ability to share only the audio from your computer. This function allows the user to utilize their camera and microphone, and simultaneously stream music from their computer.
Follow this guide to play background music during your Zoom meeting.
Step 1: Launch the Zoom desktop application and start a meeting.
Step 2: Hover over the video feed and click the ‘Share screen’ button at the bottom of the app.

Step 3: In the pop-up window, select the ‘Advanced’ tab, then click the ‘Music or computer sound only’ button.
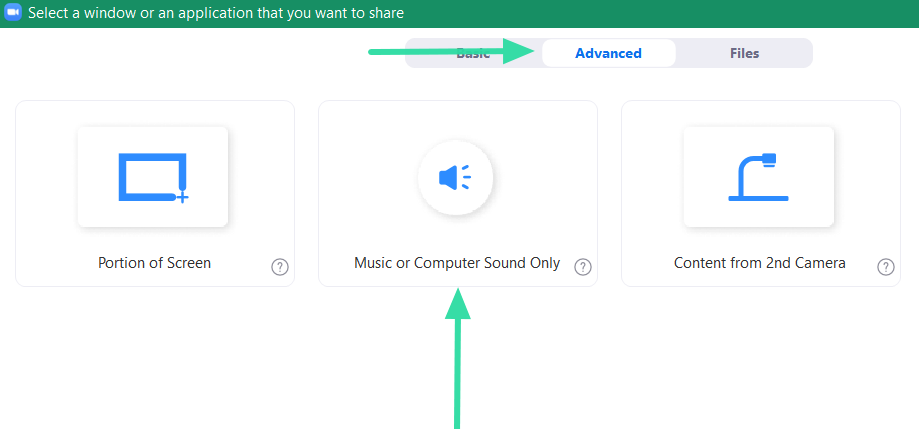
Step 4: Click ‘Share’. When you return to your video call, you will see a green indicator bar stating that you are sharing your computer’s audio. To stop sharing the audio at any point click the ‘Stop share’ button on the bar.

Step 5: Use any music streaming website/app of your choice and play the music on your computer.
Everyone on the call can now hear the music being played on your device. To adjust the volume of the music, you must go to the music streaming website/app and change it. Adjusting your computer volume will only affect the music volume for you. You can speak freely over the background music without fear of your voice getting choppy.
Note: The ‘Share Music or computer sound only’ function is only available in Zoom’s Desktop client. You cannot share device audio from the web client or the mobile app.
Performing music on Zoom? Here’s what you should consider

If you are a music instructor or learning an instrument using Zoom, the default settings will make this very difficult. This is because Zoom actively compresses the audio from your microphone to a great extent. In addition, Zoom applies audio enhancements to suppress background noises which is not what you need when playing an instrument. Except for Original Sound, these settings can only be managed on Zoom’s desktop application.
If possible, get yourself an external microphone. Your laptop microphone is fine, but they are not usually optimized for picking up much base. External microphones are way better as compared to your inbuilt one.
Enable Stereo audio
By default, Zoom compresses audio into a mono channel. This reduces the quality of the audio. Luckily there is an option to enable Stereo audio on your Zoom calls. Once enabled, the setting will appear in your Desktop client. You can choose whether to turn it on or not.
Stereo audio utilizes a lot more RAM on your computer as opposed to mono, so you might want to make sure all unnecessary applications are shut down. Once again, check out our article to learn how to enable Stereo audio and use it in a Zoom call.
► Best Audio Settings for Zoom
Disable Automatic volume adjustment

Zoom automatically stabilizes the volume of your microphone during calls so that even if a participant’s microphone is set to the highest, it won’t deafen anyone on the call. It does this by dampening the sound over a specific threshold.
While playing an instrument, however, we want all parts of the sound to be heard, including the loud one. For this reason, we are going to disable the Automatic volume adjustment function in Zoom.
Follow this guide to disable the Automatic volume adjustment function in Zoom.
Step 1: Log in to the Zoom Desktop client.
Step 2: Click your profile picture in the top right corner of the app and select ‘Settings’.
Step 3: Select the ‘Audio’ tab in the left panel and untick the ‘Automatically adjust volume’ box.

Enable Original Sound
This setting turns off Zoom’s audio enhancements that suppress background noises. The reason we turn these off is that Zoom tends to confuse music tones as background noises and tries to suppress them.
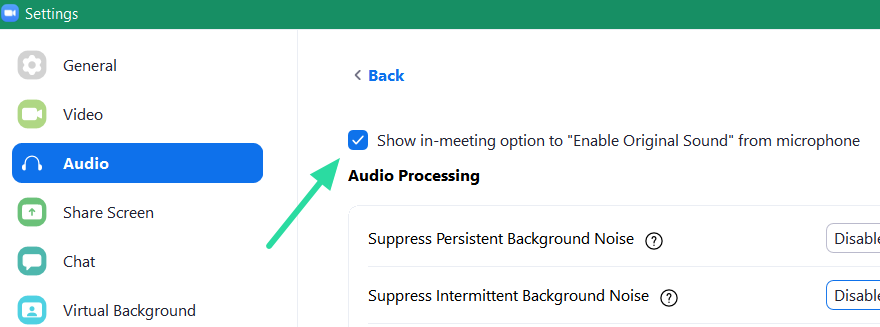
Using the guide above, head to the Advanced audio page in the Zoom desktop client by going to Settings > Audio > Advanced and tick the ‘Show in-meeting option to Enable Original Sound from microphone’ box at the top of the page.
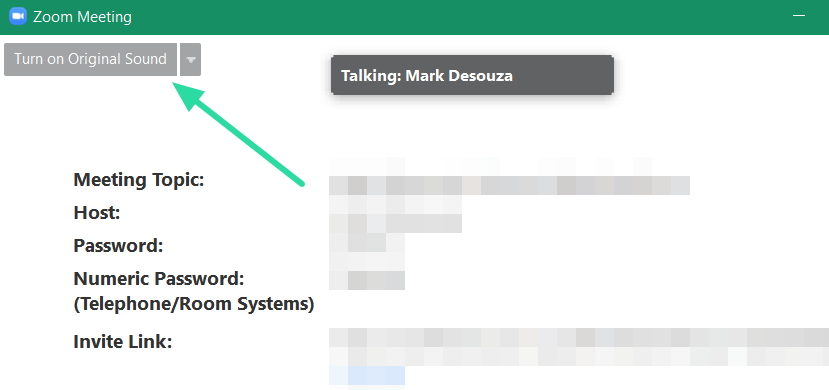
Now, when you start a new meeting, you will see an option in the top left corner of the screen to ‘Turn on Original Sound’. Select this, to prevent Zoom from trying to enhance your audio.
To enable Original Sound on the Zoom mobile application, go to the ‘Settings’ tab in the bottom right corner, and tap ‘Meeting’. Scroll down to ‘Use Original Sound’ and tap to enable it.
Once you are in a meeting tap the three dots in the bottom right corner of the screen and tap ‘Enable Original Sound’.

Disable Background Noise suppression on Zoom
Zoom audio is optimized to create clarity in speech, and remove unwanted background noise. This becomes problematic for users conducting fitness classes or teaching musical instruments or anything that requires music to be played through a Zoom call.
In this case, your audio needs to be optimized to pick up not only your voice but also music, without clipping the sound. Zoom’s audio enhancement settings allow you to disable audio suppression, and enable Original sound. This means that whatever sound enters your microphone, will be transmitted to your listeners, without any optimization.
Follow the simple guide to set up your Zoom audio for music.
Step 1: Log in to the Zoom Desktop client.
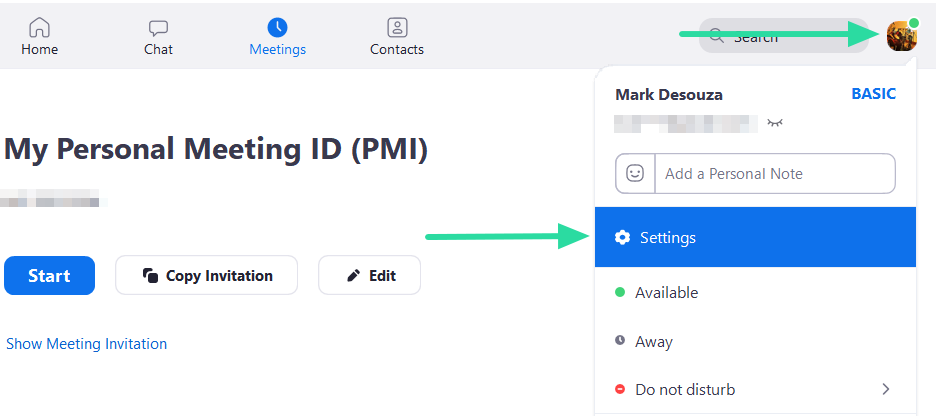
Step 2: Click your profile picture in the top right corner of the app and select ‘Settings’.
Step 3: Select the ‘Audio’ tab in the left panel and click the ‘Advanced’ button at the bottom of the page.

In the Advanced Audio page, you will see the following settings. Change them as follows to optimize your audio for background music.

- Suppress Persistent Background Noise: Disable
- Suppress Intermittent Background Noise: Disable
- Echo cancellation: Auto
For a more detailed summary of the audio settings available, check out our article below.
► Best Audio Settings for Zoom
Use High fidelity Audio mode for professional audio
Zoom audio is optimized for verbal discussions. If you’re a music professional, Zoom lets you improve your audio game by stepping up the quality of your original audio through the High fidelity Audio mode. With this mode enabled, you can enhance the “Original Audio” mode by uploading audio at 48Khz, 96Kbps mono/192kbps stereo codec quality.
This can be helpful for those of you who desire professional audio transmission during video conferences like for performance and music education. Keep in mind that for this High fidelity Audio mode to work, you need to be using professional audio equipment, headphones, and microphones.
To enable the High fidelity Audio mode, open the Zoom desktop client, click on your profile picture, and head over to Settings > Audio. Inside the Audio screen, click on the ‘Advanced’ option at the bottom.
Make sure the ‘Show in-meeting option to “Enable Original Sound” from microphone’ box is checked. That’s because you can only enable the high fidelity mode when this option is selected.
Now, check the box that read ‘High fidelity music mode’ under the ‘When original sound is enabled’ section to finalize the new audio setting for your Zoom meetings. 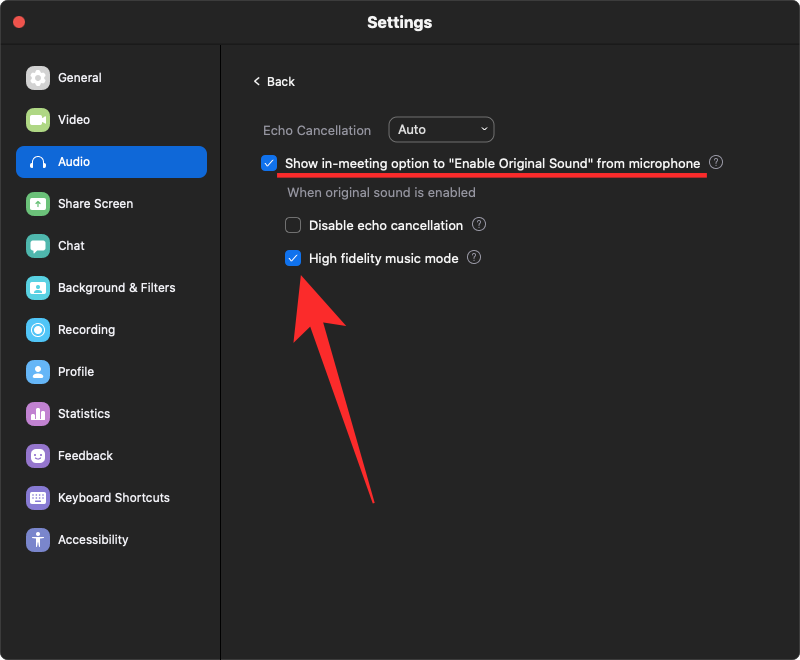
Zoom wants you to consider the following things to make the most of the High fidelity music mode:
- Use professional-grade audio equipment including microphones and headphones
- Connect to the internet via Ethernet instead of WiFi
- Expect Zoom to consume higher CPU usage
- Make sure your internet connection is unmetered as the High fidelity music mode is bound to take up a large chunk of your bandwidth
Understand the etiquette of online music by muting your microphone
When talking about audio or video usage on the internet, one word that gets tossed around often is latency. Although it’s important to know what latency is, it simply means delay and if you’re talking about audio latency, it means the delay for the audio to reach the destination from its source. The higher the latency, the longer it takes for the audio to reach others and if sent with video, you’ll see a huge gap between the video and audio.
To get the best results during a music session on Zoom and avoid audio latency, you can make sure that the audio is only shared by the person playing the music. You can follow a microphone etiquette where all the people not involved in making music can turn off their microphone when music is being played.
To mute yourself in a Zoom session, click on the microphone icon from the meeting controls at the bottom until it becomes red.
This way, Zoom doesn’t need to process the audio coming out of all the participants’ microphones but only from the ones who are sharing audio. This will minimize the latency in audio and make way for a better music listening experience online.
How to play Spotify music in a Zoom meeting

Whether you want to have some background music during your Zoom game night, or just want to show your friend your new Spotify playlist, you can play your music right from the Spotify desktop application through your Zoom call.
Spotify is one of the most widely used music streaming applications with some truly well-curated playlists. So why wouldn’t you stream your Spotify playlist on a Zoom call? Follow this simple guide, to play music using the Spotify app on a Zoom call.
Step 1: Launch the Spotify application and leave it minimized. Launch the Zoom desktop application and start a meeting.
Step 2: Hover over the video feed and click the ‘Share screen’ button at the bottom of the app.
Step 3: Here you can choose what you would like to share. If you want to share your Spotify music along with the cover art, select the Spotify application window. At the bottom of the screen tick the ‘Share computer sound’ box then click ‘Share’. Switch to the Spotify app and start your playlist. Everyone on the call will now be able to see and hear your Spotify playlist.

If you only want to share your Spotify music without sharing your screen, select the ‘Advanced’ tab, then click the ‘Music or computer sound only’ button.

Unfortunately, Zoom’s mobile and web client do not allow you to share your device’s audio during a meeting. This feature is only available on the Zoom desktop application.
We hope this article helped you understand the Zoom settings that can be tweaked to offer better audio quality on your Zoom call. Have you tried using Zoom to learn a musical instrument? How did go? Let us know in the comments below.




Hi there – Trying to solve a zoom audio issue. Zoom videoconference with my voice, plus music examples from my MacbookPro-MacOS 10.11.6. The zoom recording winds up having all the voices, but my music playback is missing. We heard it live, but it’s not in the recording. Happens every time. Thanks for any thoughts!
I am having problems with playing music in waiting room for students. They don’t hear the music. I show I am ‘sharing computer sound’ but they don’t hear the music in waiting room-what am I doing wrong?
Thanks, this is very helpful as I am about to start a Podcast using Zoom
Thanks for sharing
Cheers Johnny
Thanks for this article, it helps me a lot in dealing with sound
Thanks to it, people can connect with each other anywhere
Thanks, this is very helpful because I am about to start a Zoom Podcast project to send to everyone
Thank you for a really great article.
It gives me as well as everyone a lot of knowledge.