So you finally have your hands on that shiny new Nexus 4 you had ordered from Google Play, and have spent all morning tinkering with all those fancy new features in Android 4.2, clicked a few photo spheres, set up all your apps and are ready to take it for a spin and make your friends drool over it.
And then you realize that you haven’t added any music to it, and connect it to your Ubuntu machine. Huh – what’s this? No Auto Play window? You get that sinking feeling that maybe you have received a defective unit. Rebooting the phone and plugging it back in does not seem to be helping. What could be possibly wrong. Did you just spend $349 on a device which your Linux machine cannot detect?
The truth is that there is nothing wrong with the Nexus 4. Ubuntu, or other flavors of Linux for that matter. work differently from Windows. Just plugging the phone in, does not make the OS automatically detect it as an MTP device for you to transfer stuff to and from the SD card, and the Nexus 4 needs to be mounted for you to be able to do that. Here’s a handy little guide that we have put together,, which will have you transferring stuff between your Nexus 4 and Linux machine in no time.
How to mount Nexus 4 on Linux
- Enable Developer Options on the Nexus 4. Then enable USB debugging. Developer Options can be enabled by going to Settings >> About Phone, and tapping seven times on the Build Number.
- Now you need to install all the required modules to your computer. To do that fire up a terminal in Ubuntu, and type the following command
sudo apt-get install mtp-tools mtpfs - Next step is to configure 51.android rules, which is a set of rules which helps Ubuntu/other distros to detect the Nexus 4 correctly when connected. Type in the following commands in a terminal window
sudo gedit /etc/udev/rules.d/51-android.rules - This will open up a notepad with a bunch of text in it. Just paste the text below n that file. In case you just get an empty notepad file, just copy this to the file and save it. If you don’t have a Nexus 7 or Nexus 10, you can skip the last two lines.
#LG – Nexus 4
SUBSYSTEM==”usb”, ATTR{idVendor}==”1004″, MODE=”0666″
#Samsung – Nexus 7 & 10
SUBSYSTEM==”usb”, SYSFS{idVendor}==”18d1″, MODE=”0666″ - Now we need to make this file executable. To do that type in the following command in a terminal window
sudo chmod +x /etc/udev/rules.d/51-android.rules - That done, now restart the udev service by typing in the following command
sudo service udev restart - We’re almost there now. Hang in there for a few more minutes. Next step is to create the mount point and permissions for the Nexus 4 in Ubuntu. Type in the following commands
sudo mkdir /media/nexus4
chmod 755 /media/nexus4
[Note] If you intend to use a Nexus 7 and/or Nexus 10 as well, you would need to repeat Step 7, and replace nexus4 with nexus7 or nexus10 as may be the case. - Now plug in the Nexus 4 to your computer. Make sure that MTP is enabled on the phone.
- Mount the phone SD card by typing in the following command
sudo mtpfs -o allow_other /media/nexus4
[Note] In case of a Nexus 7 or Nexus 10, replace nexus4 in the above command with nexus7 or nexus10 as may be the case. - Once you are done, you would need to unmount your device by typing in the following command
sudo umount /media/nexus4
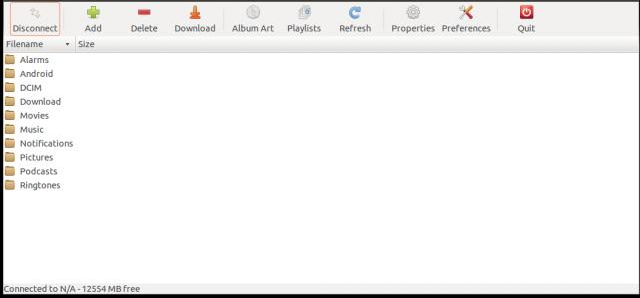
That‘s it. Now all you need to do each time you want to transfer stuff between your Nexus and you computer, is run Steps 8-10. If you find it too overwhelming to perform all the steps above, you can also use this nifty tool called gMTP which can be found in the Ubuntu software center. Launch gMTP every time you connect your Nexus device, and click connect to mount your device SD card. So go ahead and use this guide to transfer data between your Nexus 4 and Ubuntu computer, and let us know how it goes






Discussion