Most errors while using adb (Android debug Bridge), are either because adb was not set up properly in the first place, or because the right device drivers haven’t been installed. XDA member DieHappy has created an excellcent toolkit which will automatically install adb (Android Debug Bridge) as well as the appropriate device drivers for your Android phone on your computer, so that adb is able to recognize and interact with your phone.
Its called Knives-and-Forks, and is compatible with Windows, Linux and Mac. So it doesn’t matter what OS you are on, to be able to use this nifty little toolkit. This is a first release, and hence is a bit limited in features. Currently it only allows installation of adb and drivers, which by the way, is a pretty fine feature to have, in my opinion! DieHappy intends to incorporate Rooting and ROM customization features in future releases. So definitely a tool to keep your eyes on!!
I am going to cover the How-to guide for Windows & Linux. Unfortunately, I do not have a Mac that I can test this on. But Mac Users can visit the original development thread for the Mac guide.
Warning
The steps and methods included in this guide are considered risky. Please do not attempt to try this unless you know exactly what you are doing. Improper or careless usage of these tools can render your device unusable. You have been forewarned!!!
Compatibility
This toolkit is compatible with Windows, Mac OS X and Linux, and will work on any computer which is running any of these 3 Operating systems
Download Link
Knives & Forks Android Toolkit
How to use Knives & Forks on Windows
Note: I have tested this toolkit on a computer running Windows 7 32-bit
- Download the Knives & Forks toolkit to your PC (link provided above)
- Navigate to your User Profile folder and Create a new folder there. Name it “knives-and-forks“. Check the paths below depending on which OS you are running
- For Vista, Win 7, Server 2008, Server 2009 RC2 → c:UsersYourUserNameknives-and-forks
- For Windows 2000, XP, Server 2003 → c:Documents & SettingsYourUserNameknives-and-forks
- Extract the contents of the downloaded zip file (from Step 1) to the knives-and-forks folder you just created in Step 2. Check screenshot make sure you have all the files

- Now navigate to the knives-and-forks folder in your user profile (check paths in Step 2)
- Find the file “Knives-and-Forks-Windows.cmd” and Double-click it. You can also cd into this folder through a command prompt and just type the command “Knives-and-Forks-Windows” without the quotes
- You should now see a DOS window, with the text “Loading”. The tool is now checking for Python ( a high-level programming language) which it uses. If you have Python already installed, fine, if not, the tool will automatically download it and install it for you. Check screenshot below.

- In case of Windows 7 and Vista, you may get a prompt to Allow or Deny installation. Select Yes
- Once it has installed Python, Knives & Forks will automatically bring up the Main menu in the DOS window. Check screenshot below

- At this point,make sure your device is plugged in, and USB debugging is enabled on your device.
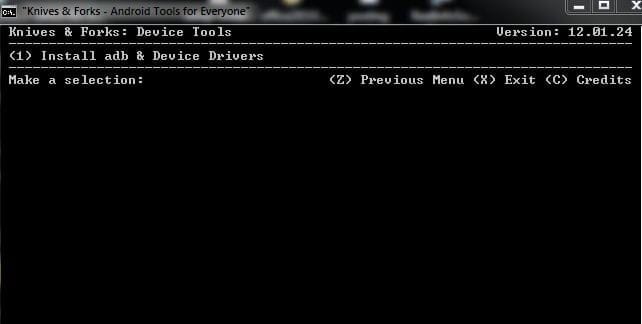
- Type the number “1” (for the Option Device tools) at the prompt and press enter. The Main menu option will change to “Install adb & Device Drivers”

- Type “1” again and press enter
- The screen will change to something like this

- Press any key to continue, Win 7 and Vista users should get the Security prompt again, Select Yes
- It should automatically download the drivers for your device, and open up the installer which you can click through.
- Once the drivers are installed, it will automatically move on to Installing ADB, and prompt you to Press any key. Check screenshot below

- Pressing any key will Test the ADB installation, and return with a List of Devices Attached message with a sting of alphanumeric characters and the word device next to it. This is your phone. Check screenshot below

- The Main Menu Option will now blank out. Just type in the letter “x” (without quotes) to exit and close the command window
- Now open a fresh command prompt, and type in the command “adb devices” (without quotes)
- You should see something like this.

- ADB is now set up on your Windows computer!!
How to use Knives & Forks on Linux
Note: I have tested this toolkit on a computer running Ubuntu 11.10 i386. Since I do not have a spare machine, I used a USB bootable version of Ubuntu 11.10. While the test was carried out on Ubuntu, the guide should work just as well for any distribution of Linux.
- Download the Knives & Forks toolkit to your PC (link provided above)
- Go to your Home Folder in Ubuntu and create a new folder. Name it “knives-and-forks” (without quotes) See screenshot below.

- Extract the contents of the file downloaded in Step 1 to the knives-and-forks folder you created in Step 2. Check the screenshot below to verify if you have all the files

- Now open a terminal session. You can do this by pressing Alt+F2 on your computer, and typing the command “xterm” (without quotes) in the field that pops up. This will bring up the terminal.
- Give the script executable permissions to run (this only needs to be done once) by typing the following command in the Terminal chmod +x ~/knives-and-forks/Knives-and-Forks-Linux.sh
- Now change to the knives-and-forks directory you created in Step 2 by typing the following command in Terminal cd ~/knives-and-forks
- Execute the Knives and Forks script by typing the following command ./Knives-and-Forks-Linux.sh (The./ prefix ensures that the script runs within the same directory)
- This should bring up the Knives & Forks Main menu in a new Terminal window. See screenshot below

- Now Type the number “1″ (for the Option Device tools) at the prompt and press enter. The Main menu option will change to “Install adb & Device Drivers”. See screenshot below

- Now type the number “1” again (without quotes). The screen will change to something like in the screenshot below

- Press “Enter” to continue. You should see multiple lines of text flash across the screen, before it comes to rest for the next command. See screenshot below

- This is the time to plug in your phone to the computer via USB cable. (Do make sure that you have enabled USB debugging on the phone. It is usually found in Developer Options in the Settings menu on your phone. The location of Developer options vary depending on ROM and Android version.) Pressing any key now, will test the ADB installation and your screen will change to something like this–see screenshot below

- Now Type “x” (without quotes) to exit Knives & Forks, and close the Terminal window
- Fire up a fresh Terminal by pressing Alt + F2 on your computer and typing “xterm” or “gnome-terminal” in the field that pops up
- In the new terminal window, type in the following command without quotes “adb devices” . You should see an alphanumeric string of characters and the word “device” returned in the terminal. This is your device, and adb has recognized it!! See screenshot below

- That’s it!! You are now all set up with ADB on your Linux machine.
How To Install Knives and Forks on Mac OS X
You can find the guide for Mac at the original development thread for Knives & Forks. Sorry, I couldn’t post it here as I do not have a Mac to test on.
If you found this guide helpful, do share it with your friends. You can also visit the original development thread, to check for updates to this toolkit, and to track development progress. If you need any help with setting this up on your machine, give us a shout in comments below, and we’d be glad to help out.







Discussion