If you’ve been stretching your legs in the new Momotaro Dentetsu or been putting the work in Age of Calamity, you’ve probably noticed your beloved Switch getting a new system recently. Nintendo released their latest patch and firmware update version 11.0.0 for the Switch devices on November 30th, 2020, which is a lot more exciting than it sounds.
This update brings about certain changes and new features to Switch’s OS. You can read more about this update’s patch notes and details right here from Nintendo’s support website.
Related: 10 Best Nintendo Switch Games for 8-Year-Olds| 5-year-olds
Thanks to the update released by Nintendo, transferring screenshots have gotten easier and quicker than before. For most of you, your Nintendo Switch would have already downloaded and installed the ‘Ver. 11.0.0’ system update. If for some reason yours didn’t, you can perform the system update manually on your console.

Just make sure that it’s connected to the internet, and then head over to System Settings. In the ‘System’ tab, select and click on ‘System Update’ and that should start the process. You can also reboot your Switch to see if it starts the update by itself.
After the update, there are two new ways by which you can transfer pictures from your Switch console’s album to your smart device or computer, and we’re gonna clue you in, on both of them.
How to take transfer screenshots from Switch to phone

- To start wirelessly transferring some screenshots, you would need to navigate to the ‘Home’ menu.
- Here, select Album and then choose whichever screenshot you’d like to transfer.
- Press A to select Sharing and Editing.
- Now, select Send to Smartphone.
- After that, you can either choose ‘Only this one’ to send the currently selected screenshot or ‘Send a Batch’ to select and send more.
- This would lead you next to a screen where you’ll be given a QR Code to scan. Use the camera on your smart device and scan both of the codes consecutively.
- Once your Switch console has established a connection with your smart device, the screenshots you’ve selected will be instantly sent to it.
An important thing to note here is that you can send only up to 10 screenshots at a time to your smart device in a batch. If you want to send more, you’ll have to repeat the process from scratch.
How to transfer screenshots from Switch to PC or Laptop via USB

The second method is all about going old school — using a USB cable to connect your console and PC, to enable data transfer between the two.
- To start, head over to the ‘Home’ menu, and then go to Settings.
- Next, select ‘Data Management’ from the Settings menu.
- Scroll down and click on ‘Manage Screenshots and Videos.’
- In the next sub-menu, select ‘Copy to a Computer via USB Connection’.
- After that, connect your Nintendo Switch console to your PC or laptop using a USB cable.
- Once you’ve done that, you can browse the contents of your console’s system memory and select the screenshots you’d like to transfer.
As a side note, the USB cable that you can use with your Nintendo Switch should have a USB-C connector. Also, to transfer images or other files, you must connect to the USB-C port at the bottom of your console. It won’t work if you try these steps using the USB ports on your console’s Dock.
How to transfer Screenshots from Switch to a PC using a microSD Card
If for some reason you are unable to use this new feature and copy your screenshot files from your Switch console to your PC, then you can always use a microSD for the same. For this, you’ll require a microSD card, a microSD adapter and also a USB adapter to connect it all to your PC if your computer or laptop doesn’t have an SD card slot.
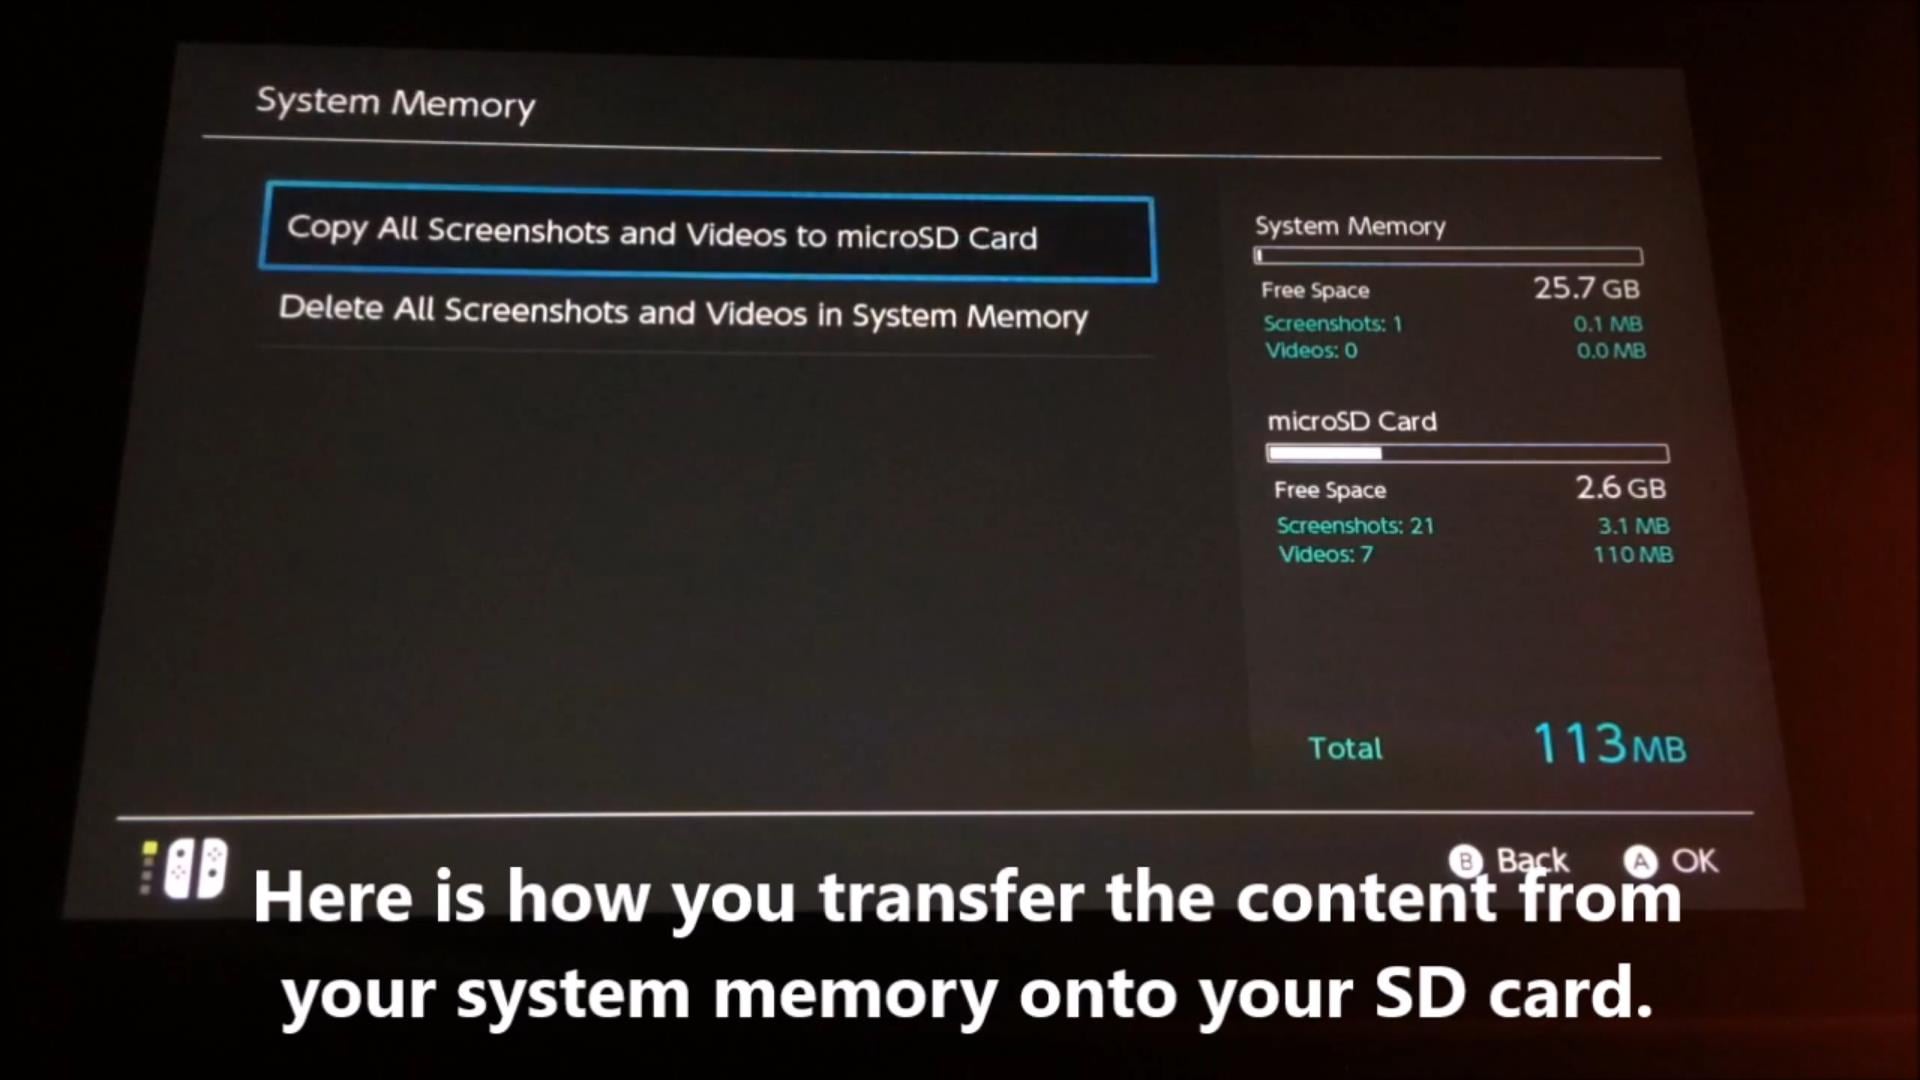
- First up, you’ll need to have all the screenshots copied to your microSD card.
- Go to Data Management in System Settings. From here, select and open ‘Manage Screenshots and Videos’.
- Set your save location to microSD Card from here.
- Next, under ‘Copy/Delete Screenshots and Videos’, click on ‘System Memory.’
- Finally, select ‘Copy all screenshots and videos to microSD card.’
This will copy all the screenshots you have stored on your system memory to the microSD card you have inserted in your Nintendo Switch console. Once you’ve completed these steps or you’re sure that the screenshots are already there on your microSD card, you can then use them to transfer those images to your PC or laptop.

So, remove the microSD card from your console and connect it to your computer using an adapter if required. You’ll find the screenshots in the storage path “\Nintendo\Album”. Simply click on the folders inside as per the date you took those screenshots on.
And that’s it! These are all the ways you can currently transfer screenshots from your Nintendo Switch console to your PC.
How to take screenshots on your Nintendo Switch
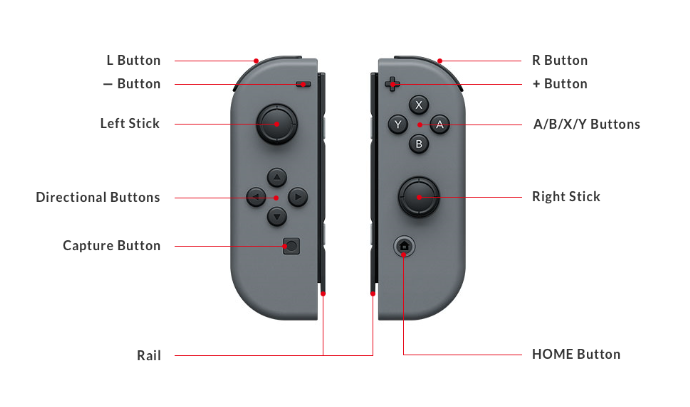
Taking a screenshot has always been quite straightforward on the Nintendo Switch. All you need to do is to press the dedicated screenshot button on your Switch console. It’s called the Capture button (as you can see in the graphic above) — it’s the square button on the left Joy-Con, below the +Control Pad.

You can view these screenshots later from your Switch console’s in-built album. Simply navigate to the Home menu and press the blue album icon as pictured above. An important thing to note here is that you may not be able to take screenshots in every game and app, only in those that allow you to do so.
Screengrab via: GameXplain | WackyX