The Windows 10 May 2020 Update came in last month, bearing version 2004 and available for all devices running versions 1903 and 1909 of Windows 10. The rollout of the update, however, hasn’t been received well as several users have reported a bunch of problems with the latest release.
While we have already made a complete list of Windows 10 2004 issues, in this post we will be discussing a specific issue regarding Microsoft OneDrive that users are facing and how you can fix it.
What is the Microsoft OneDrive “cannot connect to Windows” error
Users who have updated their systems to Windows 10 version 2004 are getting an error message shown to them when they open OneDrive on their PC. The error message reads “OneDrive cannot connect to Windows” and gives you an option to either “Try again” or “Download Files”.
Windows 10 version 2004 completely broke OneDrive from onedrive
While OneDrive shows the same error message when pressing ‘Try again’, the ‘Download Files’ doesn’t seem to be work either as the syncing process gets stuck as soon as downloading starts.
How to fix OneDrive “cannot connect to Windows” error on Windows 10 version 2004
The following is a list of solutions you can perform to get Microsoft OneDrive to work again on your Windows PC.
Solution #1: Enabling cldflt.sys
Microsoft offers its own workaround to fix the “cannot connect to Windows” error on OneDrive. You can fix the issue by following the steps below:
Step 1: Open Command Prompt as the system administrator by hitting the Windows key on your keyboard, heading over to Windows System > Command Prompt, and then selecting the ‘Run as administrator’ option after clicking on ‘More’.
Step 2: Type the following command inside Command Prompt and hit the Enter key:
cd %systemroot%\system32\drivers
Step 3: Again, enter the following command and press the Enter key
sc query cldflt
The status of the ‘cldflt.sys’ will be shown on the screen. Move on to Step 4 if the value adjacent to ‘State’ is not ‘4’.
Step 4: Now, proceed to type the following code and then press the Enter key
sc config cldflt start=auto
You should now be able to see the “[SC] ChangeServiceConfig SUCCESS” dialog box. 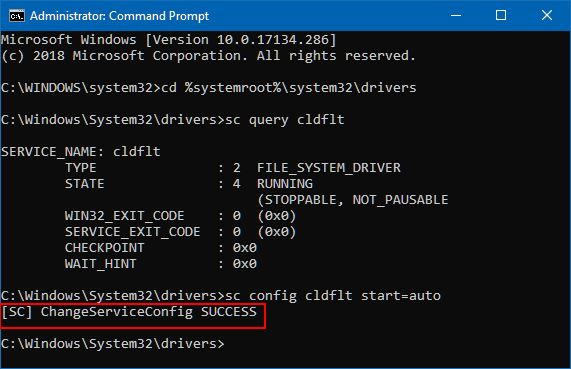
Step 5: Complete the changes by restarting your Windows PC.
Solution #2: Changing the registry value of DefaultInstance
Some users have acknowledged that using the Registry Editor to change the registry value of ‘CldFlt’ has helped them solve the “cannot connect to Windows” issue. You can do so by following the steps below:
Step 1: Open the Registry Editor on your Windows PC using ‘Windows + R’ keyboard shortcut, typing “regedit” and hitting the Enter key.
Note: It’s advised that you backup your registry by clicking on File > Export, choosing the location of the backup, and hitting the ‘Save’ button.

Step 2: Head over to \HKEY_LOCAL_MACHINE\SYSTEM\CurrentControlSet\Services\CldFlt\Instances inside the Registry Editor window. (Yes, you can copy and paste this into the address bar of the Registry Editor.)
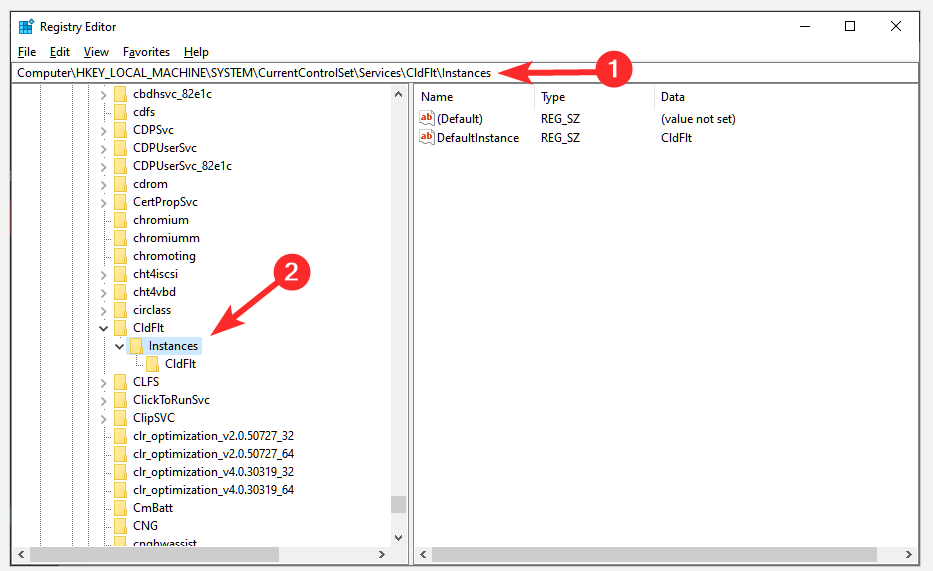
Step 3: Inside the Instances folder, change the ‘DefaultInstance’ value from ‘CldFltUpper’ to ‘CldFlt’. To do so, double-click the ‘DefaultInstance’ entry to open the edit window.
It has been noticed that the Windows 10 version 2004 is what causes the DefaultInstance to set to ‘CldFltUpper’.
You should now be able to use Microsoft OneDrive on your PC without disabling the Files On-Demand feature.
Solution #3: Reset OneDrive and download files from another device
A user inside the Microsoft Tech community said that resetting OneDrive and syncing it from another device should get it running again on your Windows PC. If you have opened the OneDrive app, close it, and then we can proceed to reset the app.
Note: Make sure you have another device where you regularly sync your files using OneDrive. Without that, you cannot reset OneDrive and expect it to have all of your files when signing in again.
Step 1: You can reset OneDrive on your computer by hitting the ‘Windows key + R’ keyboard shortcut, typing the following command and pressing the ‘Enter’ key.
%localappdata%\Microsoft\OneDrive\onedrive.exe /reset
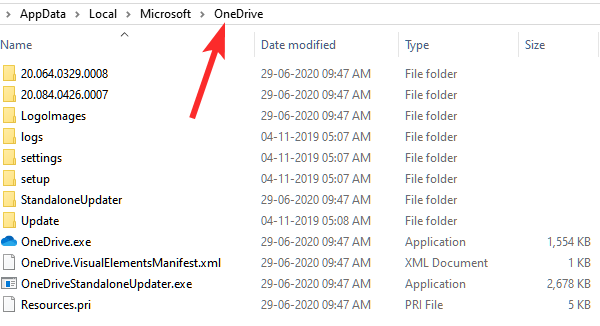
Step 2: Now delete all the contents from “C:\Users\username\AppData\Local\Microsoft\OneDrive”.
To open the OneDrive folder directly, type this into the Run command (Win+R): %localappdata%\Microsoft\OneDrive\ and then hit the enter key.
Step 3: Reopen the Microsoft OneDrive app on your PC.
OneDrive should now work perfectly like it used to before the version 2004 update.
If none of the solutions mentioned above were of help, then chances are that you’re unable to run OneDrive because its folder is being shared with other computers in the same local network. You thus have to make sure you have disabled OneDrive on shared desktops by following the steps below.
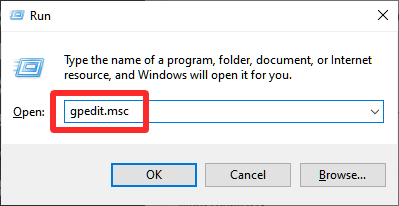
Step 1: Open the Local Group Policy Editor on your Windows PC by hitting the ‘Windows key + R’ keyboard shortcut, typing “gpedit.msc” and pressing the ‘Enter’ key.
Step 2: When the Local Group Policy Editor screen shows up, navigate to Computer Configuration > Administrative Templates > Windows Components and then open the ‘OneDrive’ folder.
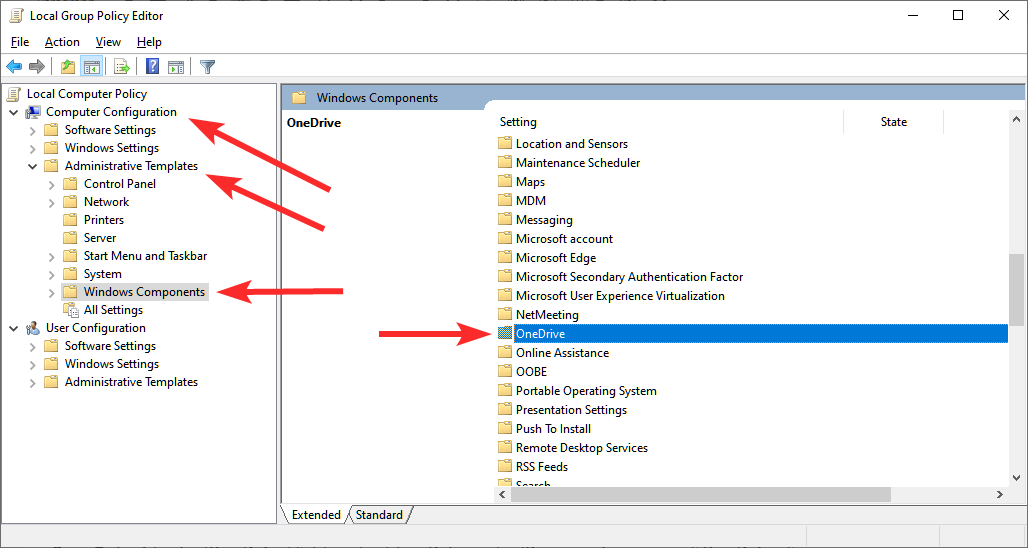
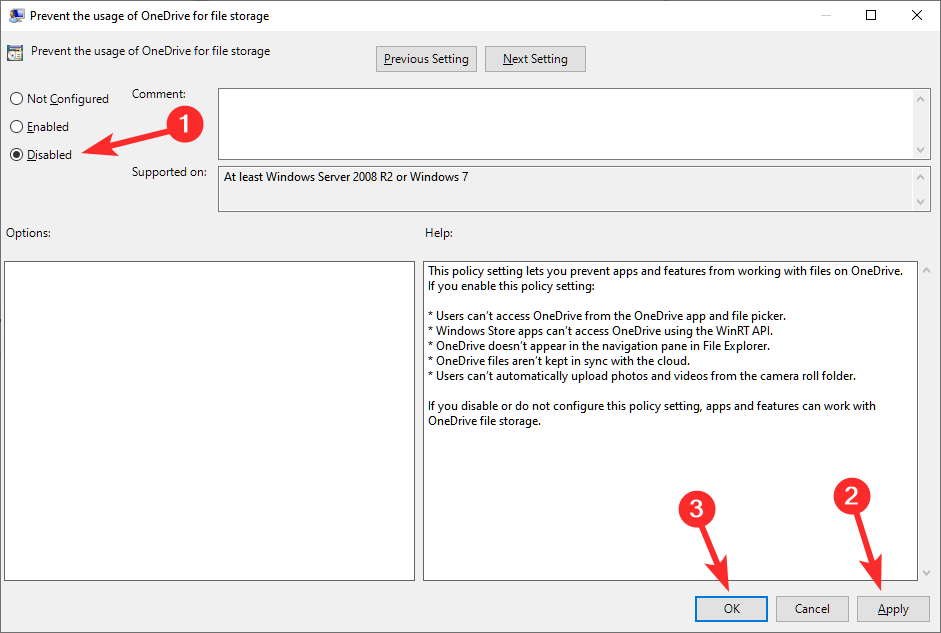
Step 3: Inside the ‘OneDrive’ folder, double-click on the ‘Prevent the usage of OneDrive for file storage’ option.
Step 4: In the new window that pops up, select the ‘Disabled’ option, and click on Apply, then OK.
Step 5: Restart your computer.
Now that you have disabled OneDrive from being used from other computers, you should be able to able use the application on your Windows 10 version 2004.
What else can you do
In case you still aren’t able to access OneDrive on your Windows PC after the Windows 10 version 2004 update, there’s an extensive user post on Microsoft Tech community where users are actively discussing issues regarding OneDrive after the latest Windows 10 release. You can check out if the error you’re encountering is similar to those shared by others or share your experience with the community.


