It has just come to our knowledge that Android M already supports multi-window, but you have to do some tweaking to enable it. Considering Android M is available on some specific Nexus devices, the Nexus 5, 6 and 9, if you are running Android M on these devices already, you can get multi-window pretty easily on these devices.
The hack involves editing the build.prop in the system partition of the device. It would have been ultra easy if proper root solution was available, which isn’t the case, so you have to use ADB in editing the build.prop. We’ve covered a detailed guide below, but let’s just say big thanks to Quinny899, who unearthed the thing.
How to enable Android M multi-window option in Settings
Supported devices
- Nexus 5, Nexus 6 and Nexus 9, running Android M preview build
- Don’t try on any other device
Warning: Warranty may be void of your device if you follow the procedures given on this page. You only are responsible for your device. We won’t be liable if any damage occurs to your device and/or its components.
Backup necessary stuff. In case your device is wiped off, it’s good to have backup of contacts, photos, videos and other files. Hence, create a backup of important stuff in your phone right away.
You need to activate the hidden option ‘Multi-window’ under the drawing category of Developer option in settings, which in itself is also hidden. The guide will do that first, and then it’s a simple task on enabling the multi-window using the option’s toggle button.
- Install new Android M ADB drivers. (If that proves a trouble for you, you can install old drivers easily using this link.)
- Install TWRP recovery for your device: Nexus 5, Nexus 6 or Nexus 9.
- Boot your phone into recovery mode. For this:
- Power off your device first.
- Then hold volume down + volume up + power button together to reboot to fastboot mode.
- Navigate to Recovery option using volume buttons and then press power button to select and boot into recovery mode.
- Connect your device to PC now.
- In TWRP, tap on Mount, and then tick the System. Now you will be able to pull the build.prop file from the device.
- Now, on PC, with ADB installed, create a new folder anywhere on PC. name it: multi-m
- Go into the folder multi-m, and open a cmd window in that folder. Right click on the white space inside the folder while holding shift button, then select ‘Open command window here’.
- Now, copy paste the command below and then hit enter key. This will pull the file called build.prop in system partition.
adb pull /system/build.prop
- You’ll have the build.prop file in the folder multi-m. Open it with Notepad++ text editor. Don’t close the command window, and don’t power on the phone either. Leave phone connected.
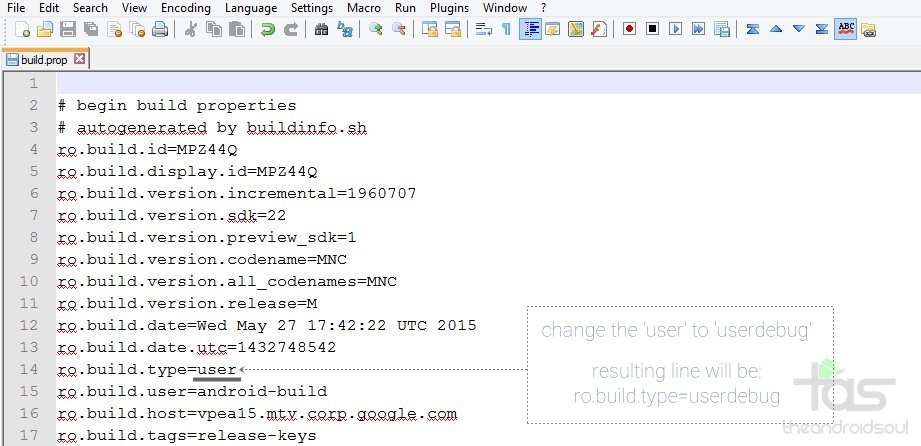
- Find the ro.build.type line in the build.prop file. It’s line no. 14 in build.prop of my Nexus 5.
- You’ll find the text user after that. Well, change it to userdebug

- Save the file, and clode the Notepad++. Now we will push the edited build.prop back into device’s system partition, replacing the old one and setting the permissions back.
- Back to cmd window, copy paste the command below and then hit enter key.
adb push build.prop /system/
- For setting permissions we got operate via ADB shell. For this, type adb shell and then hit enter key.
- Next, type cd system and then hit enter key.
- Set permission on the build.prop file we pushed to system in step 14 above. Copy paste the command below and then hit enter key.
chmod 644 build.prop
- Exit adb shell. Type exit and then use enter key.
- On the device, untick the System option in mount.
- Go back into TWRP’s main screen, and select Reboot > System. When it asks for SuperSU installation, tap on ‘Do not Install’ because currently, SuperSU is not compatible with Android M.
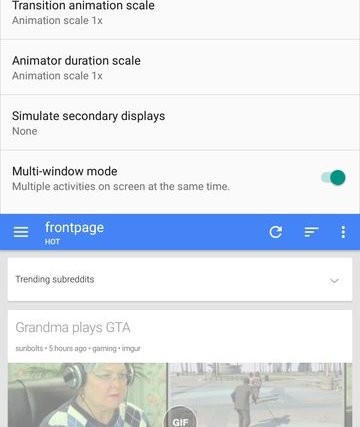
- When your device boots up, go into Settings > Developer options. under the Drawing category, find the option Multi-window mode. Enable it using the toggle button. That’s it.
Enjoy!
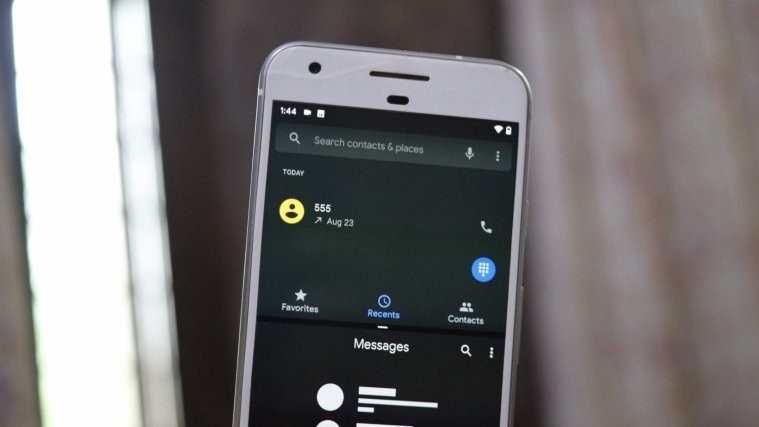
Tip: How to use multi-window? Well, After enabling it, just press the Recents key, and then tap on extra icon you see to the left of x button on every app’s window there. You’ll get to select from 3 options, each meant for setting the app to upper half of the screen, or lower part, or full screen. That’s it.
Need any help with this, sure let us know via comments section below.


I believe step 12 is backwards, pretty sure it says user right now, and needs to be changed to userdebug.
Additionally, I am unable to get this to work with the Nexus 9, TWRP keeps asking me for a password to unencrypt, which I’ve never seen before.
Thanks for pointing it out. Have made the correction!
I am not entirely sure but problem with encryption you got there could be down to encryption forced by default on new Nexus devices.
For Nexus 6, there is a modified boot image available that disables the encryption by default, but nothing I could find for Nexus 9.
Nexus 6: http://forum.xda-developers.com/nexus-6/development/how-to-flash-android-m-preview-wiping-t3120999/post61025215#post61025215
Ah ok, do you have a pattern lock on lockscreen on your device? Well, see the solution at this page: https://www.reddit.com/r/Nexus5/comments/2mskzu/twrp_is_asking_for_a_password/
You can swipe to unlock on numpad you see in TWRP.
Yeah that’s what it is looking like. I tried the pattern lock number conversion you posted (which is really good to know), but no luck. I’m going to disable screen lock and see if that helps, but it’s starting to seem like the encryption is just in the way. Thanks for the replies! I will let you know if I have any luck
Sure. Good luck!
I believe step 12 is backwards, pretty sure it says user right now, and needs to be changed to userdebug.
Additionally, I am unable to get this to work with the Nexus 9, TWRP keeps asking me for a password to unencrypt, which I’ve never seen before.
Thanks for pointing it out. Have made the correction!
I am not entirely sure but problem with encryption you got there could be down to encryption forced by default on new Nexus devices.
For Nexus 6, there is a modified boot image available that disables the encryption by default, but nothing I could find for Nexus 9.
Nexus 6: http://forum.xda-developers.com/nexus-6/development/how-to-flash-android-m-preview-wiping-t3120999/post61025215#post61025215
Yeah that’s what it is looking like. I tried the pattern lock number conversion you posted (which is really good to know), but no luck. I’m going to disable screen lock and see if that helps, but it’s starting to seem like the encryption is just in the way. Thanks for the replies! I will let you know if I have any luck
Sure. Good luck!
Ah ok, do you have a pattern lock on lockscreen on your device? Well, see the solution at this page: https://www.reddit.com/r/Nexus5/comments/2mskzu/twrp_is_asking_for_a_password/
You can swipe to unlock on numpad you see in TWRP.