What to know
- Safari Profiles help you create unique profiles based on your workflow, interests, niches, and more. History, Extensions, Cookies, Tab Groups, and Favorites are separate for all your Safari Profiles and are not shared across them.
- You can create new Safari Profiles by going to Settings > Safari > New Profile.
- To use Safari Profiles, Open Safari > Tabs icon > Menu icon > Profile and then choose the profile you wish to use.
Apple has been constantly improving Safari’s browsing experience over the past few releases. We got the ability to use tab groups, reposition the URL bar, Safari backgrounds, tab groups, and more. iOS 17 has been focused on personalizing the overall OS experience according to the user’s needs and requirements which is why we now have Safari Profiles.
This new feature allows you to create different profiles for the native browser for different workflows. You can create profiles for your work, personal browsing and even based on your interests, be it entertainment, science, news, and more. But how are Safari Profiles unique and how do they differ from tab groups? Let’s find out!
What are Safari Profiles and why use them?

Safari Profiles are a new way of personalizing your browsing experience by allowing you to create different profiles based on your workflows, interests, and more. These profiles are self-contained and keep your history, extensions, cookies, tab groups, and favorites separate across different profiles.
This is where Profiles differ from Tab groups in Safari. While Tab groups can contain different browsing sessions, they still share history, cookies, extensions, and favorites across all groups. However, Profiles allow you to create unique browsing experiences which can be specific to your interests and workflows.
For example, you can create a work profile where you’re logged into services and websites related to your work that you regularly use. Your work profile can also contain extensions that you use while working regularly but are pretty redundant when browsing the web for personal use. Similarly, you can have a unique Home profile where you can keep tab groups and stay logged into services you use at home while keeping them separate from your work Safari Profile. This can help you stay focused while working and ensure that you can get back to your browsing sessions as soon as you get home.
You can use this new feature in numerous ways depending on your interests, needs, and preferences. You can create Profiles for different topics, workflows, locations, niches, and more.
How to create and use Safari Profiles on iOS 17
Here’s how you can create unique Safari Profiles on iOS 17. Follow the steps below to help you along with the process.
Note: Safari Profiles are unique to iOS 17 which means you will need iOS 17 or higher to use this new feature. If you haven’t updated your device yet, you can do so by going to Settings > General > Software Update and installing the latest available update for your device.
Step 1: Create a new Safari Profile
Open the Settings app and tap Safari.

Scroll down and tap New Profile under PROFILES.

Now type a preferred name for your new profile under NAME AND ICON at the top.

Next, tap and choose the preferred icon you wish to assign to your new profile.

Now tap and choose the preferred color to associate with your new Safari Profile. You can tap the 3-dot () icon to view more color choices.

Tap Favorites.

Now choose a folder you wish to assign as Favorites for the current profile. You can also tap New Folder in the top right corner to create a new folder with the same name as your Safari Profile. You can then assign tabs as favorites when using the new Profile. The marked favorite tabs will be added to this folder instead.

Next, tap Open New Tabs and choose where you wish to open new tabs when using this Safari Profile.

Tap Done once you’re happy with the customization of the new Profile.

And that’s it! You can now use the next section to learn how you can use the new Safari Profile on your device.
Step 2: Use and switch between different Safari Profiles on iOS 17
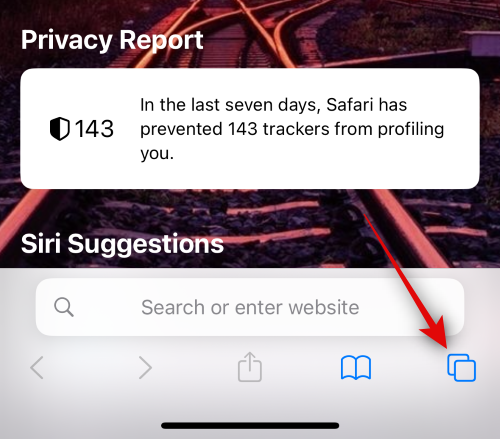
Open Safari and tap the tabs icon in the bottom right corner.

Tap the Menu icon at the bottom of your screen.

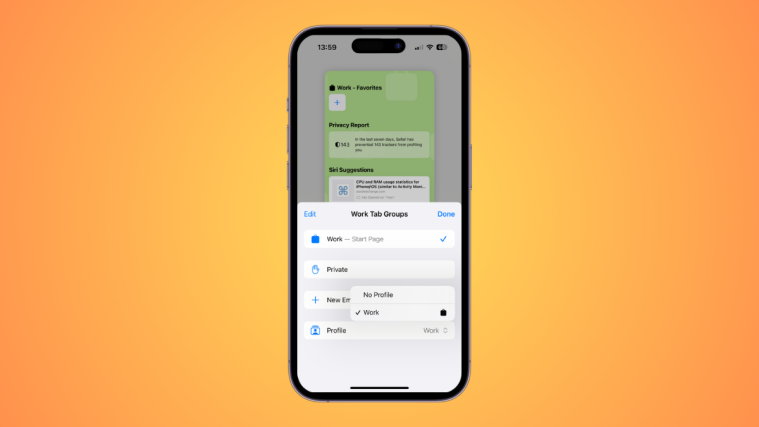
Now tap Profile at the bottom to choose the profile you wish to use currently.

Tap and choose your preferred profile.

You will now be switched to the selected profile. The same will be reflected by a colored background in the new tab page which will be the same as the color you decided to assign to your Safari Profile.

And that’s it! You can now browse, add extensions, create tab groups, and mark tabs as favorites in the current Profile. All these items will be unique to your current profile and will not be shared with other Safari Profiles on your device.
How to browse normally without a Safari Profile
You can browse normally on your device by selecting No Profile when switching profiles. Here’s how you can do that on your device. Follow the steps below to help you along with the process.
Open Safari and tap the tabs icon in the bottom right corner.

Now tap the currently assigned Profile icon at the bottom of your screen.

Tap the option for Profile at the bottom.

Tap and select No Profile.

And that’s how you can browse normally without a Safari Profile on your device.
How to delete Safari Profiles on iOS 17
You can delete Safari Profiles using the Settings app. Follow the steps below to help you delete a Safari Profile on your device.
Open the Settings app and tap on Safari.

Scroll down and tap on a Profile you wish to delete under PROFILES.

Tap Delete Profile at the bottom.

Tap on Delete to confirm your choice.

And that’s it! The selected Safari Profile will now be deleted. You can repeat the steps above to delete more Safari Profiles from your device as needed.
We hope the post helped you easily create and use Safari Profiles on iOS 17. If you face any issues, feel free to reach out to us using the comments below.


