We are not in 2005 where cell phones were just used for calling. Today, cell phones contain valuable and important data – photos, videos, SMS, call logs, documents collected over time. So, it’s very important to backup the data.
Like any other electronic device, Android devices can also stop functioning suddenly or worse get stolen or severely damaged. No, we are not scaring you, but yes, this could happen. Imagine the consequences; you’ll lose all your cherished data in either case.
To avoid the disaster of losing your data and to save yourself from the mental trauma that follows it, it’s important to backup your data. You have no excuse for not backing it up, however, if you are unfamiliar with the methods of data backup, take a seat and read on.
Also read: Cool hidden features of your Android device
Here’s a simple guide and a couple of resources that will help you backup your data.
How to backup contacts on Android
It is high time to put an end to “Lost all contacts, send your number” social media posts. If you have been in the same situation where you have lost your contacts, whatever your reason, let me tell you, there is an easy way to never lose your contacts again. All you have to do is sync your contacts to Google. (Also, yes, I did judge you for a while there.)
Anyway, though contact backup was one of the initial features in Android, many people are unacquainted with this marvelous built in feature of Android. Contact backup is essential and makes sure you never have to live without your contact list unless of course, you delete them from the cloud.
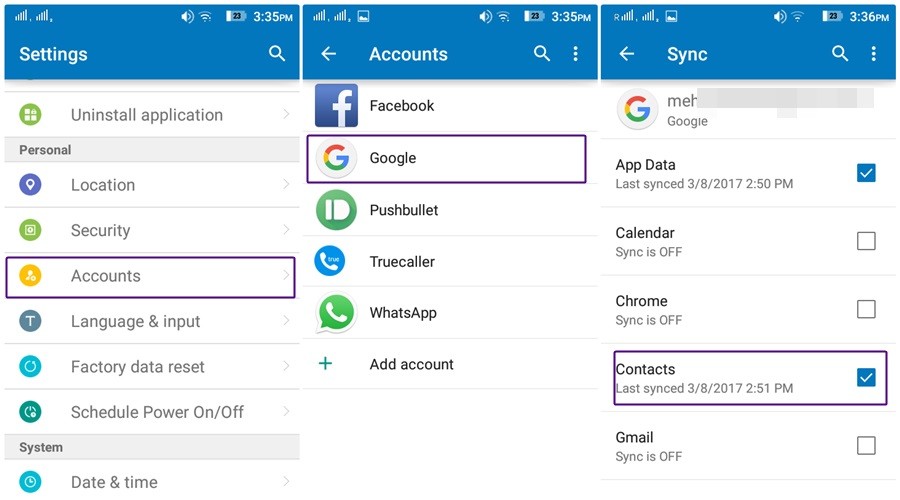
To back up your contacts, follow the steps:
- Go to device settings.
- Tap accounts, followed by Google.
- If you have multiple accounts, tap the account to which you want to backup your contacts.
- In the Sync options, enable Contacts.
That’s it. All your contacts will now sync to this account.
To restore the contacts on the device or if you want the same contacts on another device, login with the same Gmail account and enable the sync option as you did before.
Also, please share the method with your friends as well, so that we eliminate the “Lost all contacts” post and make the world a better place to live in. #SayNoToLostAllContacts
How to backup calendar, Google Fit data, and app data using Google Sync
In addition to the contact backup feature, your Android device allows you to backup other important data like calendar, Google fit data, Google Keep, Google Books, Google music etc. to Google servers. To allow Google to backup these, follow the same steps that you followed for contacts and select the items that you want to sync and backup.
Also read: How to recover notifications cleared from notification bar on Android, including Samsung devices
How to backup basic information like Wi-Fi passwords, data, and other settings
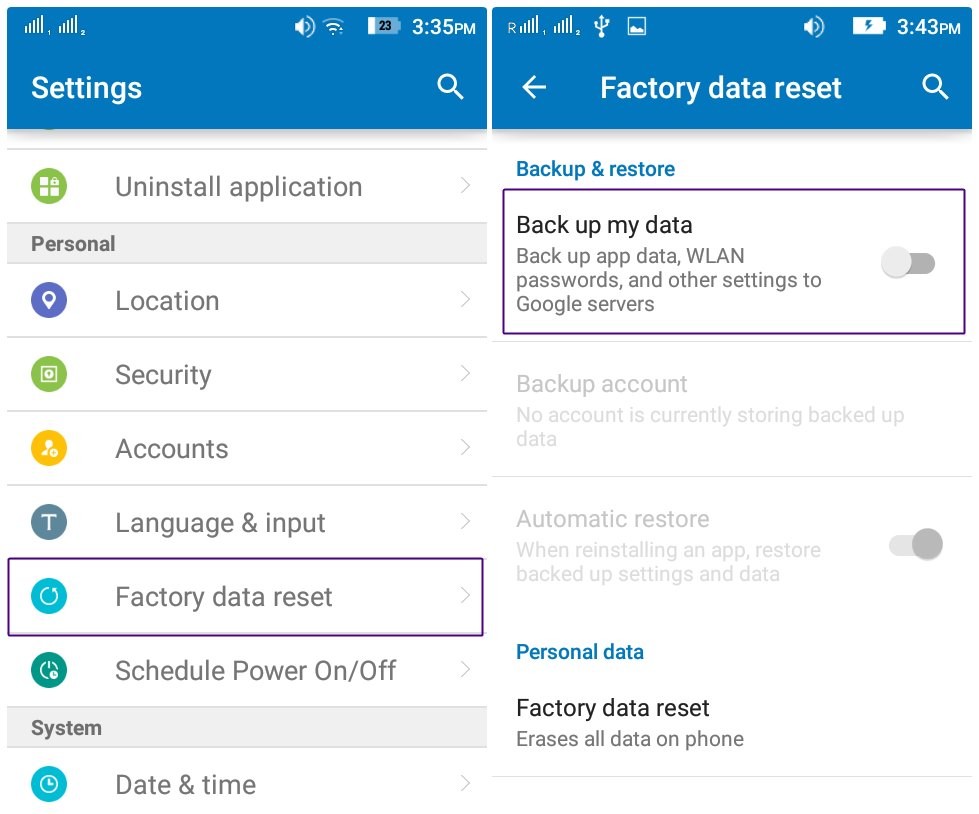
Further, your Android device allows you to backup basic information like Wi-Fi passwords and other settings to Google servers so that you won’t need to remember them once you get a new device.
To enable this amazing feature,
- Go to device settings > Backup and reset or in some devices Factory data reset.
- Enable Back up my data.
Voila.
The data is now synced regularly and you just need to log into another device with the same account to recover it.
How to backup call logs and SMS on Android
While the built-in feature in Android allows you to back up contacts among other things, it lacks call log and SMS backup. To back up these, you would have to download a third-party app from the Google store. Some of the apps that you can use to backup your call logs and SMS are:
We prefer SMS & Call Log Backup as the app has been there for years and has never failed to amaze us. The app provides you two options to store your backup, first is device backup that requires you to copy the backup to your PC then transfer it to your device again to restore it. The second option involves the use of Google Drive, which is more practical and cool. We recommend you to use this option as your backup is saved online and it eliminates the need of copying the file to PC first. The only thing you need to do is login to your Google drive account.
All in all, Google Drive option is way easier.
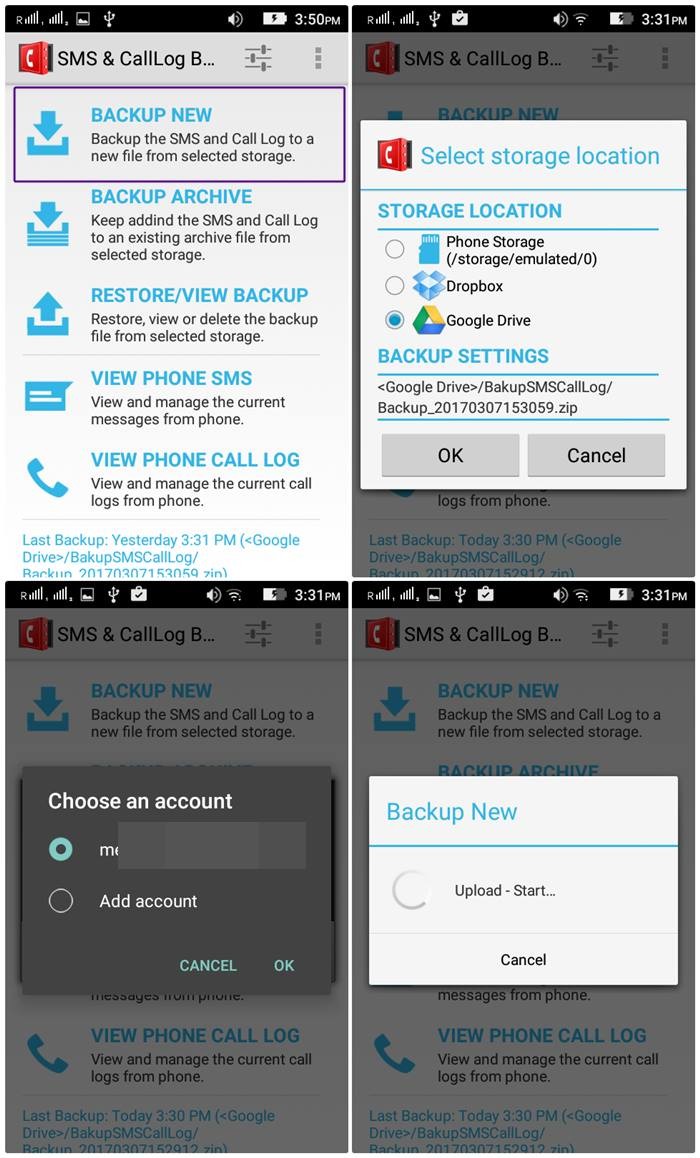
To set up the app, follow the steps:
- Download and Install SMS & Call Log Backup from the Play Store.
- Open the app. Tap the first option i.e. “Backup New” to create your backup.
- A pop-up menu will appear asking you to select the storage location. Select Google Drive – you may even select DropBox, totally your choice. Press Ok.
- Another pop-up menu will ask you to select from the existing Gmail accounts or add your Gmail account to which you want to add a backup. Press Ok. You will see the progress of the backup and when it’s done, tap Ok.
Your backup is now successfully linked to your Google Drive Account. To restore it, just tap the restore/view backup option and voila all your call logs and SMS are back from the graveyard.
In your Google Drive, you will find your backup files under a new folder with the name BackupSMSCallLog.
Keep in mind:
- Unfortunately, the app doesn’t automatically backup call logs and SMS, you have to do it manually.
- The free version doesn’t support unlimited Call log. Download the premium version to go beyond 500 limit.
- Set the default storage to Google Drive in the settings, so that the app doesn’t ask you again and again.
- Dislike the default dark theme? No worry! You can change the theme from dark to white in the settings.
Also read: How to securely save files on cloud with encryption taking place on your own device
How to backup photos on Android
The simplest way to backup photos and videos on your device is to sync them with Google Photos. Google Photos comes preinstalled with a majority of the new Android devices, but if you have been left out in this generous task, you can download it from the Google Play store here.
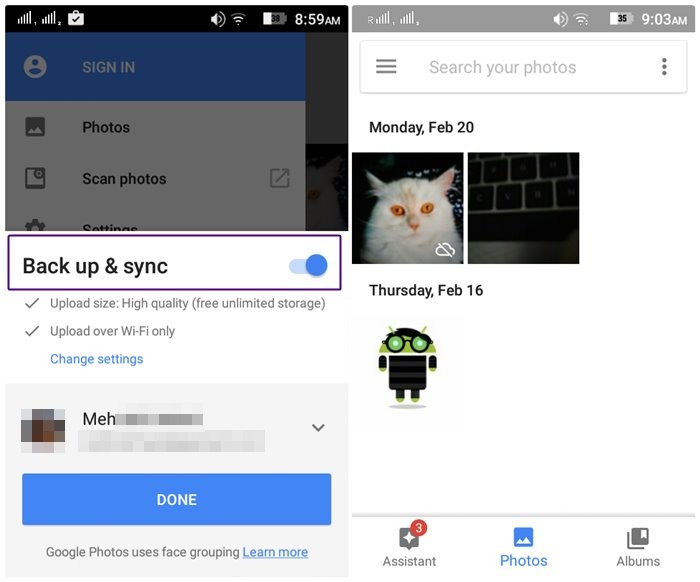
To backup photos, open the Google Photos app on your Android device, the first thing it will ask you is if you want to sync the photos, keep the toggle on to sync photos. In case you have multiple Google accounts, choose the account to which you want to sync the photos and tap done to confirm it. Doing this will backup the photos and videos that are in your camera folder to Google Drive, you can, however, even backup the photos and videos in other folders such as screenshot, Instagram images, Facebook Images, WhatsApp etc. to Google Drive.
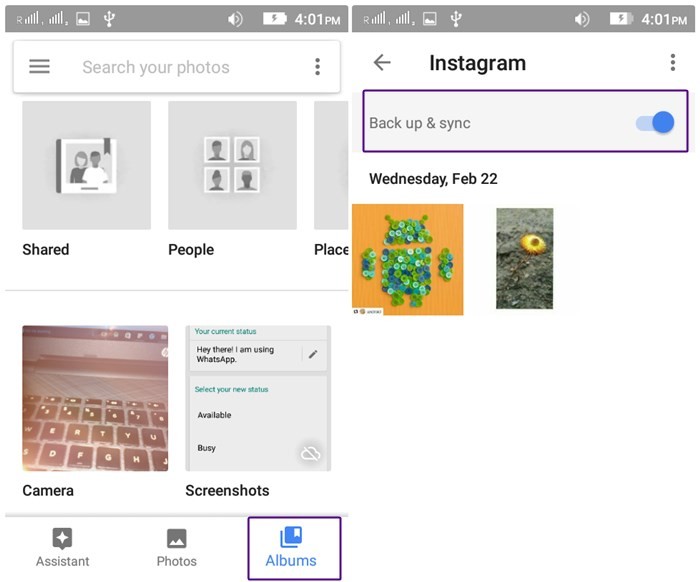
To do so, go to Google Photos app, and tap the “Albums” option located in the bottom bar. All your device albums/folders are listed here. Tap the folder that you want to backup and turn the toggle on for the “backup and sync” option present at the top.
That’s all you have to do, now whenever you capture a photo from your device camera or add a new photo to the album that is synced with the Google Photos, it is automatically uploaded to Google Photos, which you can view from any device – mobile, tablet, or even desktop. Isn’t it amazing?
Keep in mind:
- If you are wondering, are the Google photos public or private, the good news is they are private– shared only with you, unless you specify otherwise.
- Google Photos allow you to store an unlimited number of photos but comes at a price; it doesn’t store it at the original quality but at the standard-resolution of 2048px.
- If you want to store the photos at their original quality (full size), the storage limit will count against your Google drive storage, which is free up to 15 GB only and thereafter you have to buy it.
- If you want to know, which device albums are not synced with the Google Photos look for a small cloud icon with a line over it on top of the albums.
Psst: Little birdie has informed us that the future Pixel devices might allow unlimited storage of photos at full resolution to Google Photos.
Read: How to create video slideshow of photos on Android
How to backup music and other media
To backup any other significant data on your device like music, documents, use the age-old manual method of connecting your device to a computer and then transferring the data from mobile to computer and vice versa.
To do so follow the steps:
- Connect your phone to the computer using USB cable. The device is treated as an external device and will show under disks on your computer. Double click to open it.
- Navigate to the folder from where you want to copy the files, copy and paste the files on your computer.
You can even copy photos and videos by this method, to do so, head on to the DCIM folder on your device to copy photos and videos taken by the device camera. If you are looking for other picture folders, they are located in the “Picture” folder.
How to sync any folder to Google Drive
In addition to the manual method that we listed above to backup data like documents, you can use another method that allows you to sync any folder to the Google Drive. Check our detailed guide to sync any folder to Google drive here.
How to backup apps
There are two methods to backup apps on Android device; the first method is pretty simple but it involves you to install the apps over an internet connection, the second method which is slightly hectic has a benefit that you don’t need an internet connection to install the apps.
The choice is totally yours but here are the two methods:
First Method
You can simply re-download the apps from the Google Play store if you are using the same Google account that was used to download them in the first place.
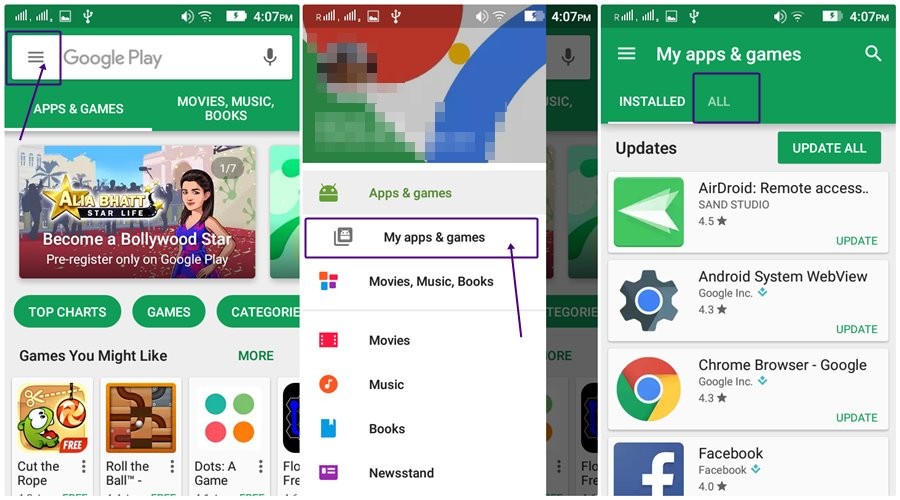
To do so, go to Google Play store, tap the three horizontal lines (the hamburger icon) located at the top left corner and then tap My apps & games, followed by “All”. You will find all your previously installed apps there; tap any app to install it again and repeat the procedure for other apps as well.
Second Method
As already mentioned, this method doesn’t require you to have an internet connection, thus allowing you to save your bandwidth. (Ah! We care for you folks 🙂 )
Follow the steps:
- Download and Install ES File Explorer from the Google Play Store (Why isn’t this app already on your phone? It’s the best file explorer replacement for your Android device, bundled with amazing features).
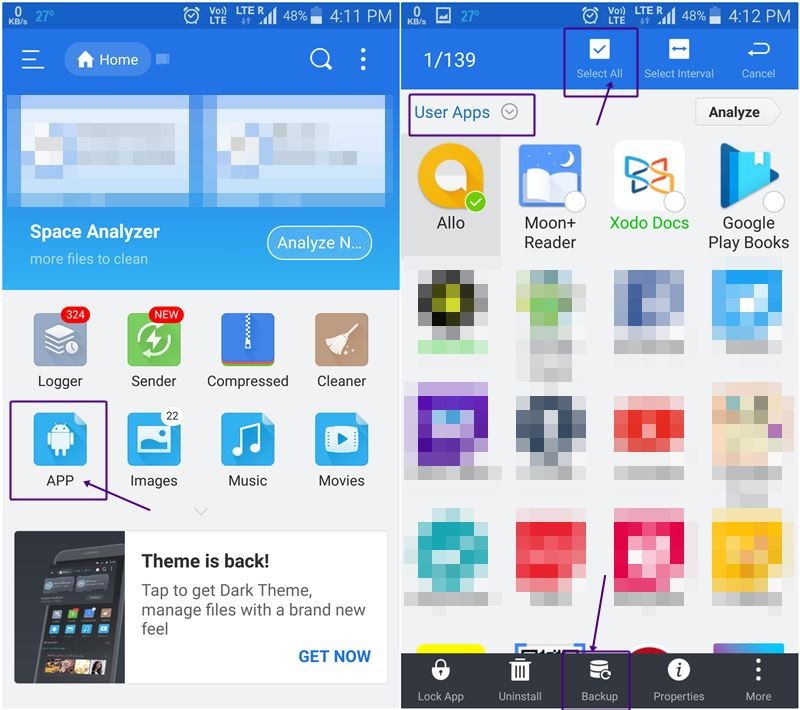
- Open ES File Explorer app, and tap the APP button on the home screen of the app. All the apps that are installed one your device are listed here.
- Long touch any app followed by Select All option present in the top bar. Doing this will select all your installed apps. However, if you want to deselect any app, just tap it once to remove it from the selection.
- Tap the Backup option present in the bottom bar. This will save an APK (installation file) of all your apps in device memory. To view backed-up apps on your Android device, tap the User Apps option in the same screen, followed by Backed-up Apps option from the menu.
- However, it makes more sense to save the APKs either on the cloud (which you can do by the Foldersync method) or simply transfer them to your computer. To transfer them to your computer, connect your Android device to your computer via a USB cable and on the computer go to Your Phone >Internal storage> Backups> Apps. Copy all the APKs to your computer. Now, whenever you need them just copy them back to your device and you will have your apps back in no time.
Keep in mind:
This method doesn’t save the app data, it only allows you to keep an installation copy of your apps that you can reuse later.
How to backup WhatsApp conversations
Almost all our conversations are done on WhatsApp these days and so it’s important to back up these conversations. WhatsApp last year introduced a feature that allows you to automatically backup your conversations – including media files, to Google Drive. You can restore your conversations when you reinstall WhatsApp. However, we feel it’s really important to mention here that the conversations are not protected by end-to-end encryption while in Google Drive.
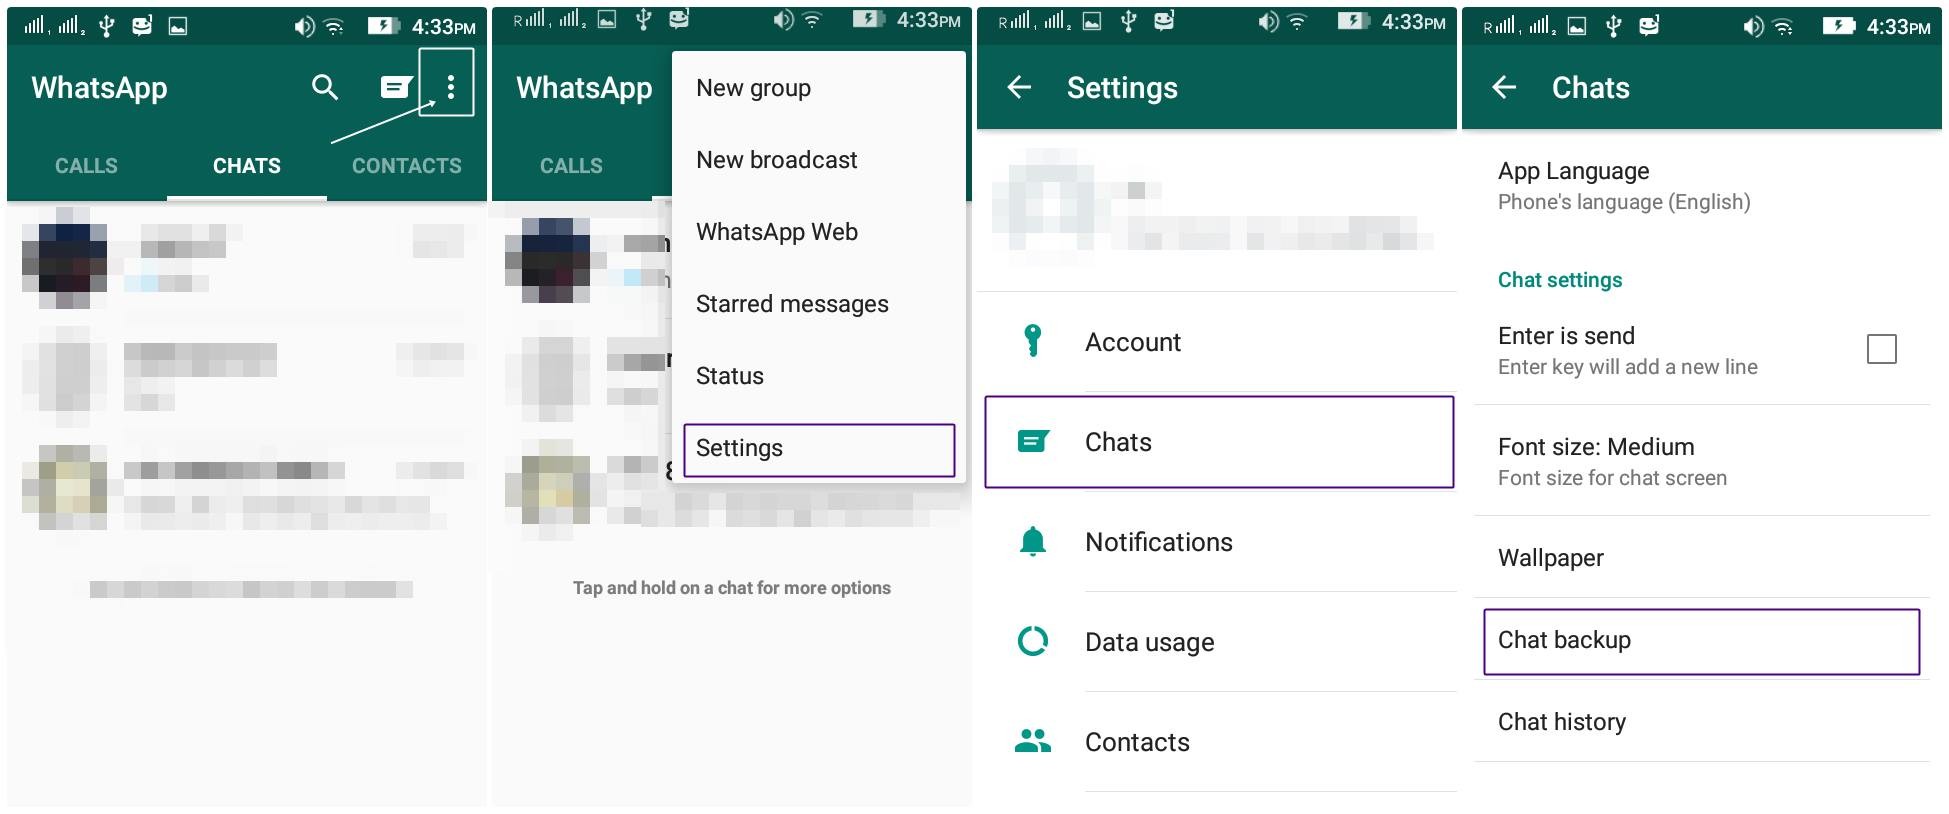
To enable chat backup in WhatsApp, follow the steps:
- Open WhatsApp. Tap the three dots present at the top right corner. Tap Settings from the menu.
- Go to Chats option, followed by Chat Backup.
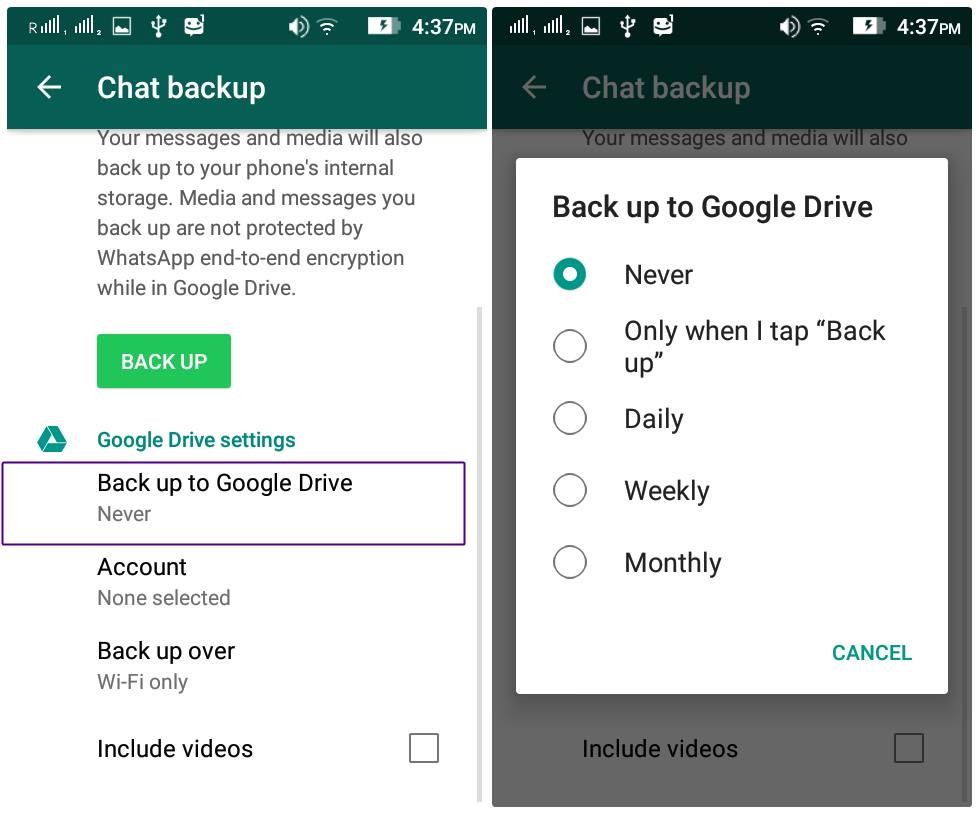
- The chat backup screen will open, listing the details of last backup (if any) and the backup settings. Tap the first option “Back up to Google Drive” and set the duration of backup, as per your requirement, from the available options of “Never, Only When I Tap Backup, Daily, Weekly, and Monthly”. Finally, select the account to which you want backup your conversations.
If you want to restrict the backups over Wi-Fi only, set the Backup over setting to Wi-Fi only.
Read: 8 cool new WhatsApp Status Tips and Tricks
How to backup using 3rd party Apps
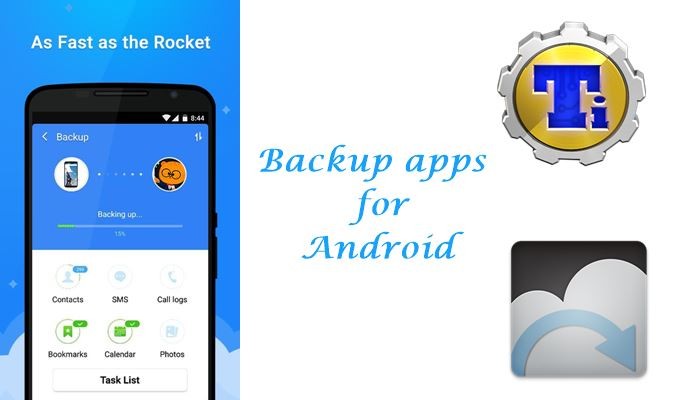
While the individual methods work fine, you can even backup using 3rd party apps that allow almost full backup of your Android device but with certain limitations.
Here’s a rundown of the few major backup apps:
CM Backup – Safe,Cloud,Speedy
Unlike Google sync, which lacks SMS and call log backup, CM backup allows you to backup messages and call logs in addition to contacts, photos, browser bookmarks, calendars, alarm, and dictionary. All in one package. But, there is a sad news as well, you only get 5 GB of cloud storage which is a real bummer.
Download CM Backup – Safe,Cloud,Speedy
Titanium Backup
Titanium backup is one of the most powerful tools to take a full backup of your Android smartphone. You are probably wondering the writer is nuts, why tell us all the individual methods when a single app can do it. Right?
That is because the app requires a root access on your Android smartphone, which for an average user seems the freakish thing to do. However, if you are a root user, you must definitely try this app.
Helium
If your device is not rooted, then Helium is a great app to backup data and comes with a nice user interface too. Further, even the root users can use the app.
Waiting for the BUT?
Yes, this app also comes with a big BUT (No, not the BUTT, but BUT)
BUT the software doesn’t work with every device, it only works with some international smartphone brands. *rolls eyes*
Anyway, now that you know every method to backup your Android device, we expect you to be more responsible, so that you backup your data and not lose your precious data.
Happy backing up.
Did you like the article? Or feel like we missed anything? Let us know in the comments below.


