It’s not only very helpful but also very cool to have a setup, that would automatically sync files and folders on your Android device to Desktop PC (Mac and Windows), and vice versa.
Well, all you need for such a setup is: a WiFi network, and free android app and Desktop software (available both for Mac Windows PC). Yes, it’s completely free solution, and an easy one to setup and use, too.
And this is all thanks to Cheetah Android app, that provides you wireless sync, which is still not that common in sync apps.
Now, let’s see how you could sync files and folders between Desktop (Windows PC and Mac) and your Android phone and tablet.
HOW TO SYNC FILES AND FOLDER OVER WI-FI BETWEEN ANDROID AND COMPUTER USING CHEETAH ANDROID APP
1. DOWNLOAD CHEETAH DESKTOP SOFTWARE
Use the link below to download the PC client of the Cheetah Android app on the OD you got: Mac, or Windows.
Visit the download link above download the installer .msi file if you got Windows PC, and installer .mpg file if Mac OS X is your choice of OS.
2. INSTALL PC SOFTWARE
Double the installation file to you downloaded in step 2 above, and install the Cheetah client on your Mac or Windows PC.
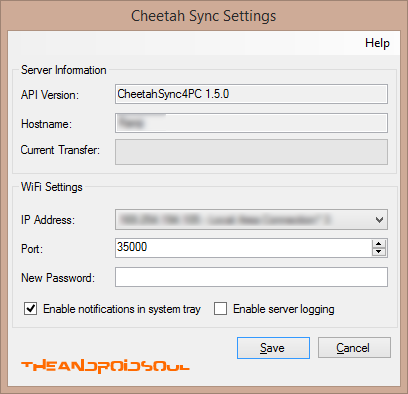
Let it run in background. It needs to be always running in background to be able to communicate with Android software to complete manual/scheduled syncs that you may set.
It would look like this below.
3. CREATE SYNC FOLDER ON PC
Now, let’s create one certain folder which you will keep in sync with your one such certain folder on your Android device.
Let’s name this folder PC Sync Folder. (Location of this folder on my PC: D drive » Downloads » PC Sync Folder.)
The files and folders inside this folder will be copied to the corresponding folder on your Android device. So, after everything is set up, you will be putting stuff to this folder that you want to be copied to your Android device.
If you put xyz.mp4 file into this folder and then run the sync job, or if it’s run automatically at a given time, then this xyz.mp4 file will be copied to Android device on sync.
And that’s it about the work we got to do on PC, for now at least.
4. INSTALL CHEETAH ANDROID APP
Download the Cheetah free Android app on your Android device from the Google Play Store (link).
5. CREATE SYNC FOLDER ON YOUR ANDROID DEVICE
Create a new folder on your Android device using any file explorer/manager app — use ES File Explorer, in nothing else.
Name this folder Android Sync Folder. (Location of this folder on my Android device: / » mnt » extSdCard » 960 » Android Sync Folder. Where, / is a root folder, the uppermost/parent-of-all folder, mnt is where external SD card folder is, extSdCard is external SD card, and yes, 960 is a folder.)
We will be syncing this folder with the PC’s folder we created in step 3 above, named, PC Sync Folder.
Everything you put inside the Android PC folder will be copied to PC Sync folder, and vice versa, depending on whether you choose one way sync (either of Android to PC only or PC to Android only) or two way sync (PC to and from Android device) under the SYNC JOB settings, which btw is the next thing to do.
6. MAKE SURE YOU HAVE CONNECTED TO SAME WIRELESS NETWORK (Wi-Fi) FROM BOTH DEVICES
You must have a working Wi-Fi network around you, and must have connected to it both from your PC and your Android phone/tablet.
If the connection breaks with either PC or your Android device, the sync would not happen, as active connection at both devices is a must have.
Here’s the screenshot shot form my PC and my Android phone.
7. SETUP THE SYNC JOB
Your files and folders are synced as specified in the Sync Job, with settings defined.
- Open the Cheetah Android app and tap on Sync Jobs.
- The Cheetah app will look for active WiFi connections to which both PC and Android device are connected, and will try to connect to Cheetah PC software. If it finds the PC for the first time, it will ask you to create one Sync Job. Next time and onwards, it will show PC name and the Sync Jobs available.
When it is able to successful talk is established between Cheetah app and its PC software, you’ve cleared one big deal already — only setting up the job remains, which is easy. Because, if you don’t get connected automatically, it can get laborious task to establish connection between the Cheetah app and PC software. Very laborious sometimes.
└ If you need help on establishing connection between Cheetah app and PC software, look at the section below, where we’re discussing that in detail, for those who are not lucky with automatic connection setup. - Tap on the Create Job, on your Cheetah android app, to start creating a Sync Job.
└ Under free version of the App, you cannot create more than one Sync Job.
The screenshot below shows Create Job screen, PC Sync Folder and Android Sync Folder (for steps 3, 4 and 5 respectively).
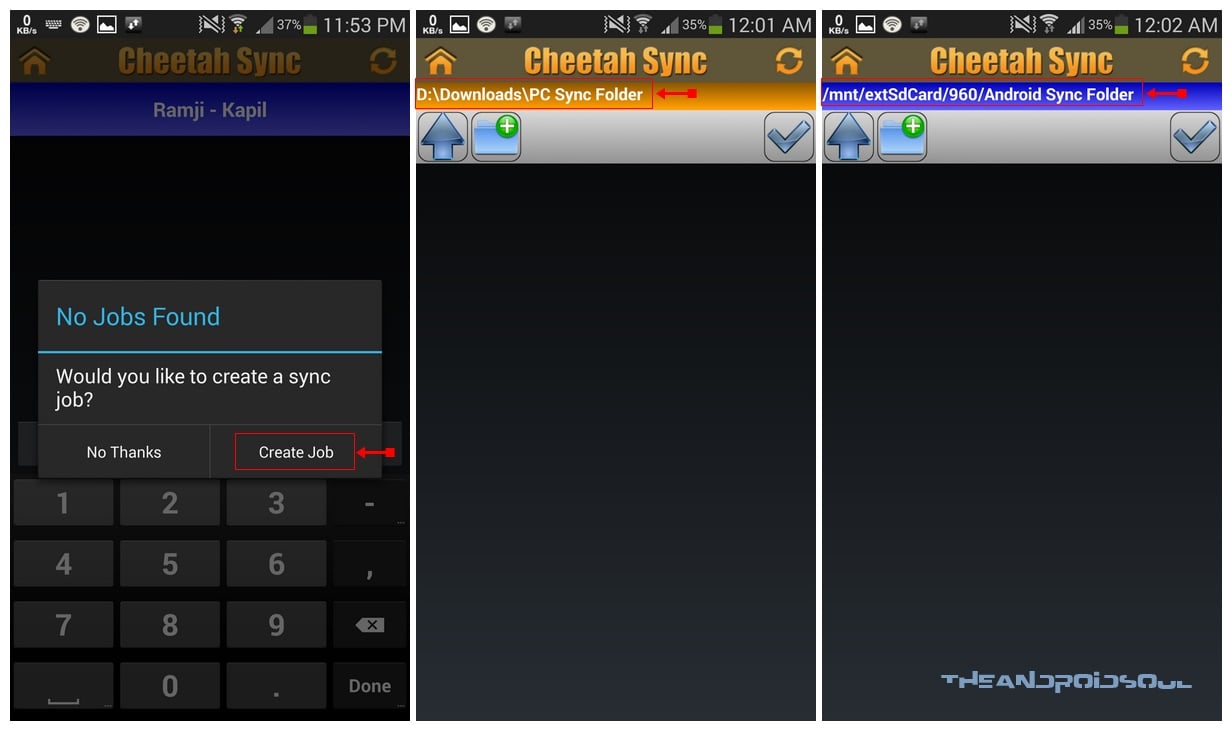
- Select the folder on PC hard disk. Now, on the app, you got to select the folder you created in Step 3 above, named, PC Sync Folder. (Tap on ‘Up Arrow’ button to move to parent folder and again if need be, and click on the folder to enter that folder.) Manage your way to PC Sync Folder and then when inside that folder, tap on the Tick sign in top right to select the folder.
└ As the default location is Documents folder on PC, you will have to browse a bit to go to your folder before selecting it. I had to tap on the Up Arrow few times to reach my Computer, from where I tapped on D drive » Downloads » PC Sync Folder.
└ Btw, you can also create a folder right here, by tapping on icon with plus sign. And, can refresh the directory too. - Select the folder on Android device now. On the app, you got to select the folder you created in Step 5 above, named, Android Sync Folder. (Tap on ‘Up Arrow’ button to move to parent folder and again if need be, and click on the folder to enter that folder.) Manage your way to PC Sync Folder and then when inside that folder, tap on the Tick sign in top right to select the folder.
└ Using Up Arrow as many times as required, I reached the uppermost folder (root, that is) on my device, and then selected mnt » extSdCard » 960» Android Sync Folder.
└ Btw, you can also create a folder right here, by tapping on icon with plus sign. And, can refresh the directory too. - Once you have selected the respective folders on PC and Android device, the app will get you to this Sync Job’s settings, where, first of all, better give a name to this job. Tap on Job Name, and enter a name, let’s say Sync 1.
- Next options are Computer Folder and Android Folder, which you’v already done in steps 4 and 5 just above. So, go into that only if you need to re-select any folder.
- Now, important one, Sync Direction. Tap on it, and select the option you want:
- PC to Android
- OR Android to PC
- OR Two-way (Android to PC and PC to Android).
└ Under free version of the app, you don’t get the option of Auto Delete under Two-way Sync, while it’s available under Android to PC and PC to Android.
└ I personally think Android to PC is good enough, as you mostly download things for Android on PC. Not on Android for your PC. Right?
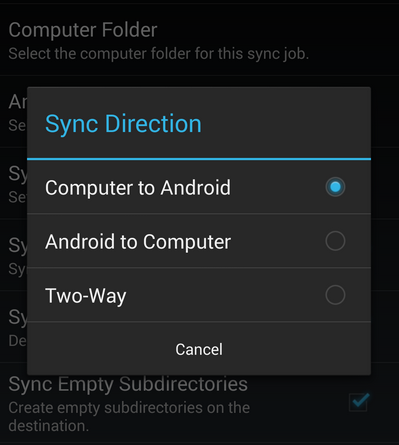
- Simply tick the options you want for
- Sync Subdirectories: whether the folders inside Android PC folder and PC Sync Folder are to be synchronized or not.
- Sync Deletes: Whether the Sync should delete files when deleted at source end. (Delete for both folders count in Two-way sync)
└ Be extra sure with this option. Why? Because, in case you haven’t selected the right folder, then it would delete all contents in that folder. Let’s say you selected the external SD card itself, not any folder inside it, then it would simply delete all of your SD card if you set up PC to Android in step 8 right above, and you PC Sync folder is empty. Damn! - Sync Empty Subdirectories: Sync the folders inside the source folder even when it’s empty.
- Deep File Compare: Better keep it selected.
- Create Conflict Files: Keep it ticked, too. Good option.

- Next option: Collision Policy. Choose that in case a conflict arises between files in Android and PC Sync folder, which should the app keep with it: Newest, Oldest, Computer, Android, Largest or smallest? I would say, keep the file on Android.
(See the screenshot above.) - Next option: Wildcard Exclusion Filters. Well, it’s a bit advanced setting to have. Specify the folders and extensions of files which are to be ignored. It’s pretty cool option to have, btw.
└ If you don’t want videos in .mp4 format to be synced, simply type *.mp4, tap OK, and on video ending with .mp4 will be synced in the source folder to be synced.
└ If you don’t a particular folder or file to be synced, simply type file name (like, xyz.mp4) or folder name (like, 565 or downloads, etc.) and tap OK, Cheetah won’t sync them.
└ Btw, if you not much experienced, you can just ignore this option, mainly because we’ve created a separate folder for Sync on our PC and Android device here, and if you fill the source folder to be synced with only the thing to be synced, you won’t be suing this very much. - Next option: Regex Exclusion Filters. This is the Wildcard Exclusion Filters in Java language. Ignore it.
- Tap on Save and that’s it, your Sync Job is created, and ready to perform sync operation.
Your Sync Jobs screen would look like this.
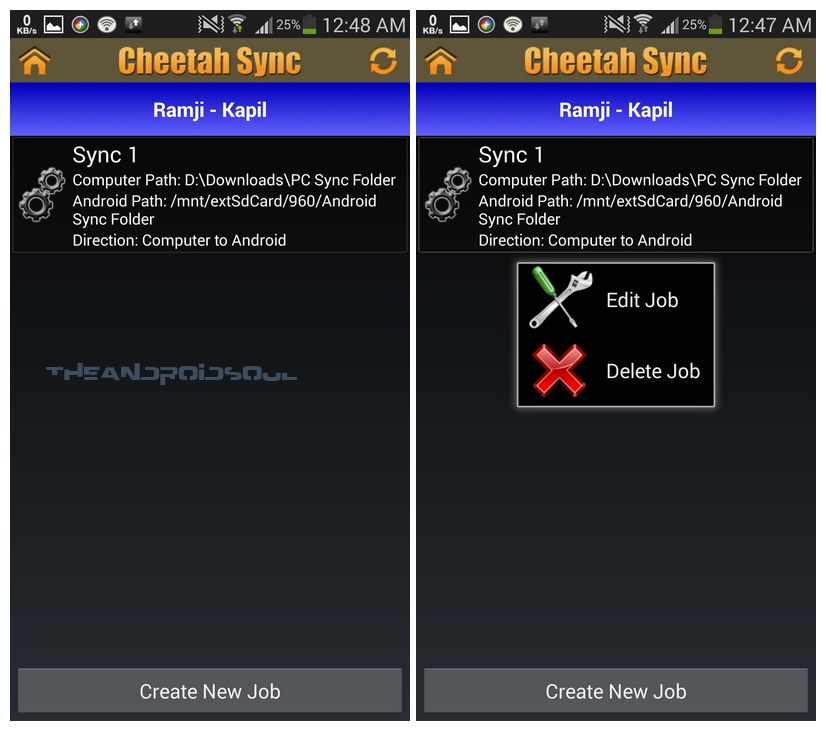
8. SETTING UP AUTOMATED SYNCHRONIZATION
Go back to main screen of the app, also called Dashboard, and tap on Settings icon.
Tap on Synchronization Interval and select one from the available options: Manually, every hour, 4 hours, 8 hours and Daily.
The option, Synchronization Time, isn’t available under free version of the app. It lets you specify a particular time for daily sync.
Set up other usual options like Retry Policy, Notifications, Reserve Space, etc.
You can also set up the default settings under the heading DEFAULT SYNC OPTIONS, so that these settings are applied by default when you create a new Sync Job. This includes the options in points 8, 9 and 10 in the Step 7 guide above.
That’s it.
9. SETUP DONE
The Cheetah sync automatically sync the stuff to/from Android from/to PC as you set in settings, automatically (if you set it so, or you can do it manually by tapping on the Sync button on the app’s Dashboard, and then tapping on Sync, with Sync Jobs selected.
ESTABLISHING CONNECTION BETWEEN CHEETAH ANDROID APP AND THE PC SOFTWARE
If you are finding trouble in connecting both Cheetah clients, and are stuck, look at the Firewall Guide linked below.
FIREWALL GUIDE: WINDOWS PC | MAC OS X
Also helpful: Link to Cheetah FAQs (Frequently Asked Questions)
By the way, my experience was both very good and very bad in connecting the Cheetah Android app with its PC software.
I am to blame too, because I tried connecting with two windows PCs on two different Wi-Fi networks, which I think were causing the complications. Mainly because, the app connected all fine in first attempt all by itself without me needing to try manually, or go into firewall settings.
At first attempt, it connected all good. Then I changed the PC and it was unable to connect. I tried manually too, but no help. Changing settings in Windows Firewall using the guide linked above, thus allowing Cheetah PC software in Windows, didn’t work either.
So, I removed Cheetah data, to make it a fresh install, and then tried manually again — by entering the IP address for WiFi which one gets from the dropdown under the WiFI settings section of Cheetah PC software. It worked (in less than 2 seconds)!
Then I changed the WiFi network and now, whatever I do, it isn’t setting up.
If the above was not clear, then as per my experience, to connect the Cheetah app and PC software, try this:
- Exit the Cheetah PC software from the notification tray in Windows. Right Click on the Cheetah’s icon and click Exit.
- On your Android device, go to Settings » Applications » Manage applications and find and tap on Cheetah Android App. Allow it to load data, and then tap on Clear Data to remove app’s settings and make it a fresh install. This will remove your Sync Jobs and everything. Files and Folders on SD Card under Android Sync Folder or any other folder won’t be deleted, or affected by any means.
- Now, start the Cheetah PC software on PC. Select WiFi from the dropdown under WiFi settings.
- Open the Cheetah Android app and Tab on Sync Jobs. Let it try automatically. If that’s not a success, then try manually.
- On PC software, change the port to 35002, and note the IP address. Click on Save. (Cheetah window will close — not a prob.)
- On Android app, type that IP address, and the port and tap on OK. It should connect.
- Try other things if it didn’t do it for you. Restart both Android device and PC, perhaps.
HELPFUL TIPS
- It’s good to set Reserve Space for the Cheetah Android app under Reserve Space option under Settings. So that, when device is getting full, the app can reserve the storage space you specify for it to be able to perform sync up to that space. If storage gets full, then Sync won’t be able to transfer files from PC and sync will fail.
- Set up default settings for Sync Jobs under Settings, as specified in Step no. 8 ‘SETTING UP AUTOMATED SYNCHRONIZATION’.
PROBLEMS?
Share the issues you are experiencing in connecting the Cheetah app and PC software, or in using the app, with us, in the comments below.
We’ll try to help you out!
Your feedback, and suggestions and corrections, to this article are welcomed!


