The Smartphone manufacturers releases the devices with a certain internal memory like 4 GB/8 GB/16 GB and more, but in reality the storage that is available on your device is not exactly rhe same as advertised. This is due to the fact that the internal memory is allocated as partitions to serve various purposes and you will lose some of the storage and the rest of the space is termed as the User available storage.
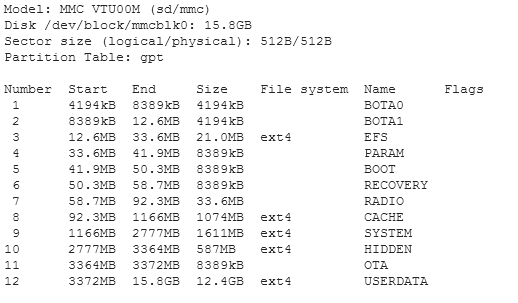
The Samsung Galaxy S3 GT-I9300 16 GB model provides 11.25 GB (12.4 GB actually but some space is further unavailable) storage as user space and the rest is allocated to various partitions. You can check the partition table of the device from the picture below:
You can observe that 1 GB is allocated to the Cache partition and 587 MB is allocated to the Hidden (preload) partition. These two partitions are not of prime importance in some cases unlike the System partition. The cache partition is used to store the OTA updates temporarily while installing, but if you have rooted your device the OTA update are not applicable so you lose 1 GB of storage. Similarly the Hidden partition stores some Samsung media files like ringtones and videos but are useless if you’re on a custom Rom.
So if you’re on a rooted device or on a custom Rom, it is highly likely that these partitions lay dormant which costs you about 1.5 GB of storage. But thanks to XDA member forumber2, who made a simple hack that will re-partition your partition table and add 1.5 GB space to the user available data and all you have to do is to flash a zip file from the recovery.
However there is a catch, once you use this hack you can’t flash any firmwares through Odin but you can install kernels, modems, bootloaders, recoveries via Odin without any problem. If you attempt to install any firmware, it is most likely that your device ends up semi-bricked which can be un-bricked again by flashing a PIT file.
So follow the simple guide for applying this hack on your Galaxy S3 device.
Note: This guide is only for the 16 GB GT-I9300 version and all the contents in the internal storage will be wiped.
WARNING!
Warranty may be void of your device if you follow the procedures given on this page.
You only are responsible for your device. We won’t be liable if any damage occurs to your device and/or its components.
STEP 0: CHECK DEVICE MODEL NO.
To make sure your device is eligible with this, you must first confirm its model no. in ‘About device’ option under Settings.Another way to confirm model no. is by looking for it on the packaging box of your device. It must be GT-I9300!
Please know that this page is meant for Samsung Galaxy S3 16 GB version only. Please DO NOT try the procedures given here on any other variant of Samsung S3 or any other device. You have been Warned!
STEP 1: BACKUP YOUR DEVICE
Back up important data and stuff before you start playing around here as there are chances you might lose your apps and app-data (app settings, game progress, etc.), and in rare case, files on the internal memory, too.
For help on Backup and Restore, check out our exclusive page on that linked right below.
► ANDROID BACK UP AND RESTORE GUIDE: APPS AND TIPS
STEP 2: INSTALL THE LATEST PHILZ RECOVERY
Skip this step if you already have latest version of Philz recovery installed on your device.
If you’re not sure on how to install the recovery, follow the exclusive page on installing Philz recovery on your Galaxy S3
► SAMSUNG GALAXY S3 PHILZ RECOVERY INSTALLATION
STEP 3: INSTALLATION INSTRUCTIONS
DOWNLOADS
Download the files given below and transfer it to a separate folder on your PC and remember the location.
RE-PARTITION FILE
DOWNLOAD LINK | File name: repart_16GB_GT-I9300_CWM.zip (4.2 KB)
Thanks to developer forumber2 for developing this hack. For updates, check the original post →
Be sure to transfer the zip file you downloaded above to your phone and remember the location of the file.
You will need to flash them now on your device using Philz recovery.
GUIDE FOR PHILZ RECOVERY USERS
- Boot into recovery mode. If you’re rooted, the easiest way to boot into recovery mode would be using the QuickBoot app. If not rooted, then follow the instructions below:
- Power off your device and wait for 5-10 seconds until the device is fully switched off.
- Press and hold Volume Up + Home + Power button together and release them as soon as you see the Galaxy S3 logo.
└ In Recovery mode, use Volume buttons to navigate Up and Down between options and use Power button to select an option.
- Create a Nandroid Backup from recovery. It’s optional but very important to do, so that in case something goes wrong you can restore to current status easily. For making a Nandroid Backup, go to Backup And Restore » Backup.
- Install the hack file:
- Select Install zip » Choose zip from sdcard (or external sdcard, you know where your files are) » browse to the location where you saved the file and select the re-partition file.
└ You may encounter some mount errors, but don’t panic.
- Select Install zip » Choose zip from sdcard (or external sdcard, you know where your files are) » browse to the location where you saved the file and select the re-partition file.
- Perform a full clean-up of the device (This will delete all apps and their settings and game progress). For this:
- Select Wipe data/Factory reset, then select Yes on the next screen to confirm factory reset (screenshot).
- Now install a Rom of your choice from the recovery menu similar to the procedure in the Step 3.
- Now navigate to Mounts and Storage and format /data and /data/media.
- Install the Rom file of your choice again.
- Reboot your device. For this, go back to the main menu of recovery and select reboot system now.
That’s all. Your phone will now reboot and it will take some time as it’ll be phone’s first boot after performing this, be extremely excited for this!
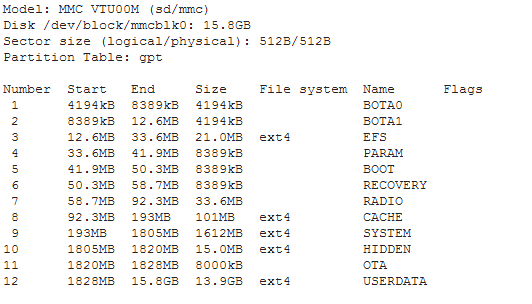
Here is the re-partition table after installing the hack:
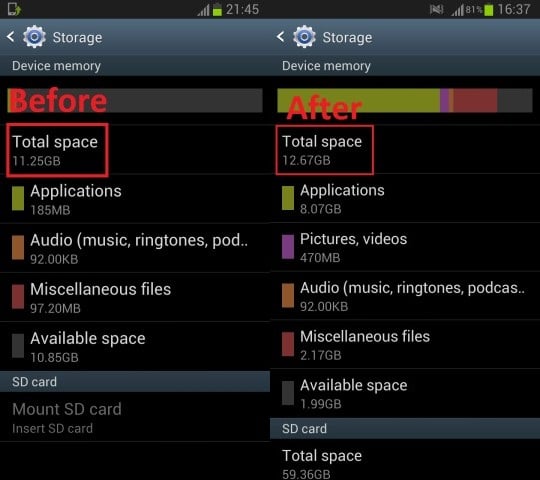
You can see that the user available storage is increased to 13.9 GB that is by 1.5 GB. Here is the screenshot from the storage menu of the device before and after the hack.
Via XDA




That’s So Cool! I’ll try that!
That’s So Cool! I’ll try that!
That’s So Cool! I’ll try that!
how to check partition table on the phone or on pc
how to check partition table on the phone or on pc
how to check partition table on the phone or on pc