At last, the international Galaxy S6 Android 5.1 update is out, too. It was ironical that its twin brother S6 Edge received it yesterday while the edge-less variant was left out. But here we have the full official Android 5.1 update available for International Galaxy S6, model no. SM-G920F, build no. being G920FXXU2BOFJ.
We know 5.1 update sounds mouth-watering but before you head over to install it, let us tell you that this update block downgrade ability of the device, thus you cannot go back to Android 5.0 build in case you don’t like Android 5.1 update — we do have a solution for this, btw, just look for method 2 below. but you cannot use Odin PC software to update, if you do, you will not be able to downgrade. Further root access isn’t available yet for the Samsung android 5.1 build, whatever device or model it is.
Sure, we also know root access will be achieved sooner or later, but if you want downgrade, use the Method 2 given below, which requires you to have root access already. Don’t use Method 1, our traditional and simple Odin PC flash that would flash the update as it is, thus blocking root.
Other Samsung device that have already received the Android 5.1 update are: T-Mobile Galaxy S5, S6 and S6 Edge, International S6 Edge, US Cellular S6 and S6 Edge.
How to retain Downgrade ability on Android 5.1 update? And what about Root?
If you have root access, you can still prevent the downgrade from getting blocked via update, while installing the update too, a bit partial though. See Method 2 below for this, that uses FlashFire android app and guides you how to flash the same OFJ 5.1 firmware using the Android app, and prevent downgrade block. It’s the same firmware you would flash with PC Odin software (Method 1), but you lose downgrade ability in Method 1.
All in all, if you don’t want root, and don’t mind the downgrade inability, simply update your Galaxy S6 to 5.1 firmware using Method 1 below, that uses Odin PC software. It’s easiest and requires no preparation. But, if you want to keep ability to downgrade, and so that you can root your Galaxy S6 again after downgrading it, follow method 2 that does the job using FlashFire android app. But you would need root access on your Galaxy S6 for this.
How to Install Galaxy S6 Android 5.1 Update
Downloads
- G920FXXU2BOFJ Update | File host link | File: XEF-G920FXXU2BOFJ-20150622133316.zip (1.57 GB)
- Odin PC software | File: Odin3_v3.10.6.zip (1.6 MB)
Supported devices
- INTERNATIONAL SAMSUNG GALAXY S6 (model no. SM-G920F)
- Don’t try this on Galaxy S6 variants at Verizon, Sprint, AT&T, T-Mobile, US Cellular, etc. whose model no. is not G920R4!
- Don’t try on any other device whatsoever!
Instructions
Disclamer: Installing an official firmware through Odin doesn’t void your device’s warranty, but it remains an unofficial process and thus you need to be cautious of it. In any case, you only are responsible for your device. We won’t be liable if any damage occurs to your device and/or its components.
Backup important files stored on your device before proceeding with the steps below, so that in case something goes wrong you’ll have backup of all your important files. Sometimes, Odin installation may delete everything on your device!
METHOD 1 - USING ODIN PC SOFTWARE
This is a very simple method to upgrade to Android 5.1, as it requires no preparation. Just install and you are done. But, you won’t be able to downgrade back to Android 5.0! Moreover, root access isn’t available for Android 5.1 yet.
- Download the Odin software and firmware file from above.
(Note: If you want the ability to downgrade to 5.0 and root thereafter, don’t use this method. Instead, look for method 2 on this page.) - Install Galaxy S6 drivers (method 1 there!) first of all. Double click the .exe file of drivers to begin installation. (Not required if you have already done this.)
- Extract the firmware file now. You can use a free software like 7-zip for this. Install 7-zip, then right click on firmware file and under 7-zip, select ‘Extract here’.
- You should get the a file in .tar.md5 format now (G920FXXU2BOFJ_G920FOXA2BOFJ_G920FXXU2BOFJ_HOME.tar.md5). We will be loading this file into Odin, to be installed on your Galaxy S6 (in step 10 below).
- Extract the Odin file. You should get this file, Odin3 v3.10.6.exe (other files could be hidden, hence not visible).
- Disconnect your S6 from PC if it is connected.
- Boot Galaxy S6 into download mode:
- Power off your S6. Wait 6-7 seconds after screen goes off.
- Press and hold the three buttons Volume Down + Power + Home together until you see warning screen.
- Press Volume Up to continue to download mode.
- Double click on extracted file of Odin, Odin3 v3.10.6.exe, to open the Odin window, as shown below. Be careful with Odin, and do just as said to prevent problems.

- Connect your Galaxy S6 to PC now using USB cable. Odin should recognize your S6. It’s a must. When it recognizes, you will see Added!! message appearing in the Log box in bottom left, and the first box under ID:COM will also show a no. and turn its background blue. Look at the pic below.
- You cannot proceed until you get the Added!! message, which confirms that Odin has recognized your device.
- If you don’t get Added!! message, you need to install/re-install drivers again, and use the original cable that came with device. Mostly, drivers are the problem (look at step 2 above).
- You can try different USB ports on your PC too, btw.

- Load the firmware file into Odin (that you got in step 4 above). Click the AP button on Odin and the select the file: G920FXXU2BOFJ_G920FOXA2BOFJ_G920FXXU2BOFJ_HOME.tar.md5
- Make sure Re-partition checkbox is NOT selected, under the Options tab. Don’t use PIT tab either. Go back to Log tab btw, it will show the progress when you hit start button in next step.

- Click the Start button on Odin now to start flashing the firmware on your Galaxy S6. Wait till installation is finished, after which your S6 will reboot automatically. You’ll get PASS message as show below upon successful installation from Odin.
- If Odin gets stuck at setup connection, then you need to do steps 6 to 12 again. For this, close Odin, disconnect your S6, remove battery, insert it back after 5-6 seconds and then start from step 6 again.
- Or, if you get FAIL in the top left box, you need to try flashing again, as stated just above.

- First start of the device may take time, so wait patiently again. Check the Settings > About phone to confirm new firmware.
That’s it. Enjoy the G920FXXU2BOFJ Android 5.1.1 firmware, or call it OFJ in short, on your Galaxy S6!
If you need any help with this, let us know via comments below and we will try our best to help you out.
METHOD 2 - USING FLASHFIRE ANDROID APP (NEEDS ROOT)
This method retains your device’s ability to downgrade easily when needed. So that you can also root your Galaxy S6 after downgrading, as root is available on Android 5.0 builds. But you need root access for this method.
- Download the firmware file from above.
(Note: If you DO NOT want the ability to downgrade to 5.0 and root thereafter, don’t use this method. Instead, look for method 1 on this page tat is easy and doesn’t require root access, but you will lose ability to downgrade, while we think root will be available soon anyway, more or less.) - Extract the firmware file now. You can use a free software like 7-zip for this. Install 7-zip, then right click on firmware file and under 7-zip, select ‘Extract here’.
- You should get the a file in .tar.md5 format now (G920FXXU2BOFJ_G920FOXA2BOFJ_G920FXXU2BOFJ_HOME.tar.md5). We will be loading this file into Odin, to be installed on your Galaxy S6 (in step 10 below).
- Connect your Galaxy S6 to PC, and transfer the tar file to phone. Remember the location where you save it.
- Make sure you have root access. You can use PingPong root if your current firmware is supported. Otherwise, use cf-auto-root.
- It’s good to set the ‘Screen timeout’ to 10 minutes under Settings > Display.
- Disconnect the phone, and download the Flashfire android app that we will use to flash the firmware in tar format:
- Login into Google using the same Gmail ID that you are using on phone. Go to Google+ page and join the community.
- Next, sign up here to be able to install the app from play store and receive updates.
- Use the play store link provided thereafter to get to pay store page of the app and install it. It may take hours before it shows up for you in play store. You can only wait.
- Open the Flashfire app. Provide it root permissions by tapping on Grant on the pop-up that shows up. And tap on Agree button on the Disclaimer pop-up that comes only one time. (Tip: Read the Instructions section, it’s helpful.)
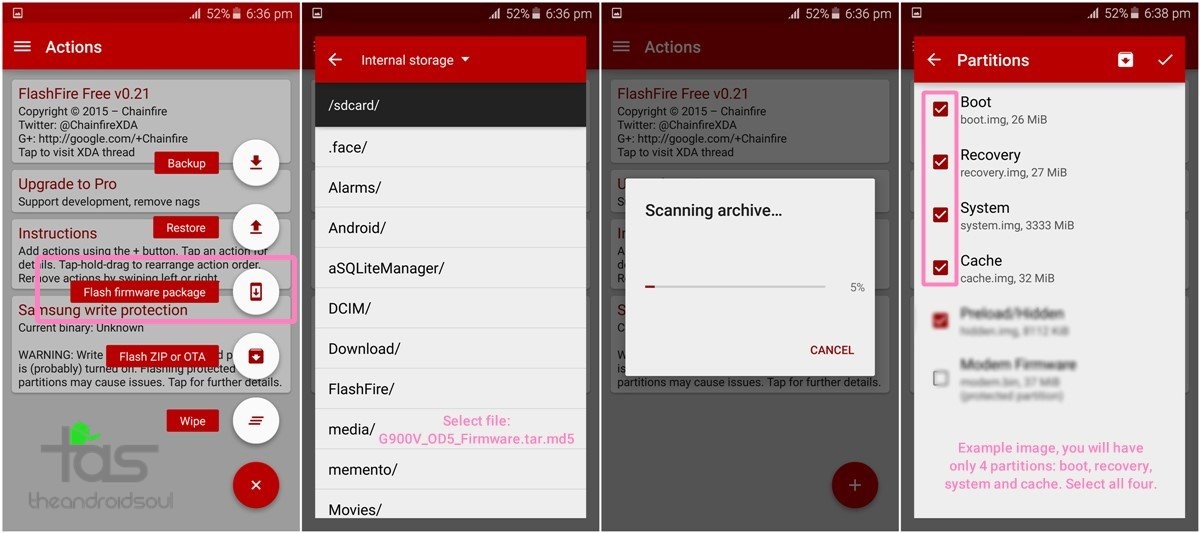
- Tap on + sign, select ‘Flash firmware package’ and then select the firmware tar file (G920FXXU2BOFJ_G920FOXA2BOFJ_G920FXXU2BOFJ_HOME.tar.md5) from step 3 here.

- IGNORE 4th SCREENSHOT IN ABOVE IMAGE! Select partitions as said here. Once you select the firmware’s .tar file, the Flashfire app will start scanning the file (as shown above), and will bring up the available partitions in the .tar in a list. Select all partitions except Recovery partition. Then tap on the right checkmark button at right top corner.
→ Take care to NOT select Recovery partition, otherwise you will lose the ability to downgrade. The recovery partition contains code that blocks downgrade, so we are to avoid installing it. - Tap on EverRoot, and un-tick all options again. Hit checkmark button, of course, then.
- Okay, you are all set to drop down the lightening. Hit the FLASH button at bottom now to start flashing process. Tap on OK to confirm.
Important! Btw, it seems Flashfire reboots the device before completely finish the process. To prevent that, there’s a small trick, keep hitting volume up/down every few seconds. Take care of this!
That would be it. Soon enough, you would have the Android 5.1 firmware running on your Galaxy S6. Enjoy! And do share this page with anyone who you think would find it useful.
If there is anything you wanna ask to us in this regard, sure let us know via comments below.


This worked perfect thanks for all your help
Glad for you. Btw, you tried method 1 or 2? Odin or Flashfire?
Method 1 Odin.
Okay, cool.
This worked perfect thanks for all your help
Glad for you. Btw, you tried method 1 or 2? Odin or Flashfire?
Method 1 Odin.
Okay, cool.
This worked perfect thanks for all your help
Glad for you. Btw, you tried method 1 or 2? Odin or Flashfire?
Method 1 Odin.
Okay, cool.
work with flashfire
work with flashfire