[rominfo]
ROOT PACKAGE INFO
| Name | Super SU |
| Version | 0.94 |
| Stability | Stable, without any issues |
| Credits | Tech N You |
[/rominfo]
WARNING!
Warranty may be void of your device if you follow the procedures given on this page.
You only are responsible for your device. We won’t be liable if any damage occurs to your device and/or its components.
GUIDE: ROOT XOLO 8X-1000 HIVE
Before you begin with guide instructions below, make sure your android device is adequately charged — at least 50% battery of the device.
STEP 0: CHECK DEVICE MODEL NO.
To make sure your device is eligible with this, you must first confirm its model no. in ‘About device’ option under Settings. Another way to confirm model no. is by looking for it on the packaging box of your device. It must be XOLO 8X-1000!
Please know that this page is meant only for Xolo 8X-1000 Hive. Please DO NOT try the procedures given here on any other device of Xolo or any other company. You have been Warned!
STEP 1: BACKUP YOUR DEVICE
Back up important data and stuff before you start playing around here as there are chances you might lose your apps and app-data (app settings, game progress, etc.), and in rare case, files on the internal memory, too.
For help on Backup and Restore, check out our exclusive page on that linked right below.
► ANDROID BACK UP AND RESTORE GUIDE: APPS AND TIPS
STEP 2: INSTALL LATEST DRIVER
You must have proper and working driver installed on your windows computer to be able to successfully flash recovery on your Xolo Device.
If you are not sure about installing drivers on your phone, here is our definitive guides on how to install drivers on Xolo 8X-1000 Hive.
► INSTALL DRIVERS ON MICROMAX DEVICES
STEP 3: INSTALLATION INSTRUCTIONS
DOWNLOADS
Download the file given below and transfer it to a separate folder on your phone and remember the location.
RECOVERY FILE
DOWNLOAD LINK | File name: Xolo 8x-1000 recovery.img (6.3 MB)
BOOT FILE
DOWNLOAD LINK | File name: Xolo 8x-1000 boot patched.img (5.6 MB)
SP FLASH TOOL
DOWNLOAD LINK | File name: SP_Flash_Tool_exe_v3.1312.0.139.zip (6.89 MB)
ROOT FILE
DOWNLOAD LINK | File name: CWM-SuperSU-v0.94.zip (658 KB)
VROOT
Download the latest Vroot software from here
SCATTER FILE
DOWNLOAD LINK | File name: MT6592_Android_scatter_emmc.txt (0 KB)
STEP-BY-STEP GUIDE
STEP 1: INSTALL CWM RECOVERY
Important Note: Backup important files stored on internal SD card of your device, so that in case a situation arises requiring you to do a factory reset after flashing CWM Recovery, which might delete internal sd card too, your files will remain safe on PC.
- Extract/Unzip the SP Flash Tool file, SP_Flash_Tool_exe_v3.1312.0.139.zip on your computer (using 7-zip free software, preferably) to get the files similar to the screenshot below:

- Place the patched boot image and the CWM recovery image in the same folder. (Just for convinience)
- Download the Scatter file, MT6592_Android_scatter_emmc.txt and place it in the same folder where you placed the recovery and boot image.
└ Note: The Scatter file contains the partition table values of your device, So don’t tamper or modify the Scatter file which may result in bricking your device. - Prepare your phone:
- Enable USB Debugging: Open phone’s Settings » select Developer options » Tick the “USB debugging” checkbox (under Debugging section).
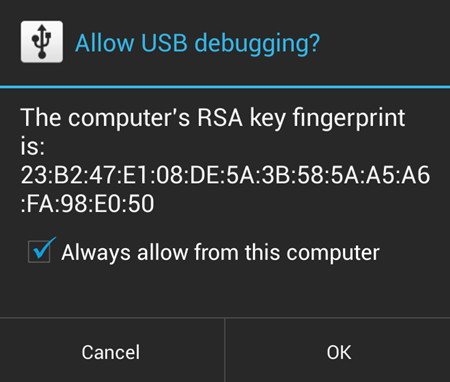
- Connect your phone to PC with a USB cable and if a pop-up screen shows up on phone asking you to Allow USB debugging for the computer, make sure you tick the checkbox and tap OK.

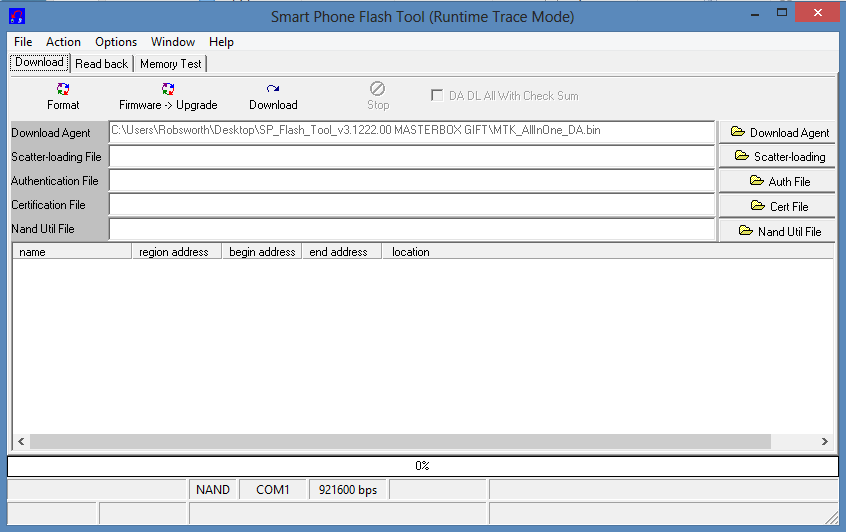
- Double-click/Run the Flash_tool.exe from the extracted SP TOOL PACKAGE. Now it will open a dialogue box named Smart Phone Flash Tool (Runtime Trace Mode) which looks something like this:

- Now click on the Scatter-Loading button on the left and navigate it to the MT6592_Android_scatter_emmc.txt file that you have downloaded.

- Now select the recovery and boot images by clicking on the individual lines in the tool and select the file seperately. Now click on the download button on the top you will get a warning box. Click yes.
└ Note: Since we are not flashing all the images present in the scatter file, the tool try to warn us but we know that we are intentionally flashing single images. So ignore the warning.

- Now you will see a status saying searching in the bottom. Now switch off you phone remove the battery once and reinsert it. Then connect the phone to the PC (without switching on) and holding volume up button.

- Now the recovery is automatically flashed into the phone and you will get a green circle saying Download OK indicating everything went fine. Now disconnect your phone and reboot.

That’s all, you have successfully flashed the CWM recovery on your device. If you need help regarding this, feel free to ask us in comments below.
STEP 2: ROOT YOUR DEVICE
- Download the SuperSu Zip provided above and transfer it to the root of your SDcard and reboot into recovery mode.
- Flash the SuperSU zip file using CWM recovery. If you’re not sure how to flash Zip files using CWM recovery, follow the flashing guide here.
- Now install the Vroot application on your PC and open it.
- Connect your phone with USB Debugging on and wait till the Vroot detects your device.
- Once the device is detected, simply click the Root button and everything is done automatically.
- Reboot your device and open SuperSU app from the app drawer. It will ask whether to remove older Superuser app (from Vroot). Press yes and you’re done
FEEDBACK US!
It was easy to root your Xolo 8X-1000 Hive, right? Let us know how it is to your liking in comments below.
Your suggestions and queries, if any, are most welcomed!


Please update the SuperSU link as I have updated it in the thread. Great guide. Cheers
-Regards Tech N You
Also make sure that you replace this flashtool with latest as the old one gives error on scatter loading attach link to latest SP Flashtool v5.13
-Regards Tech N You
Please update the SuperSU link as I have updated it in the thread. Great guide. Cheers
-Regards Tech N You
Please update the SuperSU link as I have updated it in the thread. Great guide. Cheers
-Regards Tech N You
Also make sure that you replace this flashtool with latest as the old one gives error on scatter loading attach link to latest SP Flashtool v5.13
-Regards Tech N You
Also make sure that you replace this flashtool with latest as the old one gives error on scatter loading attach link to latest SP Flashtool v5.13
-Regards Tech N You
it says
Initializing error what should i do?
it says
Initializing error what should i do?
it says
Initializing error what should i do?
followed your instruction got some error, now my phone is not turning on 🙁
followed your instruction got some error, now my phone is not turning on 🙁
followed your instruction got some error, now my phone is not turning on 🙁
Can u make video step-by-step for how to flash & root xolo 8x-1000…so it will be easy for us to root our device
Can u make video step-by-step for how to flash & root xolo 8x-1000…so it will be easy for us to root our device
Can u make video step-by-step for how to flash & root xolo 8x-1000…so it will be easy for us to root our device
Will you pls provide a video regarding this
Will you pls provide a video regarding this
I cant download the files uploaded on box.com. Any mirror links ?
I cant download the files uploaded on box.com. Any mirror links ?
how to download scatter file
how to download scatter file