“This site can’t be reached. Server IP address could not be found” issue is one of the few things in life that is capable of invoking the kind of dread that few things can. Usually, we hope and pray that closing and restarting our Wi-Fi connection will resolve whatever issues are causing the problem, but if the issue persists, then it might be time to look at more solutions.
Let’s explore how to fix the issue “This site can’t be reached. Server IP address could not be found.”
What does ‘Server IP address could not be found’ mean?
Not everyone is adept in the ways of the Internet which is why many of us tend to run into this particular error message in the first place. Any and all website that you visit on the internet has a numerical IP address that is associated with a human-readable domain name. The server IP error that you see is triggered when the DNS server (which acts as a translator) fails to retrieve the IP Address of the site you typed into the search bar. There are one of two reasons that this happens. Either the domain that you are trying to access is down or your local cache is returning to an older IP address and the site you’re trying to visit has a new IP Address.
Ways to resolve the issue: ‘This site can’t be reached.’
We’ve looked at every possible way to fix the ‘site can’t be reached issue’. Let’s check out each one.
Wait for some time
Most of the time, the site would open automatically for you after a brief period of time, maybe just a few minutes. So, without doing anything hardcore, you can simply sit it out for a few minutes and try again. Only if you are not able to view a webpage for a long time, should you take the pro-ish fixes given below.
Try restarting/refreshing the DNS service
Attempting this solution is necessary if the DNS service that you’re using became glitchy during your internet surfing activities, thus leading to you seeing the error message. Follow these steps to restart the DNS service on your computer and, hopefully, solve your issues.
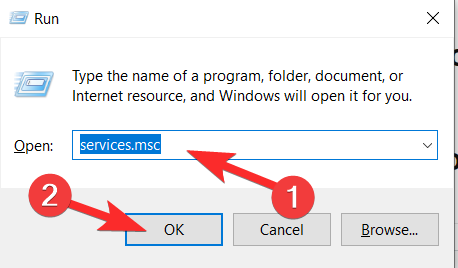
First press the Windows + R button on your keyboard to open the Run program. Then, type in services.msc and click on OK to launch the service management window.
Next, you will find yourself in the Service Manager menu. Here, scroll through the list till you find DNS Client.
Select the Restart option.
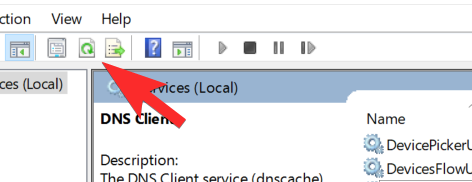
 It could so happen that the Restart action won’t respond (in case your DNS service is on automatic settings). In which case, just refresh it by clicking on the icon as indicated on the screen.
Use a VPN
It’s possible that you’re seeing the Site not loading error because of location-related issues. This happens because some websites prevent users from certain demographics access to their websites. It is for such cases that a VPN is required to access these websites. Use a VPN with a good reputation for this purpose. We recommend NordVPN as a trusted and reliable VPN service.
Download NordVPN on your PC here.
Once you run the software and open it, you can connect to any server worldwide by selecting the country you want to interconnect with.
Clear Host Cache using Chrome Commands
This is especially handy for Chrome users. Since Chrome has its own storage of DNS cache to speed up the process of surfing on the internet, what is an asset feature can become a liability when it gets corrupted. Therefore, in this step, we will be using the Chrome internal commands to reset this cache by clearing it.
Open a new tab in Google Chrome. In the new tab, type in Chrome://net-internals/#dns and press Enter.

Click on the Clear Host Cache button to clear this cache.

Reopen Chrome to see if it’s responding normally again.
Run the Network Troubleshooter
Maybe it’s not the browser that’s at fault but rather Windows that is facing an issue that is affecting Chrome. This is why it’s important to run the Network Troubleshooter to rectify the problem. To do this follow these steps:
n some cases, some core Windows features might’ve been glitched out due to which this particular issue is being triggered while searching on Google Chrome. Therefore, in this step, we will be running the network troubleshooter to rectify that. For that:
Press Windows + I to launch the Settings Menu. Here, you will see the Network and Internet option. Open the menu for it.

Now, scroll down to the Network Troubleshooter and select it.

The Troubleshooter will run and do its thing. In case of any issues, you will get a resolve button option, if everything is fine and your page is still showing an error, then move on to the solutions we’ve shared below.
DNS issues
Many times you will see DNS_PROBE_FINISHED_NXDOMAIN error is something you will see along with the other Server not found message. This usually points out to a DNS specific error. In such cases, try flushing your DNS first and if that doesn’t help, then updating your DNS to Google’s Public DNS servers. Since your computer is usually set to use the DNS configured in your router or modem which is Internet Providers DNS by default, updating it usually solves the problem (unless you’ve already changed it in which case move on to the next step).
Method 1: Try flushing the DNS cache
Type cmd in the Start menu bar and you will see a Command Prompt app option. Here, select Run as administrator.

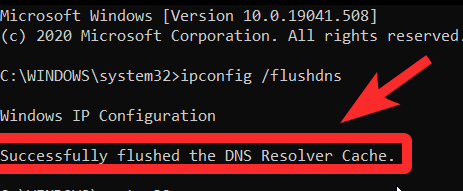
Next, type ipconfig /flushdns in the back Command Prompt menu that opens.

Once you press Enter you will see a notification that confirms that the cache has been cleared.
Method 2: Update the DNS to Google’s Public DNS Servers
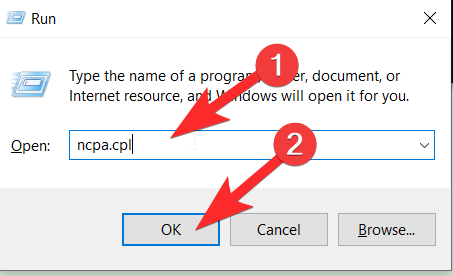
Press Windows+R to open the Run program on the bottom right of your screen. Once it opens, you need to type ncpa.cpl and then click on OK.
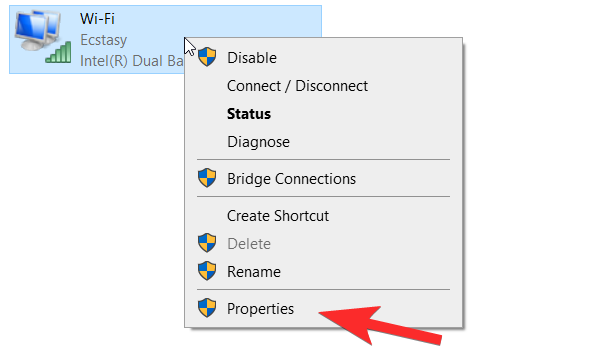
Now, the Network Connections page will open. Here, you need to select the connection that is currently active.
Right-click to open the action menu and click on Properties.
In the Properties section, you will see the items used by the network to connect to the internet. Scroll till you see Internet Protocol Version 4 (TCP/IPv4), select it, and then click on Properties.
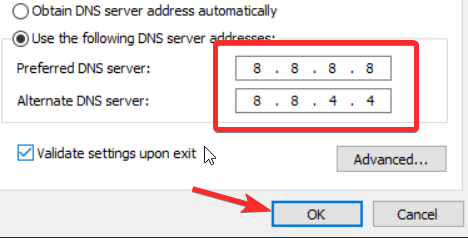
 Now, you will see an option to select the option for Use the following DNS server addresses and enter the following for Preferred DNS Server and Alternate DNS Server. These are the numbers you need to put in:
Preferred DNS SERVER: 8.8.8.8
Alternate DNS SERVER 8.8.4.4
Once you’re done, click OK.
Delete all the files in your ‘etc’ folder
Sometimes, you might be seeing the site not loading error due to some extra files being present in the crucial ‘etc’ folder of the Windows Operating System. The error message tends to be triggered if the “etc” folder in the System 32 folder contains some extra files. Let’s learn how to delete these files from one’s computer.
Before proceeding with the tutorial, make sure that you have made a full backup of all your files because you may want to keep everything just in case you might end up losing something you need. Let’s begin!
Press Windows+E to launch the File Explorer. Once the File Explorer is open, type/paste C:\Windows\System32\drivers\etc.
Once you’re in the location, simply press Delete+Shift to clear everything in the from the PC. Now check if the issue is resolved.
Reinstall the browser
It could so happen that the problem might not actually lie within your network configurations and it might instead be coming from the browser itself. This is why it becomes necessary to uninstall the browser and then reinstall it from its official download website.
Before beginning the uninstallation close all your Chrome tabs and windows.
First, go to your Start menu and type Remove program. When you do this, the Add or Remove program option will become available. Click on Open.

Now search for Google Chrome or whatever browser you’re using in the list. One the app pops up, click on it.

Now click on the Uninstall button.
 Great! Once the browser has been uninstalled, open Microsoft Edge or another browser and go to this link. You can redownload and reinstall the Chrome Browser from here.
We hope one of these solutions work in your favor. Do let us know in case you’re still facing an issue. Take care and stay safe!


