Geohot, the star hacker recently released the Towelroot root method which could root almost any Android device, and now the same has been tweaked by another star hacker, Munjeni, to work on Xperia Z1 series.
Before you proceed, Rooting is the process of gaining superuser privilege on your phone which allows you to delete, add and modify system files. After rooting you can add many performance improving mods, delete system specific application which you found useless, block ads in complete system and many more.
With root it is also easier to completely backup phone data which is not possible on un-rooted devices. There are many personalisation options in form of custom ROM’s and modified frameworks which can be used to beautify and customize your smartphone.
Below is the brief process on how to get root easily on Xperia Z1 and Z1 Compact but before you begin it is recommended to complete all the steps properly and patiently. If anything goes wrong you can ask for help in the comments section below this post.
[rominfo]
ROOT PACKAGE INFO
| Name | Newroot |
| Warranty | Voids Warranty. |
| Stability | Stable without any issues. |
| Root Manager App | SuperSU. It manages root permissions for apps on the device. |
| Credits | Munjeni |
[/rominfo]
WARNING!
Warranty may be void of your device if you follow the procedures given on this page.
You only are responsible for your device. We won’t be liable if any damage occurs to your device and/or its components.
GUIDE: ROOT Sony Xperia Z1 and Z1 Compact
Before you begin with the instructions below, make sure your android device is adequately charged — at least 50% battery of the device.
STEP 0: CHECK DEVICE MODEL NO.
To make sure your device is eligible with this, you must first confirm its model no. in ‘About device’ option under Settings. Another way to confirm model no. is by looking for it on the packaging box of your device. It must be C6902/C6903/C6906/C6943/D5503!
Do not use the procedures discussed here on any other variant of Sony Xperia Z1 and Z1 Compact or any other device of Sony or any other company. You have been warned!
STEP 1: BACKUP YOUR DEVICE
Back up important data and stuff before you start playing around here as there are chances you might lose your apps and app-data (app settings, game progress, etc.), and in rare case, files on the internal memory, too.
For help on Backup and Restore, check out our exclusive page on that linked right below.
► ANDROID BACK UP AND RESTORE GUIDE: APPS AND TIPS
STEP 2: ROOTING INSTRUCTIONS
DOWNLOADS
Download the Newroot.zip file given below and transfer it to a separate folder on your phone’s internal / external SD Card.
NEWROOT ZIP FILE
DOWNLOAD LINK | File name: Newroot.exe (Size: 30.69MB)
GUIDE FOR WINDOWS USERS
- Prepare your phone:
- Enable developer options: Go to your tablet’s Settings » select About phone » Scroll to the bottom and tap on “Build number” seven times to enable developer
- Enable USB Debugging: Open phone’s Settings » select Developer options » Tick the “USB debugging” checkbox (under Debugging section).
- Connect Phone to PC using a Data cable
- Run Newsroot.exe as administrator.
- Select Check this to root your phone and click on proced.

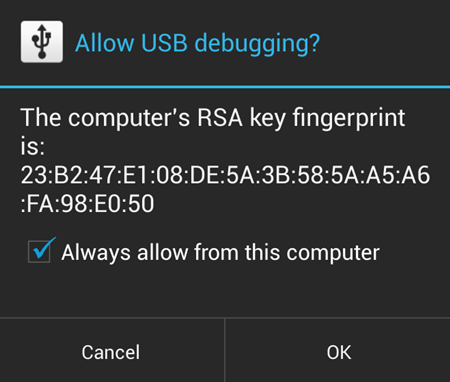
- If a pop-up screen shows up on your Phone asking you to “Allow USB debugging” for the computer, make sure you tick the checkbox and tap Okay

- Wait till it finishes the process and reboots your device automatically.
That’s it!
VERIFY ROOT ACCESS
To verify root access on your phone, install the Root Checker app (link →) from Play Store.
Your suggestions and queries, if any, are most welcomed in the comments section below.


Thank you – it worked on a Z1 Compact.
Thank you – it worked on a Z1 Compact.
Thank you – it worked on a Z1 Compact.
can it works with mac?
can it works with mac?
can it works with mac?
copy it to my Z1 compact device, cannot run as administrator. run using open, it loaded but did not recognized the phone, what to do? thanks.
Install proper drivers on your PC. Get it from here: http://developer.sonymobile.com/downloads/drivers/xperia-z1-compact-driver/
copy it to my Z1 compact device, cannot run as administrator. run using open, it loaded but did not recognized the phone, what to do? thanks.
Install proper drivers on your PC. Get it from here: http://developer.sonymobile.com/downloads/drivers/xperia-z1-compact-driver/
copy it to my Z1 compact device, cannot run as administrator. run using open, it loaded but did not recognized the phone, what to do? thanks.
Install proper drivers on your PC. Get it from here: http://developer.sonymobile.com/downloads/drivers/xperia-z1-compact-driver/