[rominfo]
ROOT PACKAGE INFO
| Name | Sprint HTC One RUU Firmware v3.05.651.6 |
| Version | Android 4.3 Jelly Bean with HTC Sense 5.0 |
| Warranty | No Issues with Warranty. |
| Stability | Stable without any issues. |
| Credits | O.M.J |
[/rominfo]
Whether you are bored or left wanting by the Android 4.4 custom ROMs, or got the love for HTC sense back in full, here’s how you can go back to Android 4.3 and HTC Sense using the HTC’s own firmware in RUU (Rom Update Utility) form.
Installing a firmware using RUU (ROM UPDATE UTILITY) will do the following (if found, of course) on your HTC One:
- Remove Root (Unroot)
- Remove CWM/TWRP recovery
- Remove Custom ROM
- Delete installed apps and settings (device gets wiped!). Files on internal memory also get deleted.
- Bring back deleted pre-installed apps (as per the firmware)
WARNING!
Warranty may be void of your device if you follow the procedures given on this page.
You only are responsible for your device. We won’t be liable if any damage occurs to your device and/or its components.
GUIDE: BACK TO STOCK/DOWNGRADE SPRINT HTC ONE TO ANDROID 4.3 and HTC SENSE 5.0
Before you begin with the instructions below, make sure your android device is adequately charged — at least 50% battery of the device.
STEP 0: CHECK DEVICE MODEL NO.
To make sure your device is eligible with this, you must first confirm its model no. in ‘About device’ option under Settings. Another way to confirm model no. is by looking for it on the packaging box of your device. It must be M7SPR/M7WLS!
Please know that this page is meant only for Sprint HTC One. Please DO NOT try the procedures given here on any other device of HTC or any other company. You have been Warned!
STEP 1: BACKUP YOUR DEVICE
Back up important data and stuff before you start playing around here as there are chances you might lose your apps and app-data (app settings, game progress, etc.), and files on the internal memory, too.
SO, BE SURE TO COPY ALL FILES ON PHONE TO COMPUTER.
For help on Backup and Restore, check out our exclusive page on that linked right below.
► ANDROID BACK UP AND RESTORE GUIDE: APPS AND TIPS
STEP 2: INSTALL LATEST DRIVER
You must have proper and working driver installed on your windows computer to be able to successfully root your Sprint HTC One.
In case you’re not sure, follow the link below for a definitive guide for installing driver for your HTC device on your computer.
► HTC DEVICES DRIVERS INSTALLATION GUIDE
STEP 3: INSTALLATION INSTRUCTIONS
DOWNLOADS
Download the fastboot file and the RUU (Rom Utility Update) file of the firmware in .exe format from below.
FASTBOOT AND ADB FILES
DOWNLOAD LINK | ADB and Fastboot Necessary Files.zip (920 KB)
SPRINT HTC ONE ANDROID 4.3 SENSE 5.0 FIRMWARE RUU EXE FILE v3.05.651.6 (for Method 1 only)
DOWNLOAD LINK | File name: RUU_M7_WL_JB43_SENSE50_SPCS_MR_Sprint_WWE_3.05.651.6_Radio_1.00.20.1108_NV_SPCS_4.38_003_release_348053_signed_2.exe (1.1 GB)
SPRINT HTC ONE ANDROID 4.3 SENSE 5.0 FIRMWARE RUU ZIP FILE v3.05.651.6 (for Method 2 only)
DOWNLOAD LINK | File name: Sprint_HTC_One_m7wls_3.05.651.6_RUU_decrypted.zip (1.1 GB)
STEP-BY-STEP GUIDE
Important Note: As flashing a firmware using RUU will surely delete everything on phone (apps, settings, files and folder on SD card, etc.), be sure to backup/copy all your pictures, videos and other important files to computer.
ABOUT THE TWO METHODS:
There are two methods to do flash the firmware. Method 1 uses RUU EXE file. And Method 2 uses the RUU ZIP file (installed via fastboot usb mode, not recovery). Both have two parts, and have their first part in common, which is, preparing for the firmware installation.
So, complete the Part 1 given right below, which is about entering the Fastboot USB mode, with bootloader re-locked. Once again, it’s common for both methods.
Once Part 1 is done, choose your method, and then do the Part 2 of that method.
We would recommend you Method 1, but if it fails you, try Method 2.
PART 1: PREPARING FOR FIRMWARE INSTALLATION [Common for both methods]
- Turn Off Fastboot mode on your device first.
- Go to Settings » Power » make sure the Fastboot checkbox is NOT selected.
- Turn on USB Debugging on your device:
- Enable developer options: Go to your Settings » select About device » Scroll to the bottom and tap on “Build number” seven times to enable developer options.
- Enable USB Debugging: Open device’ Settings » select Developer options » Select the “USB debugging” checkbox.
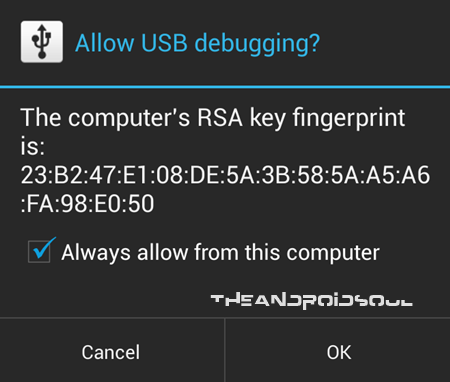
- Connect your device to computer with a USB cable and if a pop-up screen shows up on Phone asking you to Allow USB debugging for the computer, make sure to tick the checkbox and tap OK.

- Now, disconnect your device from PC.
- Boot your device into Fastboot mode.
- Power Off your device first, and wait for 4-5 seconds after screen goes off.
- Press and hold both Volume Down and Power together until you are in bootloader mode.
└ You can use Volume Up and Down to move up and down between options respectively, and Power to select an option. - The selection (in blue) must be on FASTBOOT (otherwise use Volume keys to move the selection to it), and then press Power to select it and boot into Fastboot mode. You will enter FASTBOOT with fastboot written in red color.
- Once in fastboot mode, connect the device to PC using the USB cable. The fastboot text will change to FASTBOOT USB (still in red color), which means your phone is properly connected to PC in fastboot mode.
└ If you don’t get the FASTBOOT USB, then there is a problem with drivers, uninstall and re-install the drivers again. Connect your device to PC in normal Android mode, if it shows up in My Computer, then it means drivers are installed properly and working. That should get you to FASTBOOT USB. - Now, read the device’s lock status on top of the screen. If it says LOCKED or RE-LOCKED, then skip to PART 2 directly, ignoring step 8 and 9. But, if it says UNLOCKED, then do step 8, 9 and 10 now. Because, you can’t flash RUU on unlocked bootloader.
- Extract the Fastboot files in the ADB and Fastboot Necessary Files.zip (can use 7-zip free software for this), to get these files. Let’s call this folder on your PC as FASTBOOT FOLDER, where all your necessary fastboot and adb files are.

- Open cmd window in fastboot folder.
- RE-LOCK your device’s bootloader, if it’s UNLOCKED right now. You can’t flash an RUU on unlocked device, that’s why you need to re-lock it.
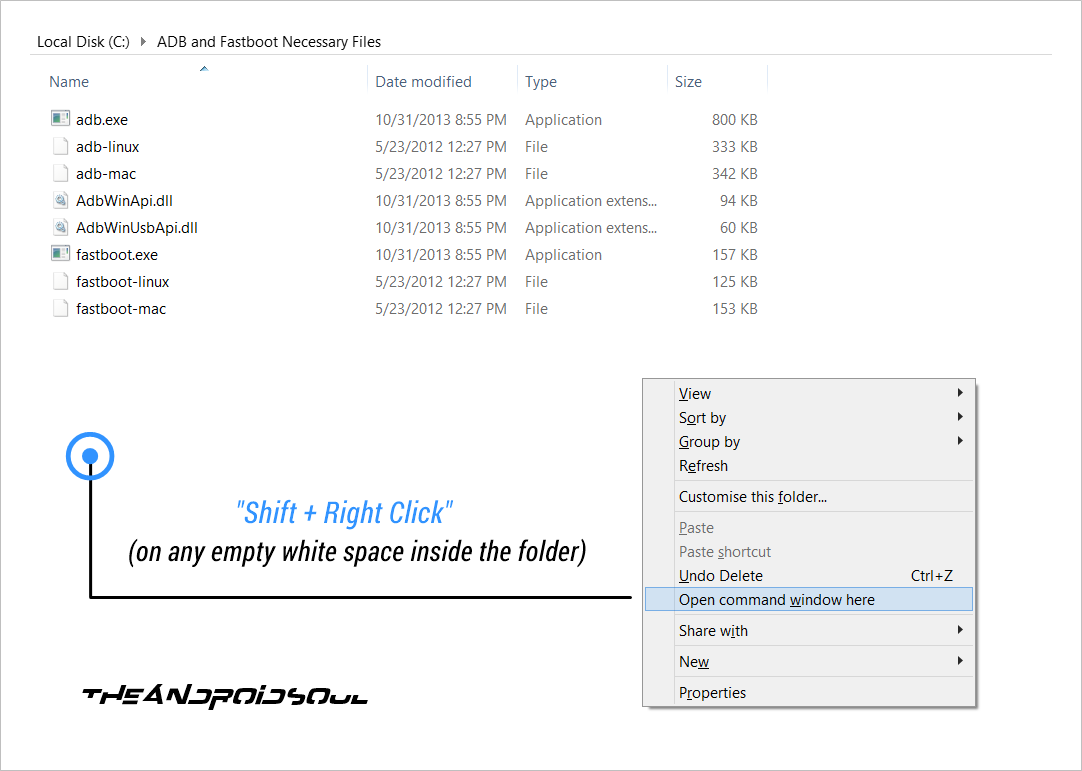
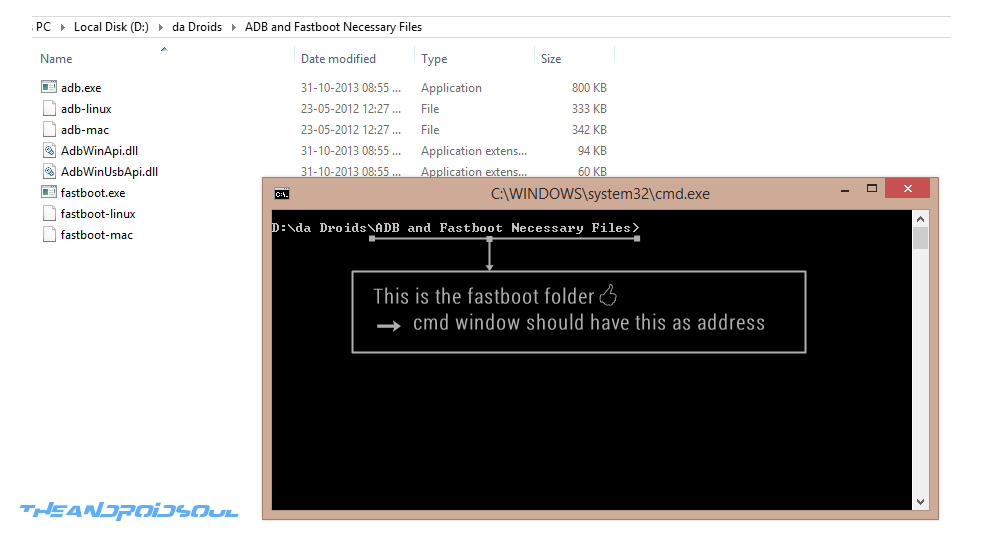
- In the fastboot folder, hold shift button and then right click on empty white space to get a list of options, and then click on this option ‘Open command window here’. This will open a cmd window with your fastboot folder as its address.
- Now, with your device connected to PC and in FASTBOOT USB mode, type this fastboot command in cmd window and then hit enter key:
fastboot oem lock - That will re-lock your device, and device will reboot itself automatically into FASTBOOT USB mode. But if it doesn’t and reboots normally to Android, then just do step 3 and 4 to reboot it into FASTBOOT USB mode again, so that we can flash a firmware RUU now.
- It should read RE-LOCKED on top of screen now. If you either or both of the text like TAMPERED and Security Warning at the top, together with RE-LOCKED, then just ignore them.
Now, that Part 1 (common in both methods) is over, choose you method to install the firmware. Method 1 uses EXE file of RUU, while Method 2 uses ZIP file of the same RUU.
METHOD 1: USING RUU FIRMWARE IN EXE FORMAT
Make sure you’ve completed Part 1 above.
PART 2: INSTALLING ANDROID 4.3 AND SENSE 5.0 BASED RUU FIRMWARE in EXE FORMAT (Method 1)
- On PC, go to the folder where you have the RUU file: RUU_M7_WL_JB43_SENSE50_SPCS_MR_Sprint_WWE_3.05.651.6_Radio_1.00.20.1108_NV_SPCS_4.38_003_release_348053_signed_2.exe.
- Right click on the RUU file and select Run as administrator to run the RUU file with admin privileges.
- Wait for the Administrator prompt and then select ‘Yes’ when the User Account Control windows shows up. It will take time to show up because the RUU is really big file. So, don’t panic and just wait for the prompt to select Yes.
- You may have to wait again a bit till the RUU installation/setup window shows up. Click next to get to Rom Update Utility window, which looks like below:

- Select the Checkbox in the middle (almost) of the window to confirm that you understand the caution, and then click Next button.
- Make sure that your PC doesn’t goes to Sleep OR Hibernate mode while installation is going on, and take care that it doesn’t suhts shuts down. OR, in case of laptop, make sure that there is enough battery to make it last for half an hour.
└ YOUR PC SHOULD REMAIN ON WHILE RUU IS WORKING. Otherwise, it may brick your device. - On next screen, select the checkbox again and then click on Next button.

- Now, the will verify information on your device, which relates to firmware being compatible with your device.
- Once it’s through that, RUU will show up again, with Image version of your device written on it. Click the Update button now.
- The next window will show info about current and expected Image Version. Click on Next.
- That’s it. Just one more click to start installation of Android 4.3 and Sense 5.0 based firmware. Click Next.
- Now, wait for some good 10 mins (maybe less) until RUU finishes, and your device reboots to Android. When it has, go through the setup and complete it. Your phone is a good as new one, one that came out of the box.
It’s done! Your device has returned Back To Stock! Or, downgraded back to Android 4.3 and Sense 5.0, if you were on AOSP Android 4.4 custom ROM.
ALTERNATE METHOD 2: If the above method failed you, try Method 2 below. No need to do the Part 1 again if you have already done it.
METHOD 2: USING RUU FIRMWARE IN ZIP FORMAT
Make sure you’ve completed Part 1 above. No need to do it again, though.
PART 2: INSTALLING ANDROID 4.3 AND SENSE 5.0 BASED RUU FIRMWARE in ZIP FORMAT (Method 2)
- We ignore the .exe file here. And stick to the firmware in .zip format. So, to begin with, copy the .zip file of the firmware, Sprint_HTC_One_m7wls_3.05.651.6_RUU_decrypted.zip, to your fastboot folder (see step 8 of Part 1 guide above, that’s your fastboot folder).
- Rename the firmware file to firmware6516.zip — make sure the file name doesn’t become firmware6516.zip.zip by error.
- Open cmd window again as you did in step 9 above. If you still have the old cmd window open, no need to open a new one, you can use the old one.
- Reboot the device in FASTBOOT RUU mode. (You can’t flash an RUU in ZIP format in normal Fastboot USB mode, btw, incase you were wondering.) Here’s how:
- Now, with your device connected to PC and in FASTBOOT USB mode, type this in cmd window and then hit enter key:
fastboot oem rebootRUU
- Now, with your device connected to PC and in FASTBOOT USB mode, type this in cmd window and then hit enter key:
- Confirm your device is in FASTBOOT RUU mode. Do you black screen on your device with HTC written in the middle of it? Ig yes, we are good here. If no, there is something wrong, please re-check the steps above and re-do those needed.
- FLASH THE FIRMWARE IN FASTBOOT RUU MODE.
- Now, type this in cmd window and then hit enter key:
fastboot flash zip firmware6516.zip - This will start the installation of the RUU ZIP file, firmware6516.zip, on your device. If you get any error during installtion, don’t worry, just look at step 7 below. Otherwise, reboot your device as stated in step 8 below, when installation has been completed successfully. (yes, ignore step 7 in this case).
- Now, type this in cmd window and then hit enter key:
- If you get this error in installation — “FAILED (remote: 90 hboot pre-update! please flush image again immediately)” — then, well, don’t worry and do this:
- Make sure device is in Fastboot RUU mode, otherwise do step 4 right above for that and bring it back to Fastboot RUU mode.
- Now, do the step 6 again to install the firmware file, firmware6516.zip, again. It should work alright this time around!
└ When the installation is complete, reboot device as said in step 8 below. - Btw, if you get error 155, then it means you didn’t re-lock the bootloader as asked in Part 1. So please do that first, and then follow the rest of the guide.
- Reboot your device.
- Type the command below followed by enter key:
fastboot reboot
- Type the command below followed by enter key:
That’s it.
It’s done! Your device has returned Back To Stock! Or, downgraded back to Android 4.3 and Sense 5.0, if you were on AOSP Android 4.4 custom ROM.
FEEDBACK US!
It was easy to bring the Sprint HTC One back to stock or downgrade to Android 4.3 and Sense 5.0, no?
Your suggestions and queries, if any, are most welcomed!


Hi, sorry I have a problem: I get the error 155, but I have locked bootloader relocked appears me, I repeated many times and I keep getting this error in method 1.
In method 2 I see this:
Please help, thanks in advance.
Hi, sorry I have a problem: I get the error 155, but I have locked bootloader relocked appears me, I repeated many times and I keep getting this error in method 1.
In method 2 I see this:
Please help, thanks in advance.
my htc model no is: HTC PN072, does it mean this tutorial doesn’t fit my phone? if no, is there a way i can get sense 5 on my phone also?
my htc model no is: HTC PN072, does it mean this tutorial doesn’t fit my phone? if no, is there a way i can get sense 5 on my phone also?