
AmonRa Style Recovery is an alternative recovery for the HTC Rezound that can be used to install custom ROMs and hacks on the phone, instead of the famous Clockworkmod recovery usually found on Android devices. If flashing custom ROMs is on your agenda, AmonRa recovery is something you surely must have on your Rezound.
This guide will walk you through the steps required to flash AmonRa recovery on your HTC Rezound. Just go through each and every step carefully and you’ll have AmonRa recovery installed on your phone in no time.
Compatibility
This guide is applicable only for HTC Rezound. DO NOT try this on any other device.
Warning!
The methods and procedures discussed here are considered risky and you should not attempt anything if you don’t know completely what it is. If any damage occurs to your device, we won’t be held liable.
How to Install AmonRa Recovery on HTC Rezound
- Unlock the bootloader on your phone. You can do this by following the bootloader unlocking guide for the HTC One X here. The procedure is completely similar for both phones, with the only exception that you need to select HTC Rezound in the procedure instead of “All Other Supported Models”, when required.
- Download the following two files:
- HTC Sync Software
You’ll need it for installing proper drivers for your phone. Skip this step if you already installed the drivers while unlocking the bootloader in step 1. - Fastboot.zip
These are the files required to run fastboot commands on your Windows PC.
- HTC Sync Software
- Now install the HTC Sync software you downloaded in Step 2.1 on your PC. This will install the necessary drivers for the phone.
- Download AmonRa recovery image.
Download Link | Filename: recovery-ra-vigor-3.15-gnm.img.zip - Extract the recovery-ra-vigor-3.15-gnm.img.zip to obtain a file named recovery-ra-vigor-3.15-gnm.img.
- Extract the fastboot.zip file you downloaded in Step 2.2 on your PC and you’ll see the following four files inside a folder named fastboot:
- adb.exe
- AdbWinApi.dll
- AdbWinUsbApi.dll
- fastboot.exe
- Now, turn off the phone. Then, turn on the phone in bootloader mode by pressing and holding down the Volume Down + Power keys together. Here, highlight Fastboot by using the volume keys then select it using the Power button to enter fastboot mode. Then, connect the phone to the computer.
- Then, do the following:
- Open the fastboot folder that you extracted in Step 6.
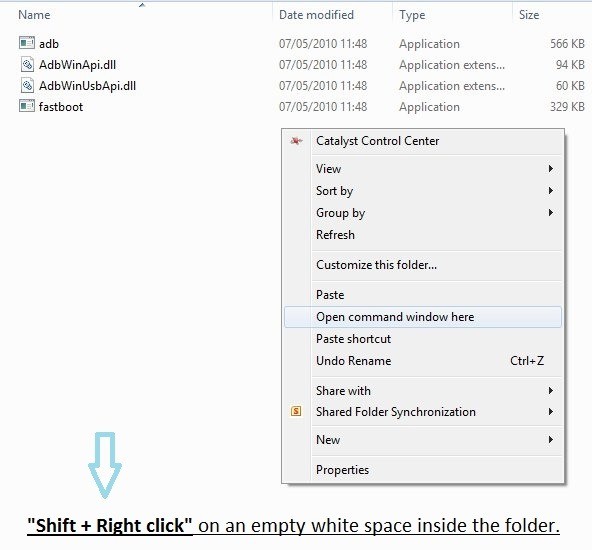
- Then open a Command prompt window inside the fastboot folder. To do that: “Shift + Right Click” on any empty white space inside the folder and select the ‘Open command window here’. See image below:
- Now type the following in the command prompt window and press Enter:
fastboot devices
You will get a string of random numbers and letters on the screen as shown in screenshot below, this is to ensure that your device is detected, if nothing appears on-screen with this command, then it means you don’t have the proper drivers installed on your PC. And if that’s the case you should download and install/re-install the HTC Sync software given in Step 2.1. And also restart your PC if required.

- Now, keep the command prompt window open. Then, copy the recovery-ra-vigor-3.15-gnm.img file obtained in step 5 to the fastboot folder extracted in step 6, so that you have a total of 5 files inside the fastboot folder.
- Then, enter the following command in command prompt, then press Enter to flash the recovery on your phone:
fastboot flash recovery recovery-ra-vigor-3.15-gnm.img - You will get a finished/OKAY message after recovery has been flashed. Then, reboot the phone by typing fastboot reboot and pressing Enter in the command prompt window.
- That’s it. AmonRa recovery has been installed on your HTC Rezound. To try it out, turn off the phone and boot into bootloader mode as given in step 7 above. Then, highlight the Recovery option and select it using the Power key to enter AmonRa recovery.

AmonRa recovery is now installed on your HTC Rezound, which you can use to flash custom ROMs on the phone. Let us know how it works for you, in the comments below.


30 responses to “AmonRa Style Recovery for HTC Rezound [Installation Guide]”
i’ve spent many hours and tryed the other threads on this and this one got it done. thanks guys, now i might be able to get some sleep. is there a way to get in touch if i need more help.
Thanks. Sure, just ask using the comments system here and it will be okay, we’ll try our best to solve your problem.
Ok so I got s off and now my sd card or my internal sd won’t work. keep gettin error message that says kernal still uses old table and something about something being busy.
I was useing cmd on windows 7
What did you do exactly?
YEA! and a million thank you’s! I wish you could know how much fun I had doing this and thanks to you what a great sense of achievement I earned. Just awesome!
Thanks bud! and yep, it’s so awesome, esp the first time.
YEA! and a million thank you’s! I wish you could know how much fun I had doing this and thanks to you what a great sense of achievement I earned. Just awesome!
Thanks bud! and yep, it’s so awesome, esp the first time.
did not work for me. in the cmd screen after entering
fastboot flash recovery recovery-ra-vigor-3.15-gnm.img
i get
sending ‘recovery’ (7078 KB)… OKAY [ 1.534s] writing ‘recovery’… INFOsignature checking…FAILED (remote: signature verify fail)finished. total time: 3.472s
can you help?
I get the same message. I think there is a missing step? I did this crap several times.
Thanks a lot, your instruction save my phone and my money…
Thanks a lot, your instruction save my phone and my money…
Thanks a lot, your instruction save my phone and my money…