Google Sheets is structured to add and evaluate datasets easily but you can always tweak them to make large sets of values more presentable. One way to do so is by adding alternating colors to rows and columns which can instantly improve your spreadsheet’s appearance.
In this post, we’ll help you understand what alternating colors are all about and how you may add them to Google Sheets.
What are alternating colors on Google Sheets?
When you apply alternating colors, your spreadsheet will instantly look a lot better than the original layout. Each row or column is differentiated from adjacent ones and this makes it easy for readers to view and analyze the data you’ve added inside the sheet.
You can customize the alternating colors to be applied to either rows or columns in your spreadsheet with colors of your choice. Adding an alternating color to your spreadsheet will also let you isolate tabular data from other data sets you’ve entered. This way, you can create different data sets in your spreadsheet and apply alternating colors to distinguish them from other elements.
How to add alternating colors in Google Sheets [4 methods]
Alternating colors can be added to both rows and columns inside Google Sheets and here are all the ways you can use them inside your spreadsheet.
Method 1: Add alternating colors to rows
- Before you add alternating rows to your spreadsheet, you need to first select the cells you want to apply this appearance to.
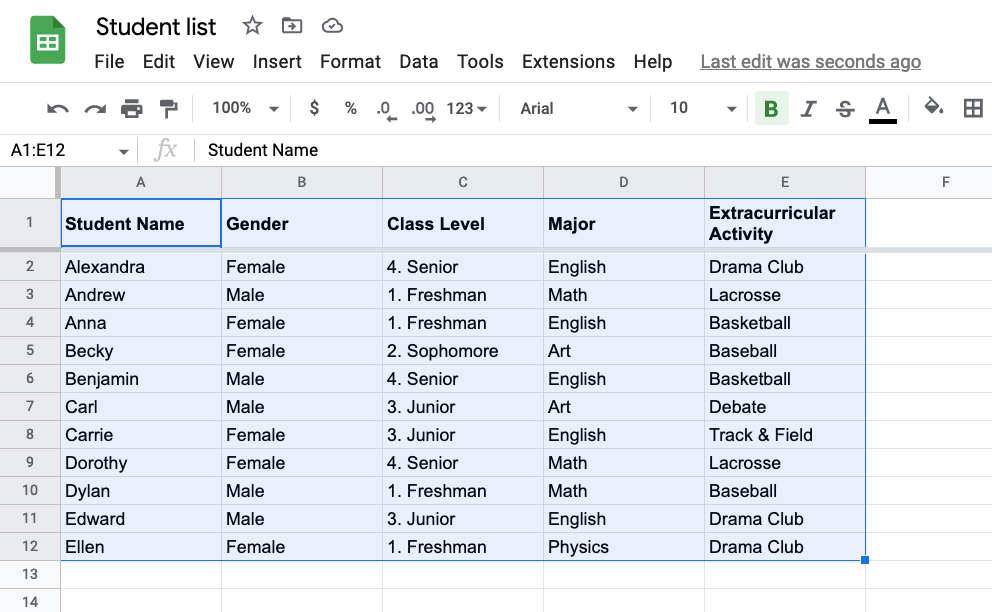
- When the cells are selected, click on the Format tab from the top toolbar and select Alternating colors.
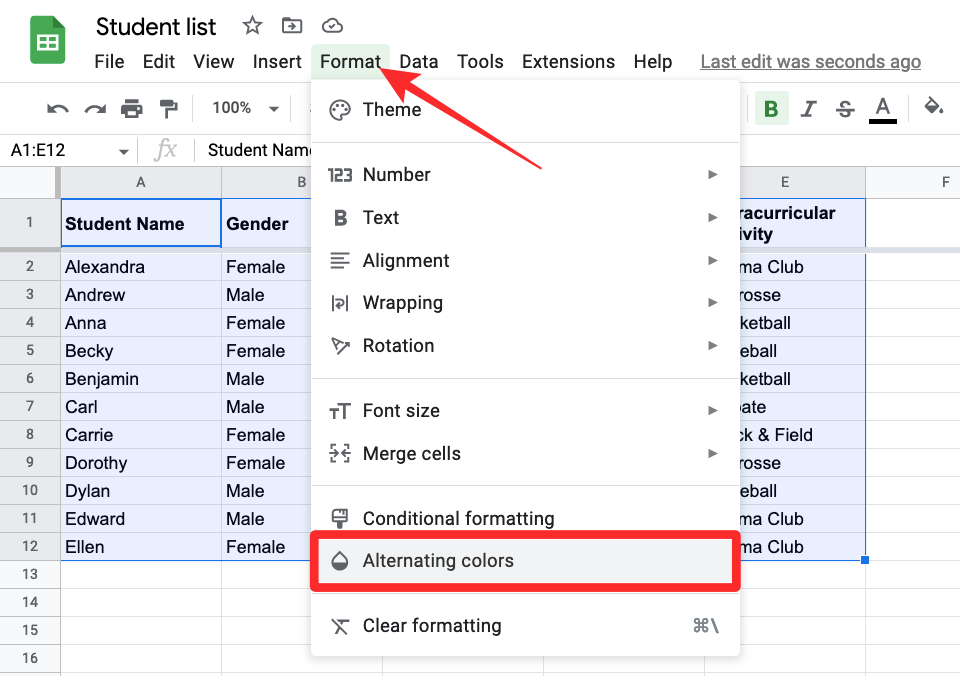
- Google Sheets will now apply alternating colors to your spreadsheet with the default color set at grey. The header’s colors will be slightly darker than other rows. If you had previously applied color to the header’s background, that will be replaced with the colors you pick here.
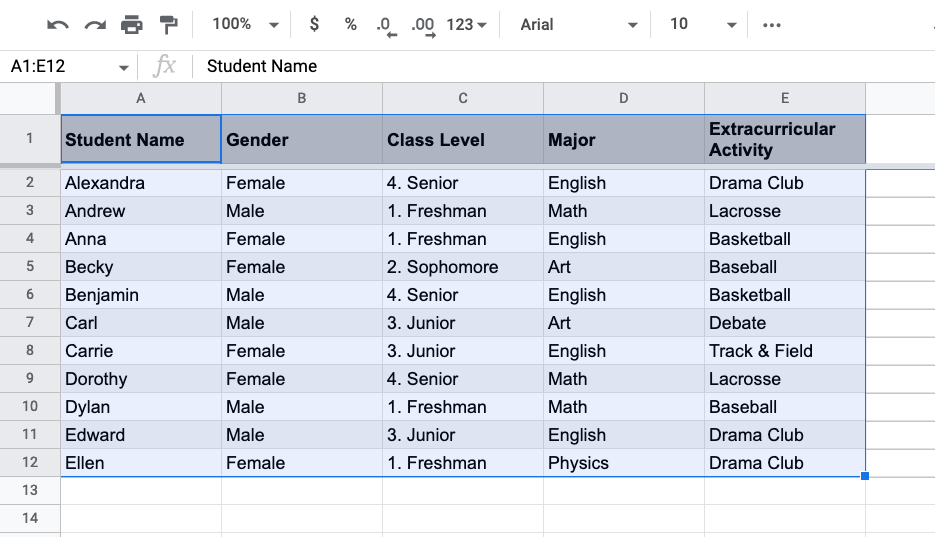
- You will also see the Alternating colors sidebar on the right-hand side of the screen. In this sidebar, you can customize the following options.
Apply to range: Here, you can select the range you want to apply alternating colors in.
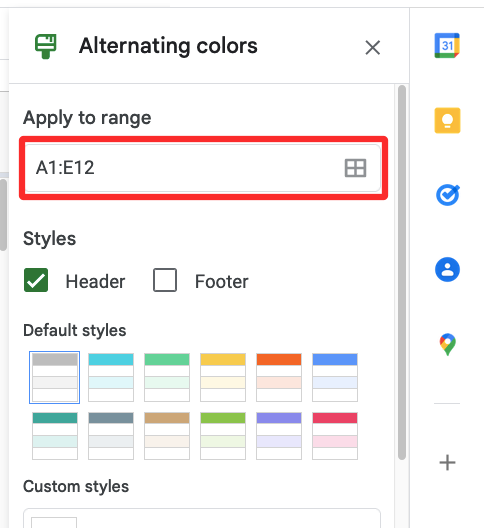
Head and Footer: Checking these boxes will add a darker shade to the header or footer of the cell range, depending on which of the two you enable.

Default styles: You get 12 color options to apply to your sheet.
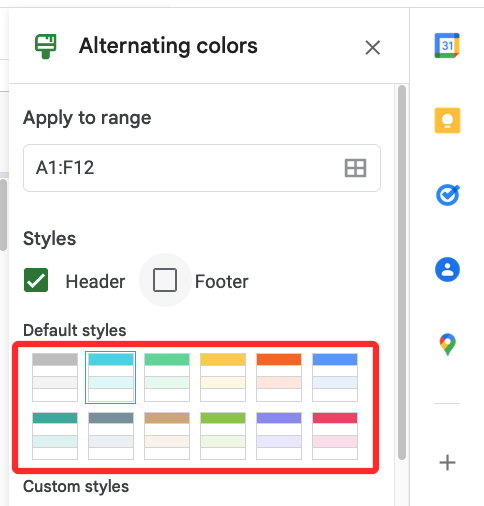
Custom styles: If you aren’t satisfied with the default styles that Sheets offers, you can create your style by clicking the + icon inside this section.

From there, you can apply different colors for the Header, Color 1, and Color 2 boxes.

- Once you’re done making all the changes, click on Done at the bottom.

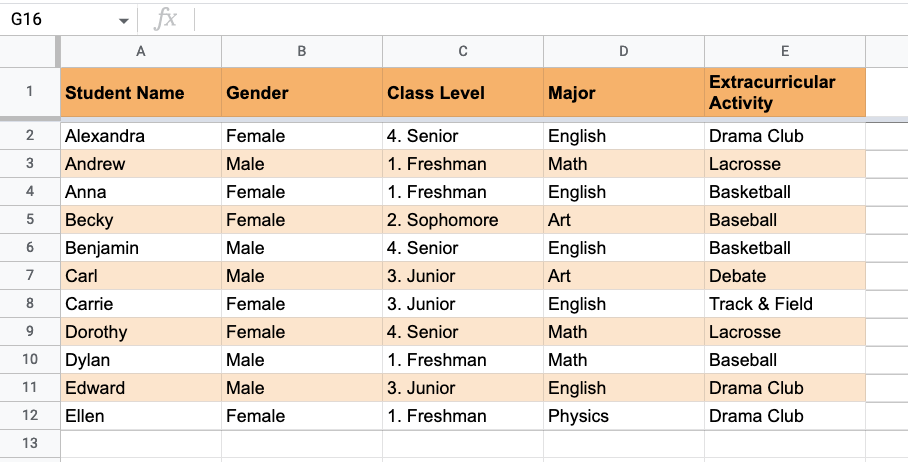
- Your spreadsheet will now look something like this.
Method 2: Add alternating colors to columns
Google Sheets’ native Alternating colors feature applies to rows only by default but there’s still a way to add them to columns in a spreadsheet using Conditional Formatting.
- Before applying alternating colors to columns, select the cell range you want to edit.
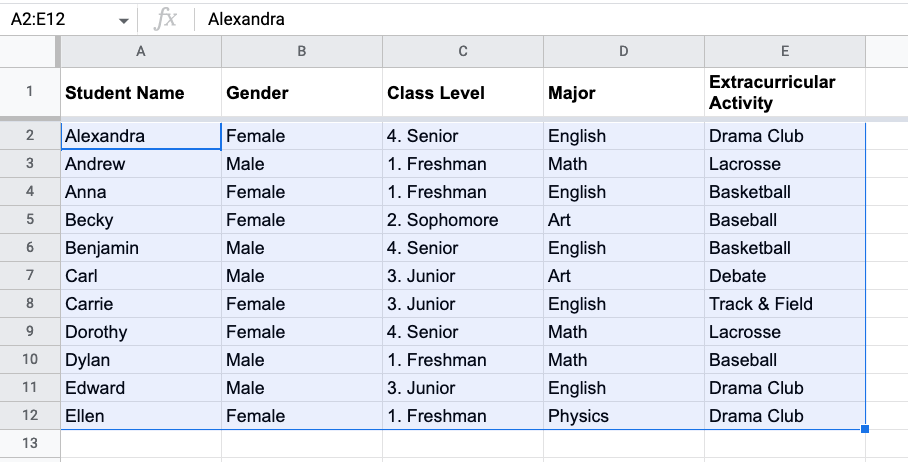
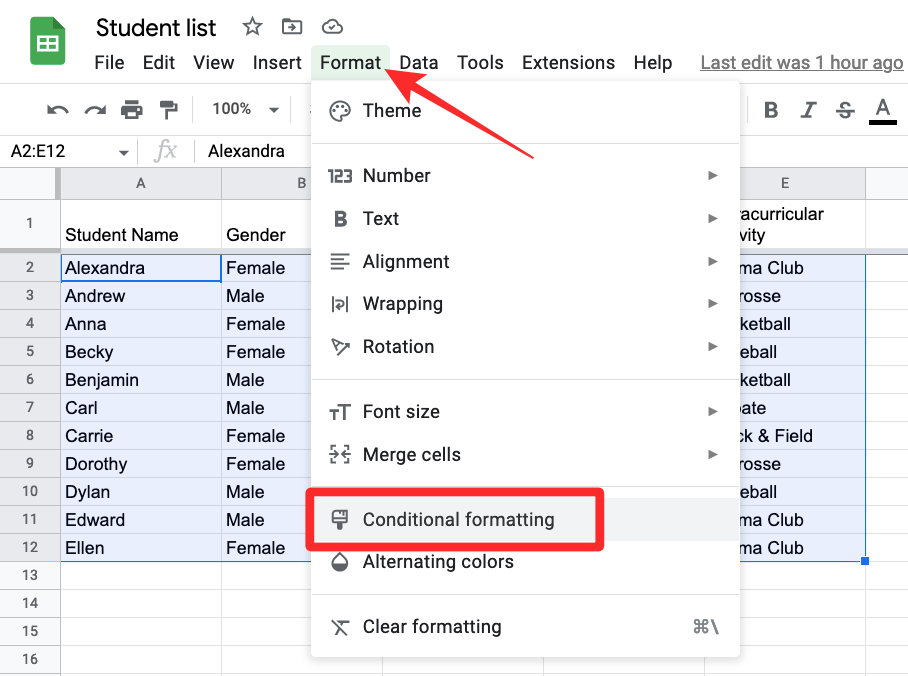
- When selected, click on the Format tab from the top toolbar and then select Conditional Formatting.
- You should see the Conditional format rules sidebar on the right-hand side. In this sidebar, click on the dropdown under Format cells if.
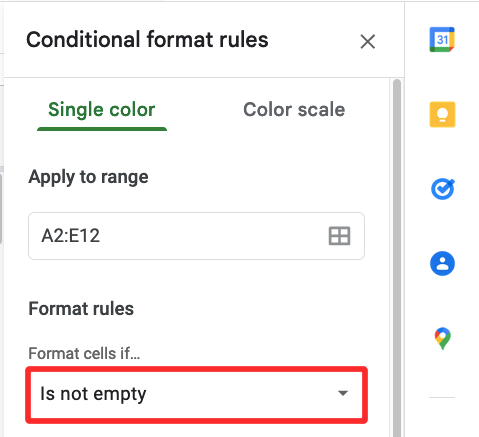
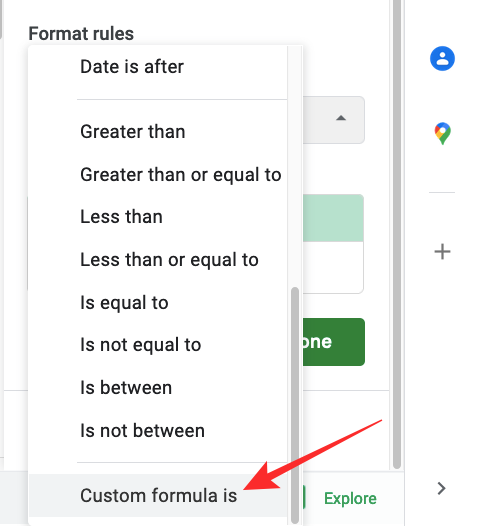
- In the list of options that appears, select Custom Formula Is.
- After that, type the following formula inside the text box that appears below – =ISEVEN(COLUMN()).
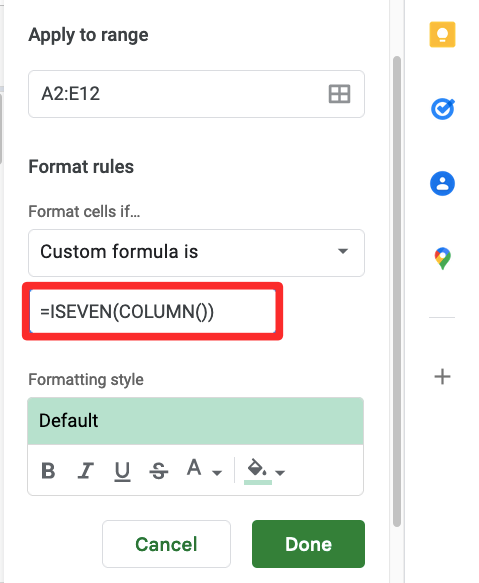
- After entering the formula, you should be able to see a preview of the spreadsheet with alternating columns.
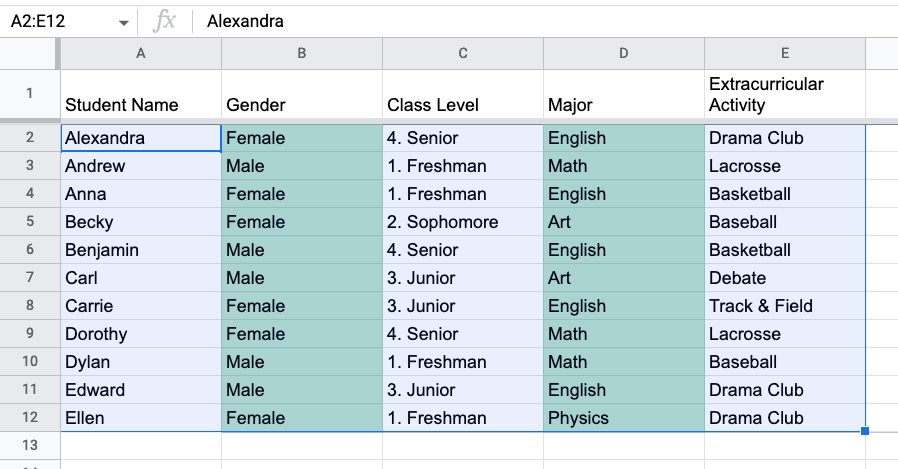
- By default, Sheets applies a green color to the spreadsheet. To change this, click on the Fill color icon (the one indicated by a paint bucket) under “Formatting Style”.
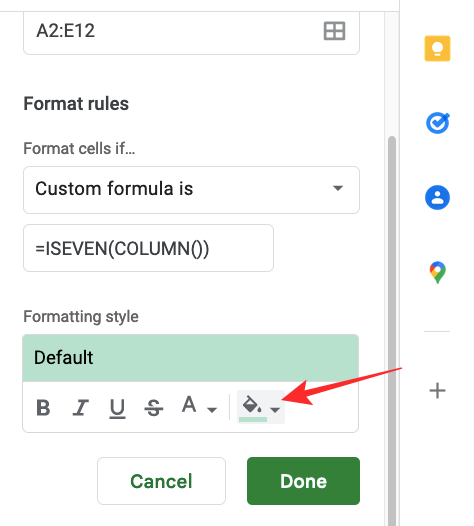
- Here, select the color you wish to add to alternating columns of the spreadsheet.

- Once you’ve chosen a color, click on Done.
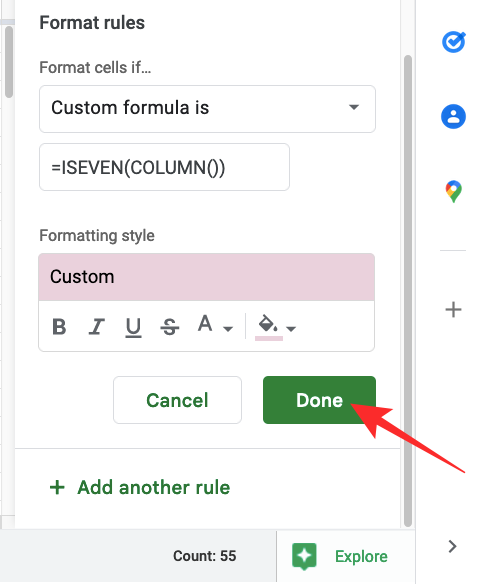
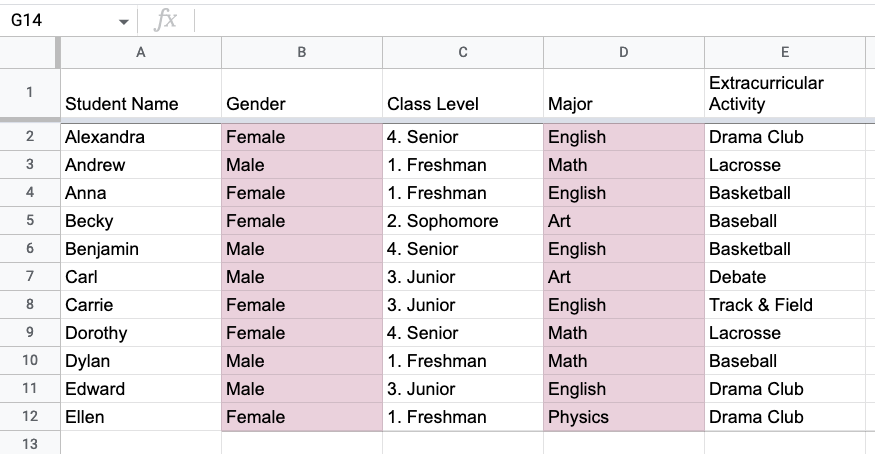
- Sheets will apply the chosen color to even-numbered columns of the selected cell range (i.e., columns 2,4,6, and so on) while other columns will be set to white.
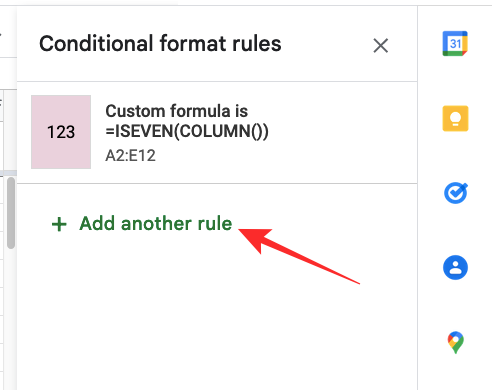
- To choose a custom color for odd-numbered columns as well, click on Add Another Rule inside the Conditional format rules sidebar on the right. If you accidentally closed the sidebar, you can access it by going to Format > Conditional formatting from the toolbar at the top.
- You’ll now be creating a rule to color the other columns of the spreadsheet. To do that, click on the dropdown under Format cells if and select Custom Formula Is.
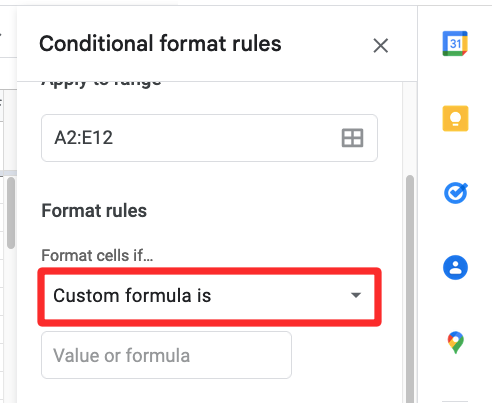
- In the text box that appears, enter the following formula – =ISODD(COLUMN()).
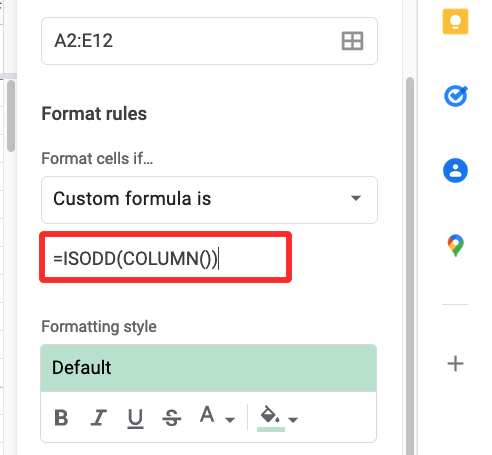
- Now, click on the Fill color icon under “Formatting Style”.
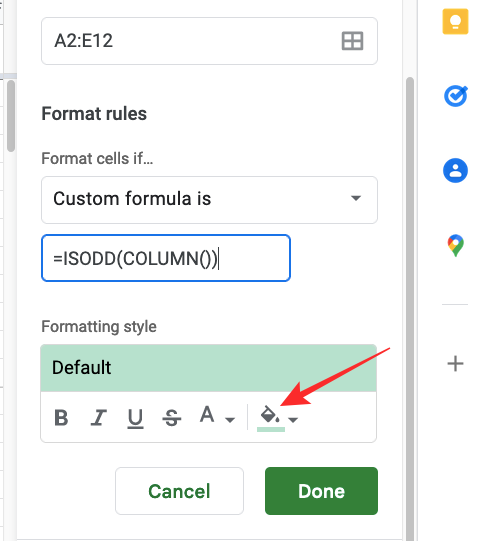
- In the overflow menu, pick a color you want to apply to the other columns.

- When you’ve chosen the color, click on Done at the bottom.
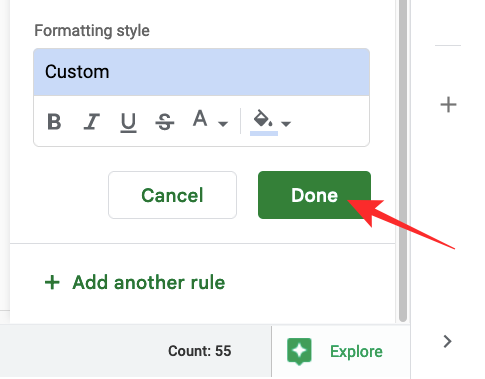
- Your spreadsheet will now be formatted with alternating colors for columns.
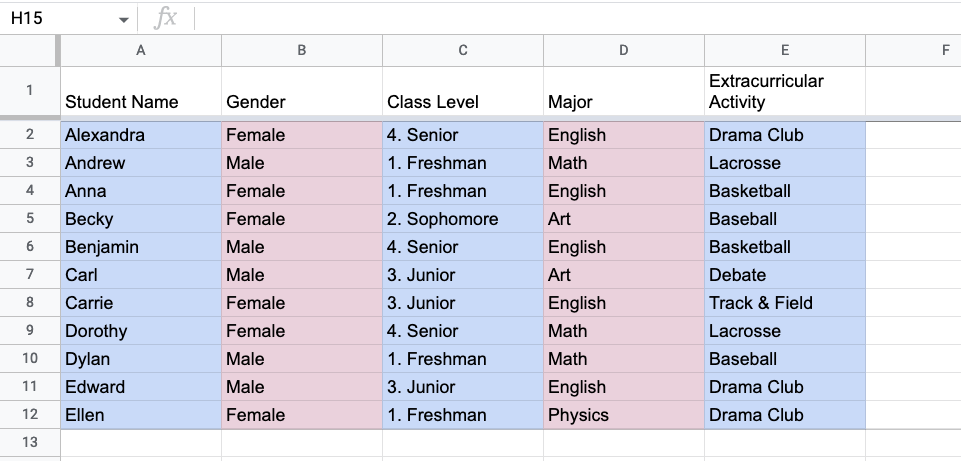
Method 3: Add alternating colors to every “n” rows
By default, when you add alternating colors to rows to your spreadsheet, Google Sheets adds the assigned color to every other row, so it appears after a gap on one row. You can, however, also add alternating colors after every second, third, or nth row in your sheet using Conditional formatting.
To apply alternating colors to every nth row, we’ll use this formula for conditional formatting – =MOD(ROW(),n)=0, where n is the position of the row on which you want to add the chosen colors.
In this instance, we’ll try adding colors to every third row in your spreadsheet.
- To get started, select the cell range where you want to apply alternating colors.
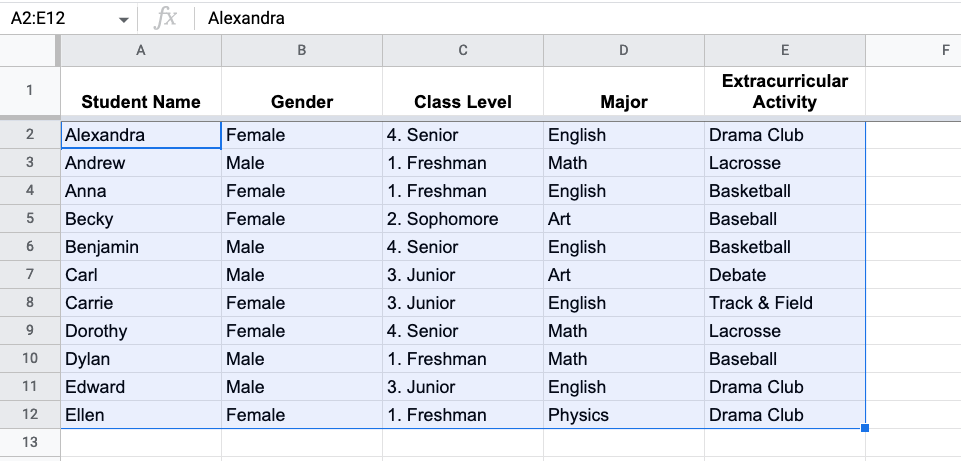
- With the preferred cells selected, click on the Format tab from the toolbar at the top and select Conditional formatting.
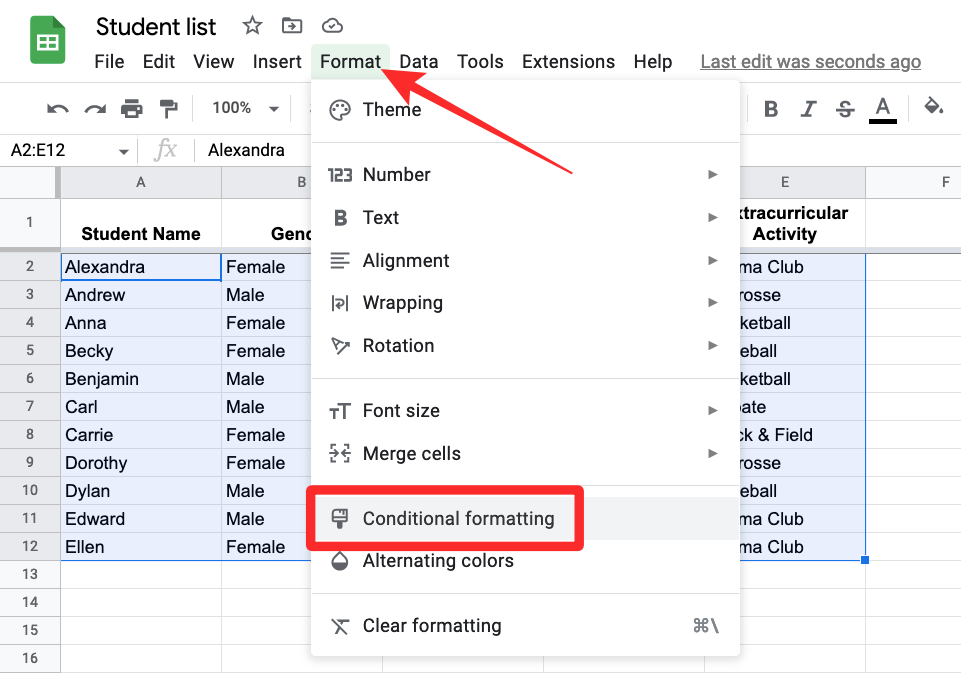
- You should see the Conditional format rules sidebar appear on the right-hand side. Inside this sidebar, click on the dropdown under Format cells if.

- In the list of options that appears, select Custom Formula Is.

- After that, type the following formula inside the text box that appears below – =MOD(ROW(),3)=0.
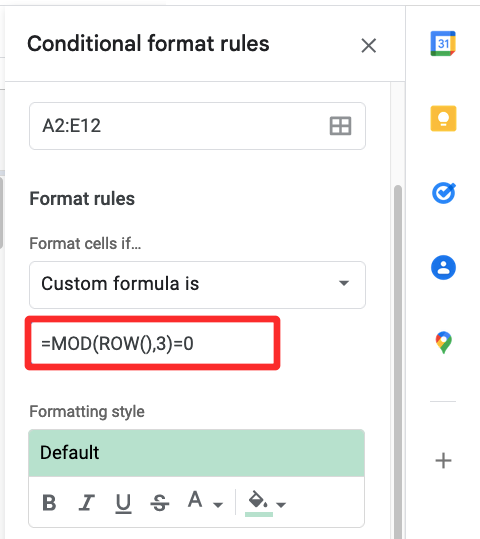
- After entering the formula, you should be able to see a preview of the spreadsheet with alternating rows.
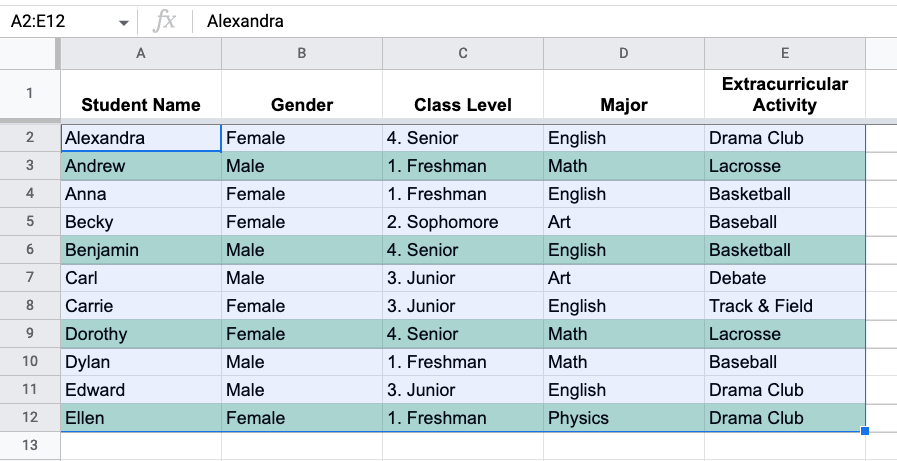
- By default, Sheets applies a green color to the spreadsheet. To change this, click on the Fill color icon (the one indicated by a paint bucket) under “Formatting Style”.
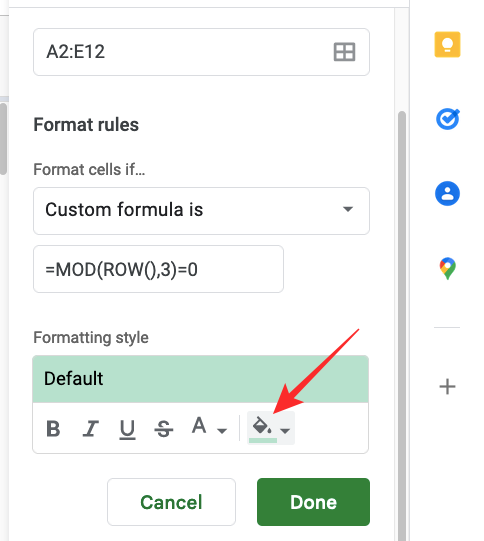
- Here, select the color you wish to add to alternating rows of the spreadsheet.
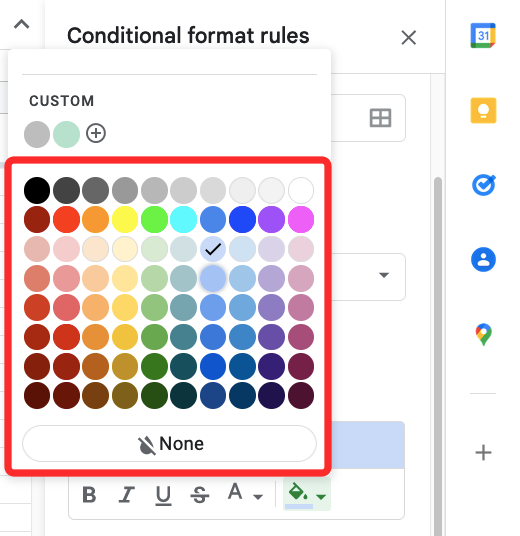
- Now, click on Done.
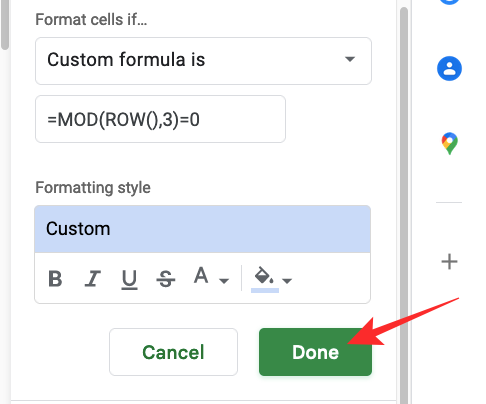
- The result will look something like this.

Method 4: Add alternating colors to every “n” columns
When you use method #2 to apply alternating colors to columns in your spreadsheet, Sheets will assign a chosen color to every other column leaving a gap of one column every time. If you wish to add alternating colors to your spreadsheet every nth column, then you’ll need to use another formula to get it done.
To apply alternating colors to every nth column, we’ll use this formula for conditional formatting – =MOD(COLUMN(),n)=0, where n is the position of the column on which you want to add the chosen colors.
In this instance, we’ll try adding colors to every third column in your spreadsheet.
- To get started, select the cell range where you want to apply alternating colors.
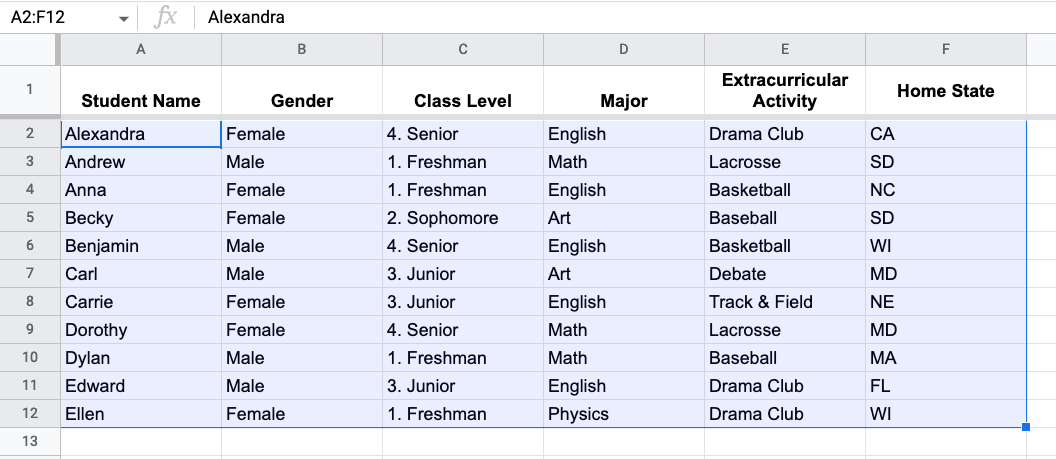
- With the preferred cells selected, click on the Format tab from the toolbar at the top and select Conditional formatting.
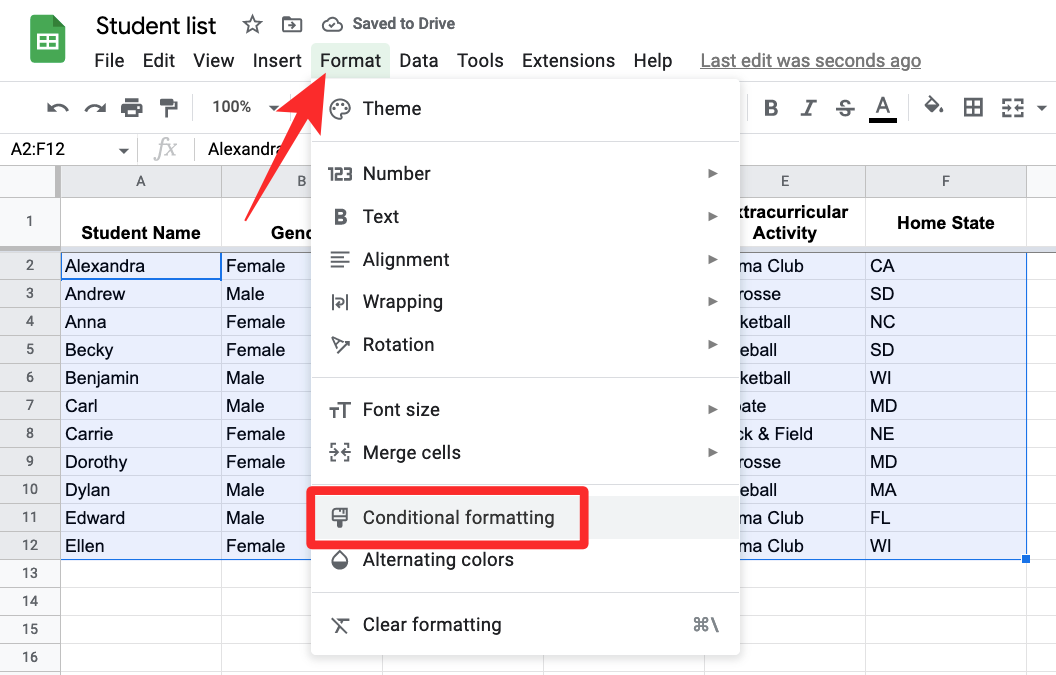
- You should see the Conditional format rules sidebar appear on the right-hand side. Inside this sidebar, click on the dropdown under Format cells if.
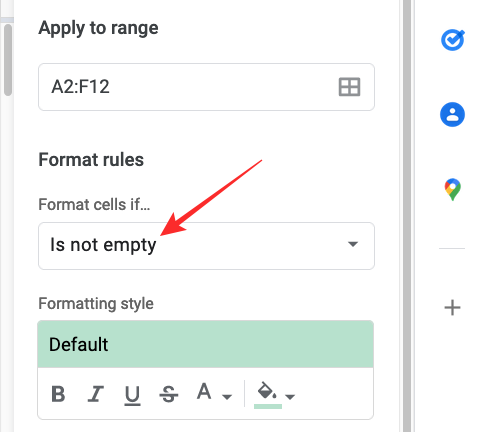
- In the list of options that appears, select Custom Formula Is.
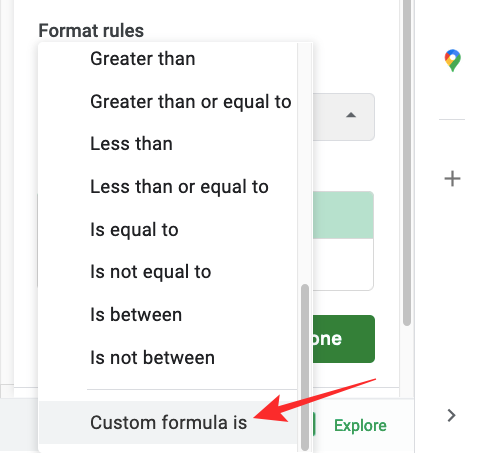
- After that, type the following formula inside the text box that appears below – =MOD(COLUMN(),3)=0.
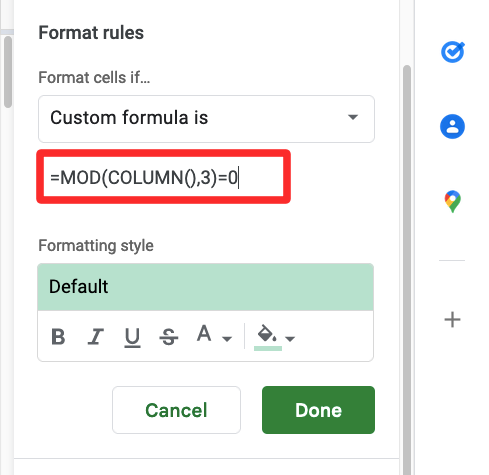
- After entering the formula, you should be able to see a preview of the spreadsheet with alternating columns.
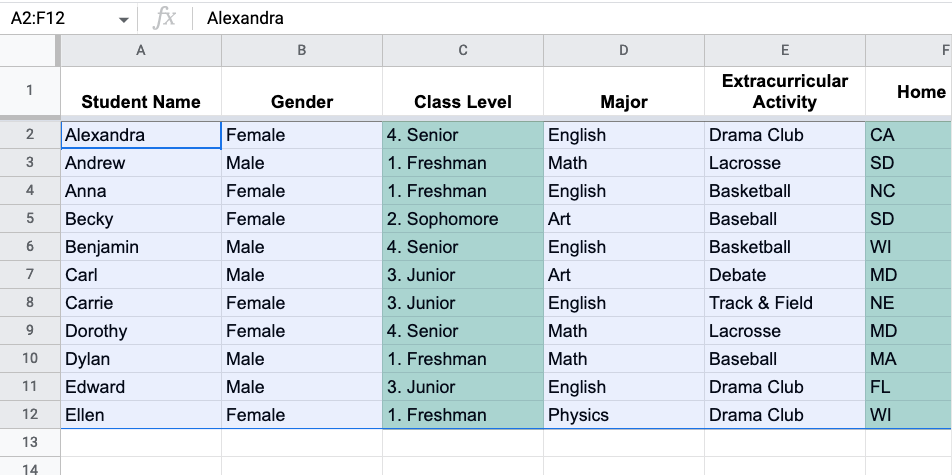
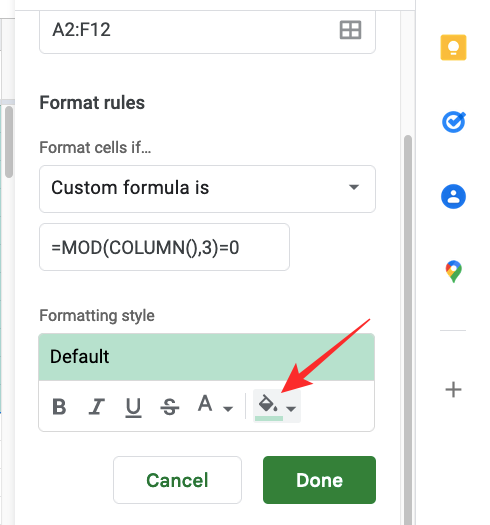
- By default, Sheets applies a green color to the spreadsheet. To change this, click on the Fill color icon (the one indicated by a paint bucket) under “Formatting Style”.
- Here, select the color you wish to add to alternating rows of the spreadsheet.

- Now click on Done.
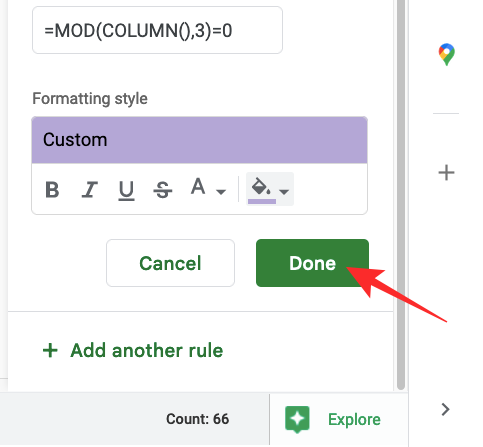
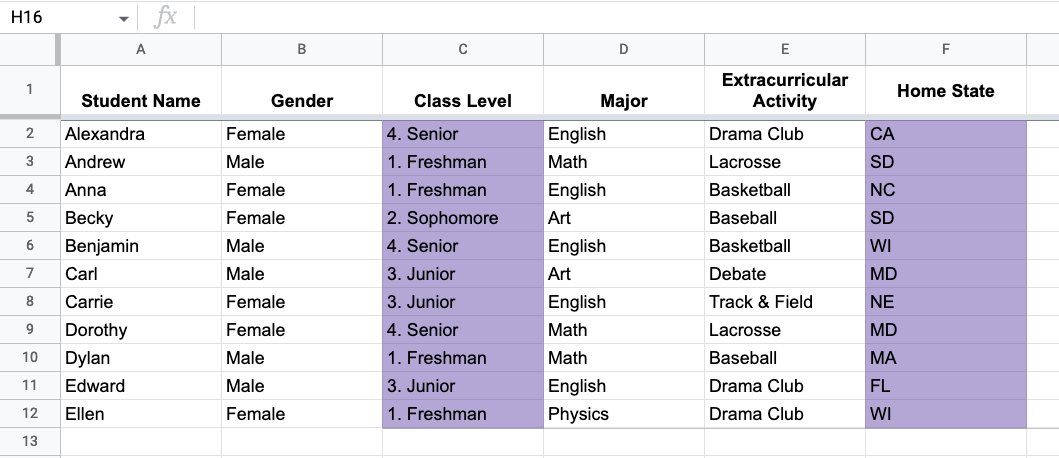
- The result will look something like this.
How to remove alternating colors on Google Sheets
Regardless of how and where you applied alternating colors in your spreadsheet, removing them entirely from Sheets is pretty easy. However, you can also choose to remove specific elements from the spreadsheet if you use Conditional formatting.
Method 1: Remove alternating colors entirely from a cell range
- To remove alternating rows or columns entirely, select the cell range where you’ve applied this formatting.
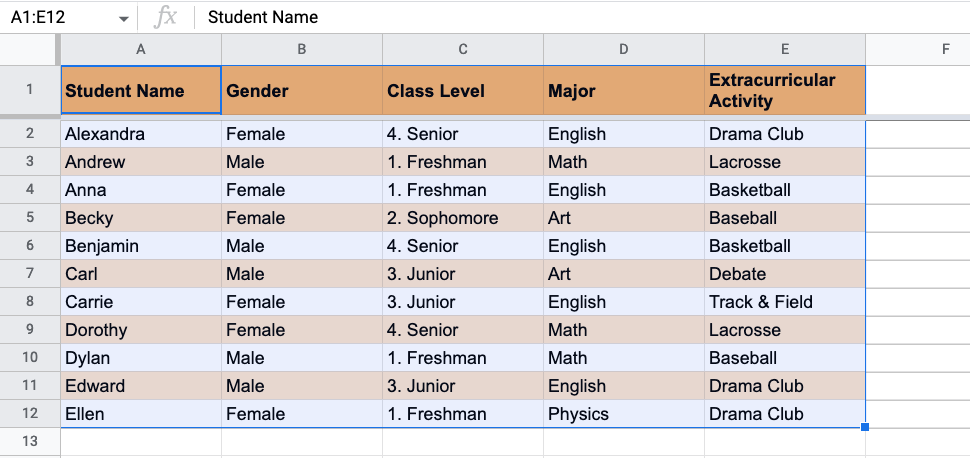
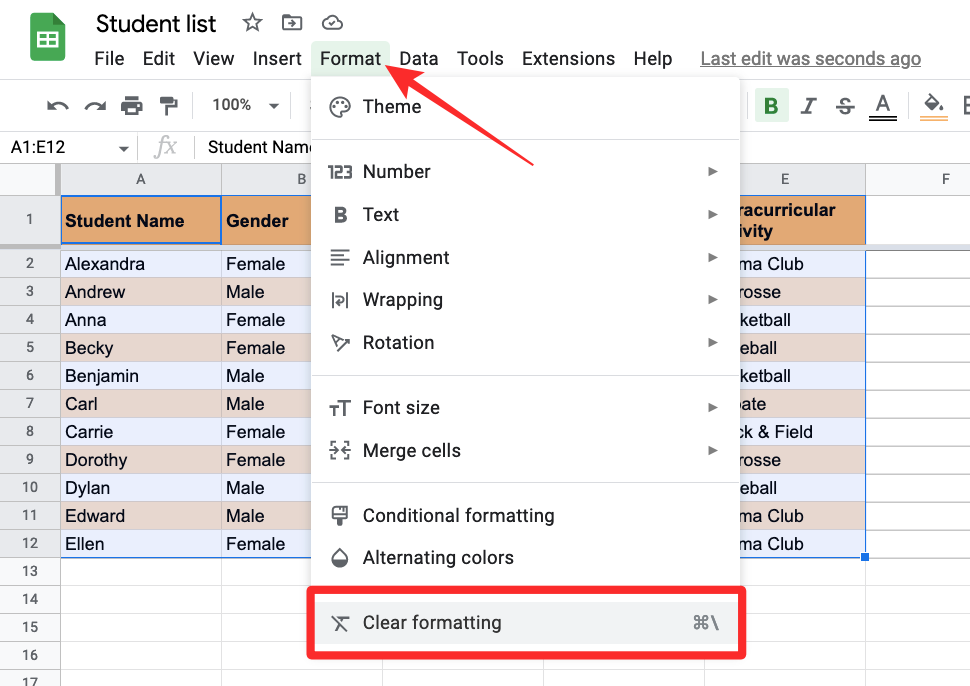
- With the cells selected, click the Format tab from the top toolbar and select Clear formatting.
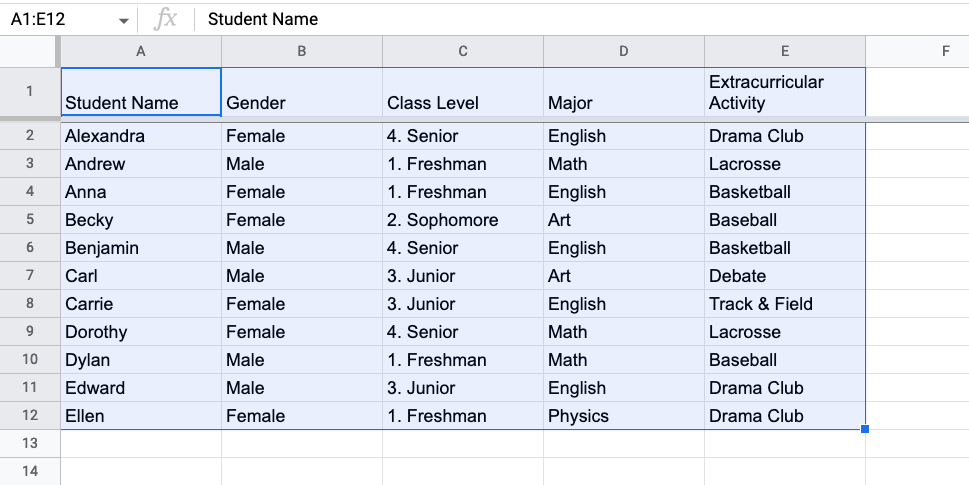
- The alternating colors will be removed everywhere inside the selected range.
Method 2: Remove specific conditional formatting
Suppose you used conditional formatting to apply alternating colors. In that case, you can edit and remove certain elements from the sheet, so that not all the formatting you applied is removed from your spreadsheet.
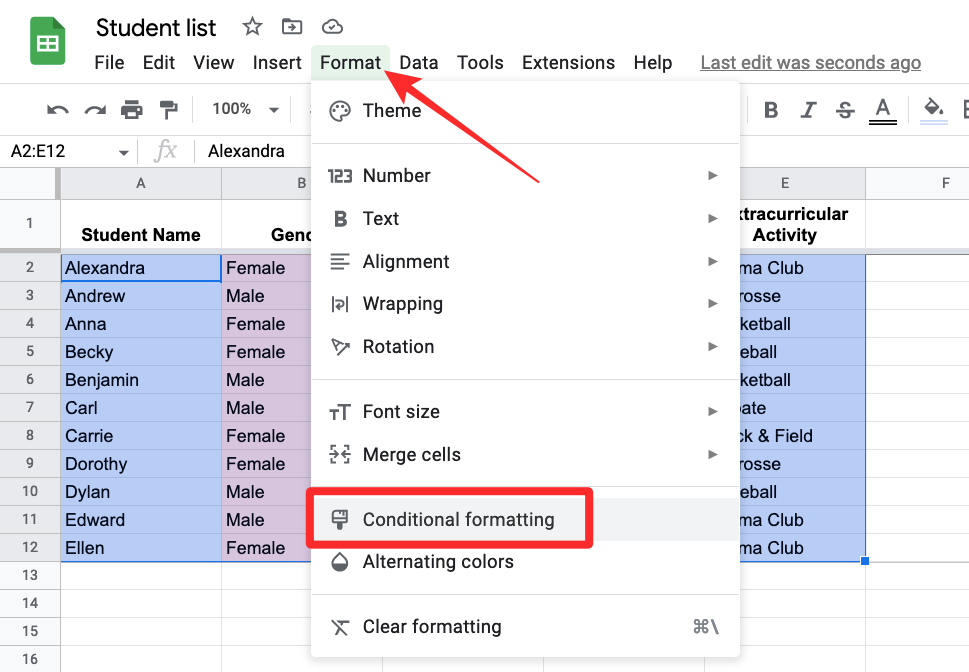
- Select the cell range where you applied alternating colors and then go to Format > Conditional Formatting from the toolbar at the top.
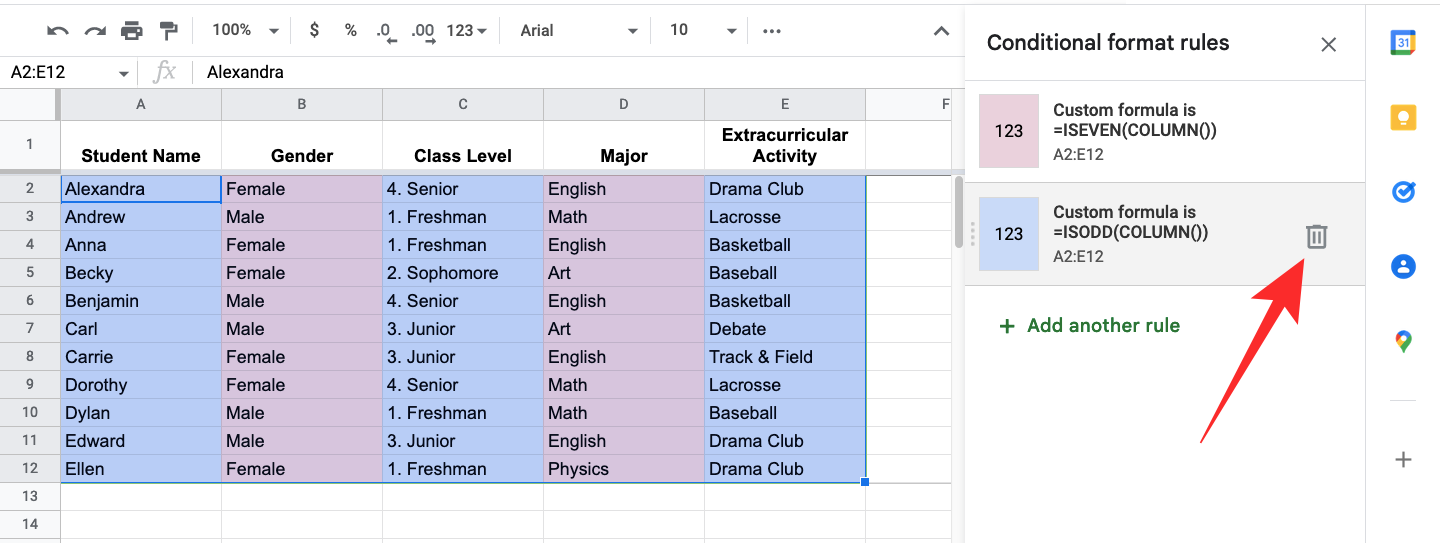
- When the Conditional format rules sidebar appears, locate the rule you want to remove and then click on the Trash icon on its right-hand side.
- Sheets will remove the selected rule from your spreadsheet.
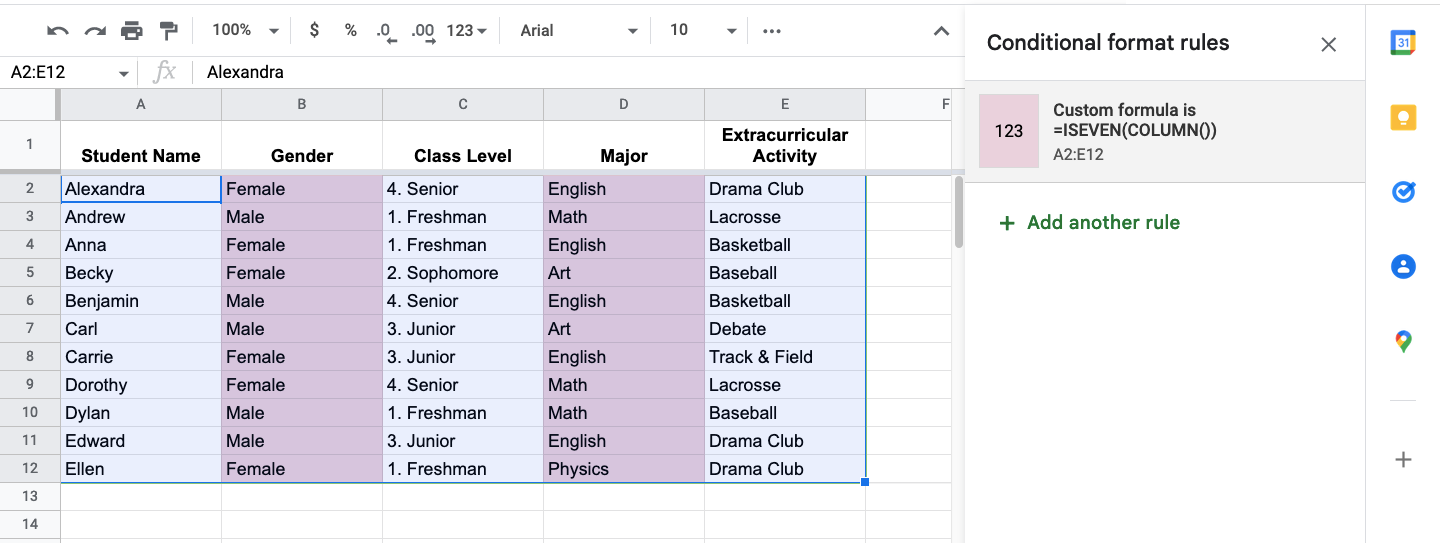
You can use this method when you want to delete only one of the rules you applied to your spreadsheet.
That’s all you need to know about adding alternating colors on Google Sheets.


![Solution For Quiz - Where Did the Dragon Hall Deal a Major Blow to the Khitan Navy [Where Winds Meet]](/content/images/2026/01/1-15.png)


Discussion