In SAND: Raiders of Sophie, stop spreading resources across tempting tech nodes early and prioritize Trampler upgrades that improve extraction consistency: weight capacity, cargo, reactor/motor progression, and maneuverability before expensive combat or shop-item unlocks.
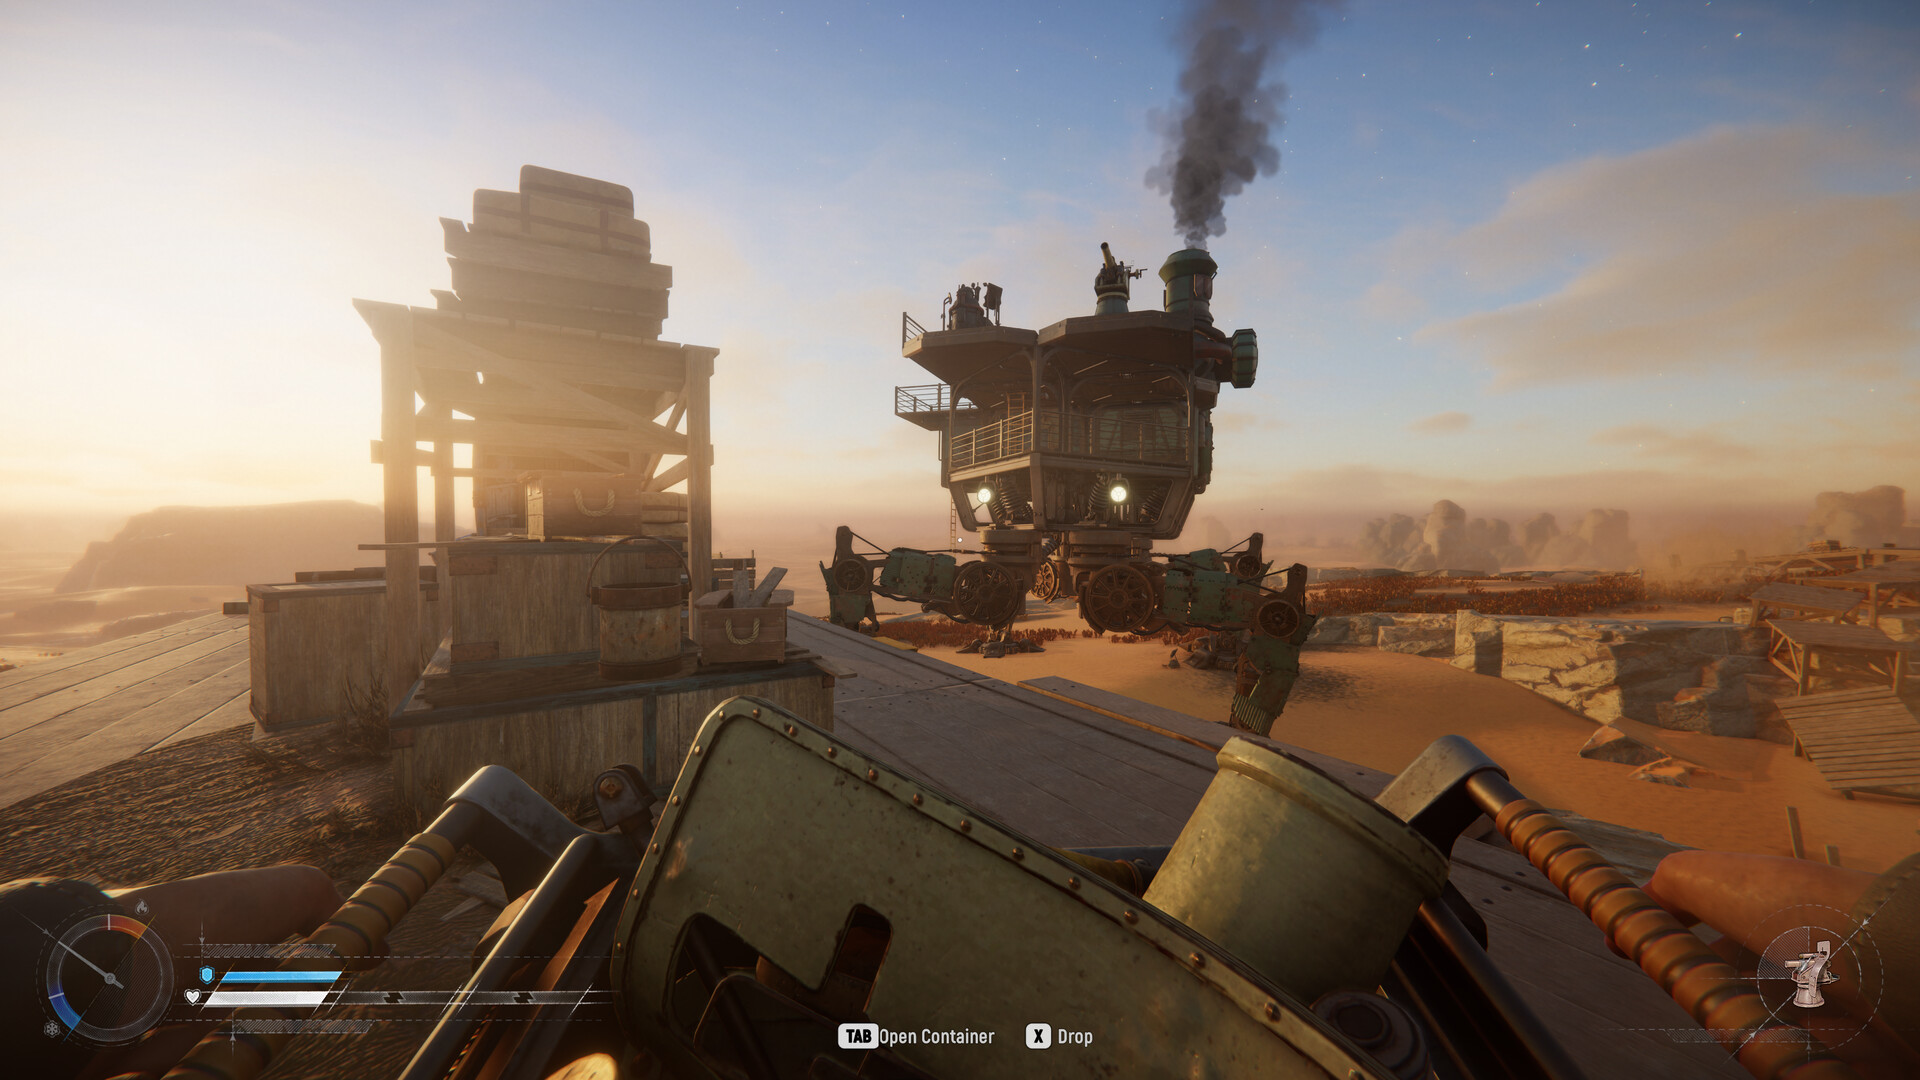
SAND: Raiders of Sophie is built around a simple but punishing loop: prepare in the hangar, deploy the Trampler, activate its reactor, loot, extract, and turn that salvage into better runs. The early tech tree should serve that loop before anything else. If a node does not help you carry more, move better, power the Trampler more reliably, or bring loot home more often, it can usually wait.
- Build the tech tree around extraction
- Hidden lower tier in the tech tree
- Prerequisites can jump between branches
- Early tech priorities that save resources
- Blue, orange, and green branch roles
- Shop nodes still need a purchase
- Resources traps that slow early runs
- Combat and armor timing
- Frequently Asked Questions
Build the tech tree around extraction
The early mistake is treating the tech tree like a checklist. It is not a checklist. Every unlock costs resources that could have gone into a better Trampler, and a better Trampler is what lets you survive raids, reach loot routes, and extract with enough salvage to keep progressing.
That does not mean there is one mathematically perfect route for every player. Your best next node depends on what is currently limiting your runs. If you are hitting weight limits, push capacity. If your Trampler is sluggish as it gets larger, work toward movement and motor/reactor upgrades. If your runs are ending with full pockets and no space, cargo and storage become the better spend.
Use the tech tree as an extraction tool first and a combat toy box second. Weapons, armor, cannon mounts, and shop gear matter, but they pay off more once your Trampler economy is already stable enough to fund them.
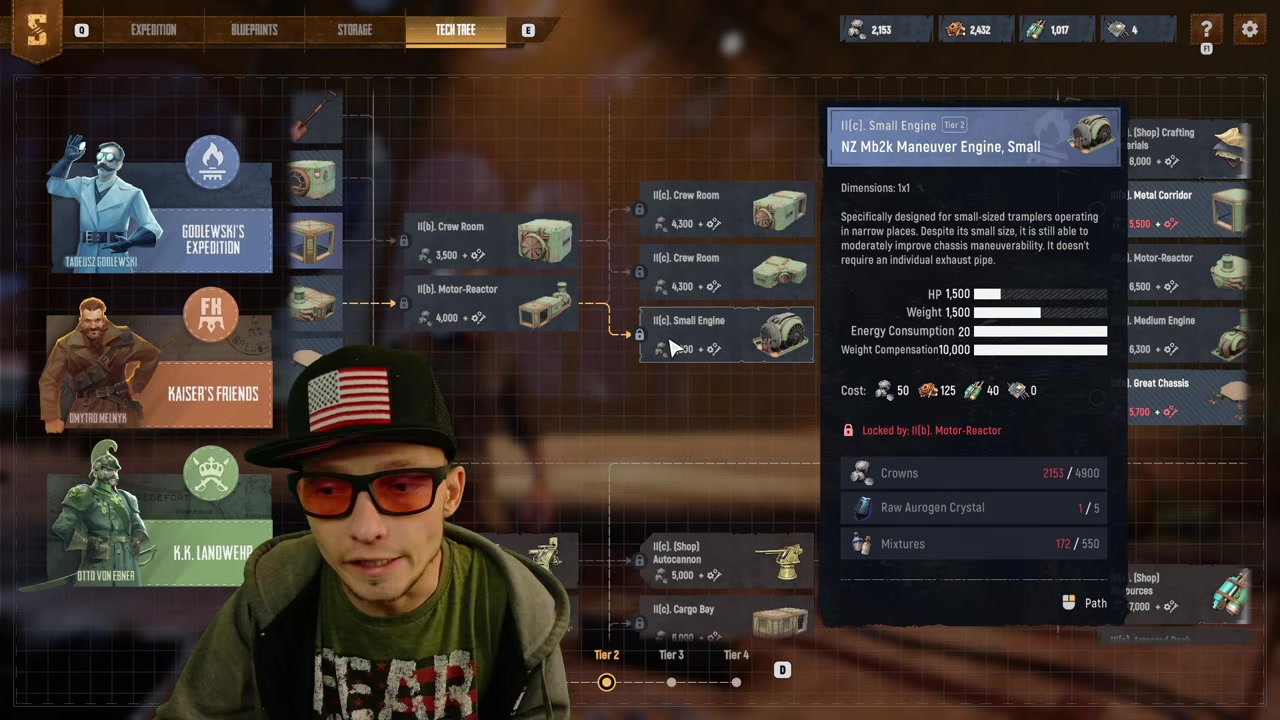
The tech tree has a lower section that is easy to miss because it is not exposed by normal scrolling alone. Click-and-drag downward inside the menu to reveal a third bottom tier.
Click-and-drag the tech tree downward before spending early materials so you can see the hidden lower tier and avoid planning around only the visible nodes.
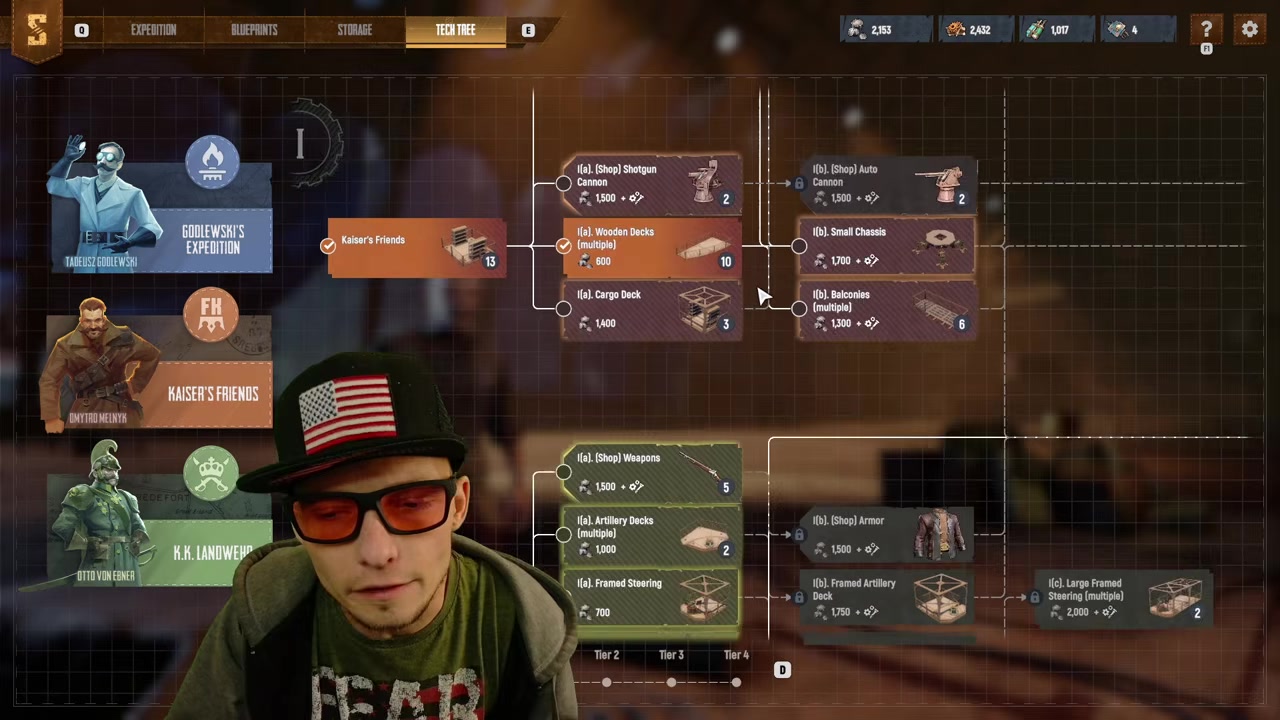
Prerequisites can jump between branches
The layout can look more linear than it actually is. A route may appear to move cleanly from Stairs to Frame Stairs to Wooden Corridor and then into Crew Room, but the requirement chain can pull from a different-looking part of the tree.
In the Crew Room example, the later Crew Room node requires Captain’s Cabin first. Captain’s Cabin, in turn, traces back to the earlier Crew Room. So even when nodes look connected, the real requirement may be an earlier or upper-branch unlock you skipped.
Early tech priorities that save resources
| Priority | Tech focus | Why it matters | Source-supported examples | When to delay it |
|---|---|---|---|---|
| 1 | Weight capacity and basic Trampler economy | Lets you build a sturdier Trampler without hitting the chassis limit too early. | Middling Chassis raises capacity from 20,000 to 35,000; Wooden Corridors weigh 400 each. | Delay only if your current build is far below the cap and movement or power is the real problem. |
| 2 | Movement, legs, reactor, and motor progression | Keeps larger Trampler usable and supports longer, safer runs. | Small Engine, motor/reactor chain, legs and reactor priority. | Delay if you cannot afford the prerequisites or your current weight cap blocks the build first. |
| 3 | Storage and cargo | Turns successful raids into better progression by letting you extract more salvage. | Orange path storage and cargo holds; early 1×2 Cargo holds as a strong logistics target. | Delay if you are dying before extraction or not filling your current space. |
| 4 | Utility shop items | Useful only when you can also afford the shop purchase after the node is unlocked. | Energy Rod becomes buyable after its tech node. | Delay if unlocking the node would leave you unable to buy the item. |
| 5 | Weapons, armor, cannon mounts, and higher-tier combat options | Improves fighting power, but does not fix a weak extraction economy by itself. | Green path weapons and armor; orange higher-tier cannons; tier-three armor plates. | Delay until your Trampler can reliably loot, survive, and extract. |
Your first priority should be the Trampler’s ability to keep producing successful extractions. That means weight capacity, cargo space, reactor and motor progression, and maneuverability before expensive combat paths.
Middling Chassis is a strong early target because it raises weight capacity from the original 20,000 to 35,000. That matters fast once you start using heavier build pieces. Wooden Corridors, for example, weigh 400 each, so the original chassis can feel tight once you add protection and more structure.
After capacity, start thinking about movement and power. Small Engine improves Trampler maneuverability, but it sits behind the motor/reactor progression path, so it is not a one-click pickup. If your Trampler is getting larger and harder to handle, this route becomes much more valuable.
Cargo is the other early economy pillar. Early 1×2 Cargo holds are reported as a strong quick unlock, but treat them as a practical recommendation rather than a universal law: they matter most when your runs are limited by how much salvage you can bring back.
Blue, orange, and green branch roles
| Branch | Main focus | Examples mentioned | Best for |
|---|---|---|---|
| Blue path | Trampler speed, maneuverability, motor/reactor progression | Small Engine, motor/reactor chain | Making larger Trampler easier to control and keeping movement upgrades on track. |
| Orange path | Storage, cargo holds, and higher-tier cannons | Storage, cargo holds, higher-tier cannons | Improving extraction capacity first, then adding heavier firepower later. |
| Green section | Shop weapons, armor, Trampler compartments, and armor plates | Weapons, armor, flywheel compartments, artillery compartments, cannon mounts, tier-three armor plates | Combat specialization once the Trampler economy can support it. |
The three visible color paths are best treated as broad roles, not full verified node lists. Exact costs, material prices, timers, multipliers, and full prerequisites may change, so check the in-game tree before locking in a long route.
For early planning, the split is clear enough: blue leans into Trampler movement and motor/reactor progress, orange supports storage, cargo, and higher-tier cannons, and green pushes shop weapons, armor, compartments, mounts, and later armor plates.
Shop nodes still need a purchase
Any tech nodes do not hand you the item directly. They unlock the ability to buy that item from the shop. Energy Rod is the clean example: once its node is acquired, it appears as a buyable item in the Storage tab’s shop.
Separate those shop unlocks from Trampler-building pieces. Nodes tied to building up the Trampler itself are about what you can construct or attach to the walker-fortress, while shop-item nodes are access gates for later purchases.
Resources traps that slow early runs
| Mistake | Why it wastes resources | Better move |
|---|---|---|
| Spreading resources across every branch | You end up with scattered access instead of one stronger extraction loop. | Pick the current bottleneck: capacity, movement, power, or cargo. |
| Rushing flashy combat nodes too early | Weapons and armor help fights, but they do not fix poor hauling, weak handling, or low extraction consistency. | Stabilize the Trampler first, then branch into combat. |
| Ignoring cargo capacity | You can survive a run and still lose progress by leaving too much salvage behind. | Work toward storage and cargo upgrades when your current space is filling up. |
| Missing the scrollable bottom tier | You plan around an incomplete tree and miss important lower-tier dependencies. | Click-and-drag downward in the tech tree before plotting your route. |
| Assuming every connected-looking node is available | Some nodes require earlier or upper-branch unlocks despite how the lines look. | Red the requirement text for each target node before spending. |
| Unlocking shop items without a buying budget | The node may only make the item buyable, leaving you with no usable upgrade yet. | Same enough to unlock the node and purchase the item afterward. |
The worst early spending patterns usually come from impatience. A flashy node can feel good in the menu while doing very little for the next raid, especially if your Trampler is still weight-capped, underpowered, or short on cargo.
Use this table as a quick check before spending rare materials. If the node does not improve your next few extractions or unlock something you can actually afford to use, it probably belongs later.
Combat and armor timing

Combat tech becomes a better spend once your Trampler is already doing its job. That means you can leave the hangar prepared, power the reactor, move across the dunes, reach valuable loot, and extract often enough to fund more upgrades.
At that point, the green section starts making more sense for weapons, armor, flywheel and artillery compartments, cannon mounts, and tier-three armor plates. The orange path can also support higher-tier cannons when you are ready to turn cargo-focused progression into stronger firepower.
For PvP-focused spending, stay conditional. Early player routes are still settling, and exact values are patch-sensitive, so do not treat any single combat path as a confirmed meta. Build the Trampler economy first, then specialize around the fights you are actually taking.
Frequently Asked Questions
Is there one best tech tree path in SAND: Raiders of Sophie?
No. The early priority is consistent, but the exact path is subjective. Focus first on the Trampler upgrades that improve extraction consistency: weight capacity, cargo, reactor/motor progression, and maneuverability.
How do I scroll the tech tree to see the lower tier?
Use click-and-drag inside the tech tree menu. The lower third tier can be hidden if you only look at the visible rows, and it includes important progression nodes.
Why can’t I unlock a node even though it looks connected?
The tree can look linear, but some nodes require earlier or upper-branch unlocks. For example, a later Crew Room can require Captain’s Cabin, while Captain’s Cabin traces back to the original Crew Room.
Does unlocking Energy Rods give me the item immediately?
No. Unlocking Energy Rod access makes the item buyable in the Storage tab’s shop. You still need the resources to purchase it afterward.
Should I rush Small Engine or Middling Chassis first?
Pick based on the bottleneck. If weight is limiting your build, Middling Chassis is a strong early target because it raises capacity from 20,000 to 35,000. If your growing Trampler is hard to handle, start working through the motor/reactor route toward Small Engine.
More questions⤵
When should I start spending on weapons and armor tech?
Start once your Trampler economy is stable. If you can loot, survive, carry enough salvage, and extract reliably, then combat nodes, armor, cannon mounts, higher-tier cannons, and PvP-focused upgrades become much easier to justify.
Video help