XPERIA Z ANDROID 4.3 UPDATE.
Only a day after the official release of Android 4.3 by Google, Sony announced their upgrade plans for Android 4.3 and listed Xperia Z as one of the first devices to get the update. However, Sony didn’t (still hasn’t) given us any word on the release date of Android 4.3 update for Xperia Z.
We all have known and experienced how Android device manufacturers take painful lot of time to release upgrades that otherwise takes only a few weeks for our smart developer community to build and port latest Android versions to various devices. Most of these third party developers have day jobs so they do this in their spare time. Which is freaking cool. You’re the best developer folks!
So getting to the point of this post, let’s show you how you can get the Android 4.3 update on your Xperia Z even before Sony releases it officially. There will be a few risks involved with installing the unofficial updates on your phone, most important being: Loss of warranty! Read the full warning below:
WARNING!
This page is only meant for the Sony Xperia Z. Do NOT follow the procedures provided on this page for any other device than Xperia Z.
And if anything given on this page damages your device and its components — you only will be held liable for it. theAndroidSoul.com takes no guarantee for the safety of your device.
That said. Let’s get to the purpose of this page.
One page for all Android 4.3 updates for Xperia Z!
This is going to be a one page with all Android 4.3 updates for Xperia Z. Be it an official, unofficial or a modified official ROM — we’ll list the best from all of them here with well explained step by step installation instructions.
Understanding the types of ROMs
- Official firmwares: These firmwares are released by Sony. You may get them directly on your phone as an OTA update or by using Sony’s official tool for PCs — Sony Update Service. These official firmwares can also be installed using a tool called “Flashtool” which is much faster and advanced tool than Sony’s official tools.
└ Warranty friendly - Unofficial ROMs (AOSP): Unofficial ROMs are AOSP (Android Open Source Project) based custom ROMs made by independent developers who are not related to Sony in Anyway. These ROMs feature original Android User Interface (like that of Google’s Nexus devices) with many many cool customization options giving users the real power of Android OS.
└ Voids warranty - Modified Official ROMs: These are based on Sony’s official ROMs but modified by independent developers with enhanced features like faster processing, bloatware free, etc. These are more stable compared to AOSP based unofficial ROMs
└ Voids warranty
Types of files we’ll be using..
- .FTF – FTF files are firmware packages used to flash an official Sony firmware to your device and can only be used with a tool called “Flashtool”
- .ZIP – ZIP files will mostly contain custom ROMs and will be used in custom recoveries on your phone only. You don’t need to extract them unless mentioned to do so in the instructions.
Brief description of Flashtool
Flashtool is a multi-utility program that works only with Sony Xperia devices. It makes a lot of complex tasks simple and user friendly, satisfying both pros and newbies. Check out the full features list for which Flashtool could be used for:
- Flash official Sony firmwares (.ftf files)
- Flash only selected parts of a firmware (for e.g. Kernel)
- Unlock Bootloader without using Sony’s bootloader unlocking site
- Root device
- Install appropriate drivers
- Batch install APKs stored on PC
Official Sony Android 4.3 Firmwares
As of now Sony hasn’t released any official Android 4.3 update for the Xperia Z. We’ll update this page as soon as Sony releases an official update along with detailed installation instructions.
Unofficial AOSP based Android 4.3 ROMs
AOSP based custom ROMs gives you the stock Android user experience along with a handful of customization options. And the fact that Xperia Z has on-screen soft keys makes it a complete Nexus experience device when flashed with an AOSP ROM.
The best AOSP Android 4.3 ROM which is well maintained and updated daily is CyanogenMod 10.2 aka CM 10.2. Almost every other AOSP ROM is based on CyanogenMod sources, but that doesn’t mean that the other ROMs are just mere rip-offs. Infact, some of the roms which are based on CyanogenMod sources are far more capable and awesome than CM. It’s going to be a great experience for you to discover about these ROMs if you’re into this for the first time.
Best AOSP based ROMs available for Xperia Z
Below is a list of best AOSP based Android 4.3 ROMs available for Xperia Z.
CyanogenMod 10.2
CyanogenMod 10.2 is a community built, AOSP based Android 4.3 ROM, which offers a barebone Android experience coupled with some very powerful tweaks. Thanks to its huge community of users, the CyanogenMod ROM is the most widely available AOSP based ROM ever made.
If you’re looking for an smooth Android experience along with some matured features and tweaks, then you should definitely give CyanogenMod a whirl. It’s best for stability, support and updates.
→ Download ROM file | Download Gapps package
AOKP
AOKP is one of the most loved AOSP based ROM for Android devices. It’s the second most popular ROM after CM and has lots of cool features and customization options to make your everyday smartphone use even more fun and easy.
→ Download ROM file | Download Gapps package
Development page → link
Paranoid Android
Paranoid Android has been a blessing for Android users. Its innovative features like ability alter user interface to Tablet and Phablet UI, the famous PIE control feature and the geniuos HALO feature are loved and appreciated by every Android user who has ever used this ROM. You MUST give this ROM a try.
→ Download ROM file | Download Gapps package (Different from others)
Development page → link
PAC-ROM
PAC ROM is a mixture of 3 of the best AOSP based ROMs ever made — Paranoid Android, AOKP and CM 10.2.
→ Download ROM file | Download Gapps package
Development page → link
Team Asylum CM10.2
If you’re looking to make your device as fast and barebone as possible then the Team Asylum’s version of CM10.2 is your deal. It’s the most barebone ROM I’ve used till date, works very fast and smooth and has no entertaining nonsense at all. It’s about 45MB lesser in size than CM10.2. Even the ringtones and notification tones included in this ROM are limited to 2-3 only.
Most importantly, battery life is better on this ROM as compared to others.
→ Download ROM file | Download Gapps package
Development page → link
CarbonROM
The Carbon ROM is compiled using the linaro toolchain which is known for boosting speed and performance of a device. Other than that Carbon too features many cool features from CM, Paranoid Android and AOKP.
→ Download ROM file | Download Gapps package
Development page → link
Pre-requisites for flashing AOSP based Android 4.3 ROMs
In order to flash AOSP based ROMs on your Xperia Z you’ll first have to unlock bootloader on your phone. Since AOSP ROMs require you to flash a different boot image and that can’t be done without unlocking the bootloader.
UNLOCK BOOTLOADER
Unlocking bootloader on Xperia devices is fairly simple and can be done either by using Flashtool or by Sony’s official method. Visit the link below for detailed guide for unlocking Xperia Z’s bootloader.
Link → How to Unlock Xperia Z Bootloader
CUSTOM RECOVERY
A custom recovery would be required to flash ROM zip files. Both CWM and TWRP will work. Below is a link to a very detailed guide for installing custom recovery on Xperia Z.
Link → How to install custom recovery on Xperia Z
BACKUP
Important data like Contacts, Call logs, Messages gets deleted when you flash a new custom ROM on your device. So make sure you backup all the important data on your phone. If you’re flashing a custom ROM for the first time then (just to be on the safe side) I’d recommend that you also backup your photos, music and other important files stored on your phone’s internal SD Card.
Below is a link to the most definitive guide to backup your device.
Link → How to completely backup your Android device
Instructions for installing AOSP based ROMs
Follow the instructions given below very carefully and till the end for successfully installing AOSP based custom ROMs on your Xperia Z.
Transfer the files
You need to download the following files for the ROM you prefer to install on your Xperia Z
- ROM .zip file: Download and transfer the .zip of the ROM of your choice to the internal memory or external SD Card of your phone
└ Always download the latest uploaded ROM file from the download links - Gapps .zip file: Download and transfer the .zip file of gapps package linked with the ROM of your choice to the internal memory or external SD Card of your phone.
Gapps packages could be different for each ROM so make sure you download it from the link attached with the ROM you’re choosing to install.
→ Click to jump back to ROMs list section for downloads
Flash the files using recovery
Now we’ll flash the files we transferred above to your phone using a custom recovery
-
Boot into Recovery
- Switch off your Xperia Z first
- Switch it back on and the time when you see your phone’s LED notification light turn purple or pink — start pressing either the Volume UP or Volume Down key a couple of times and your phone will reboot into recovery
NOTE: If you’ve a non-touch recovery then know this that you’ve to use Volume UP and Down keys to scroll through options in recovery and Power key to select options
-
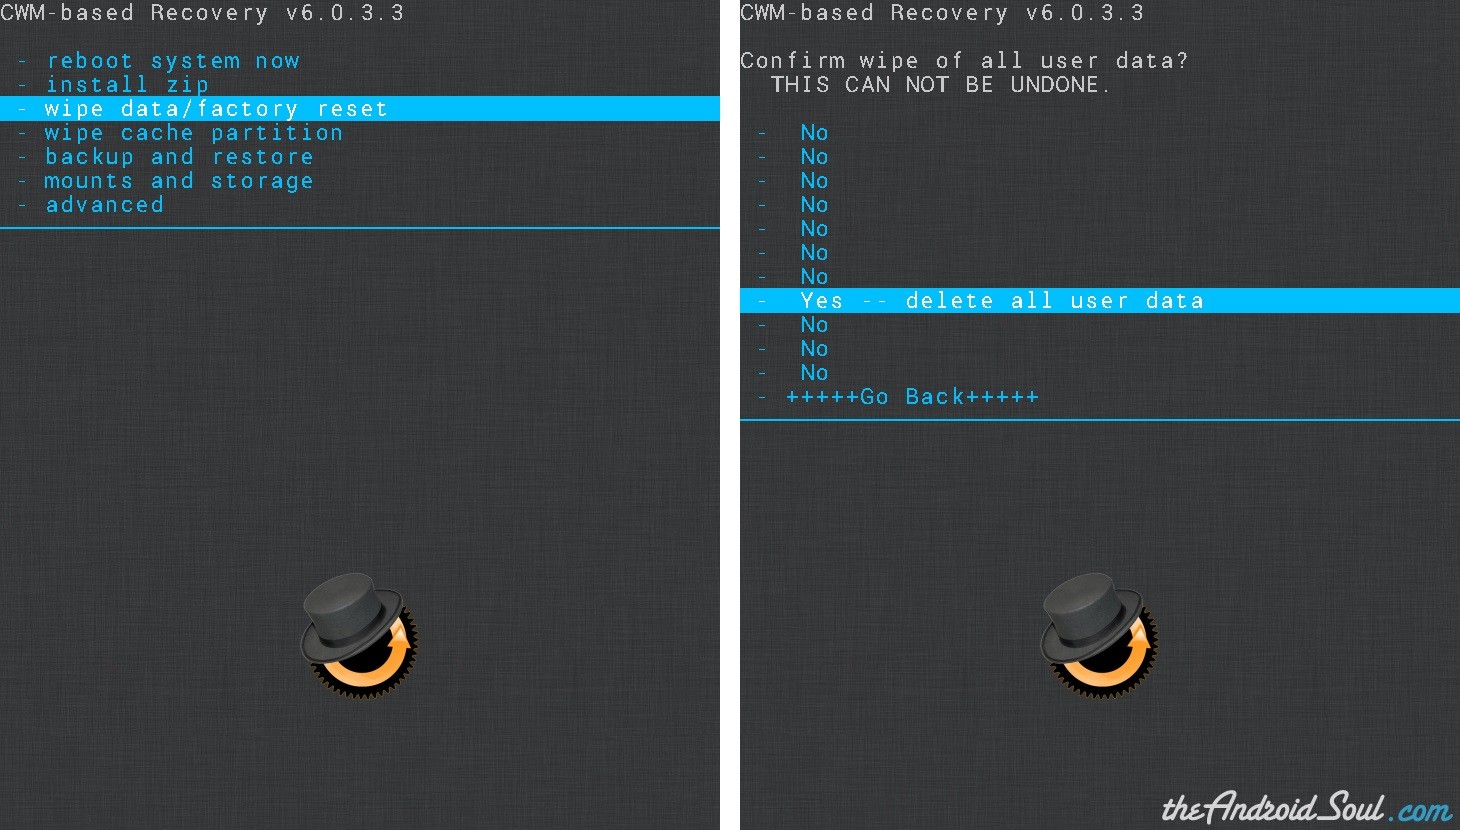
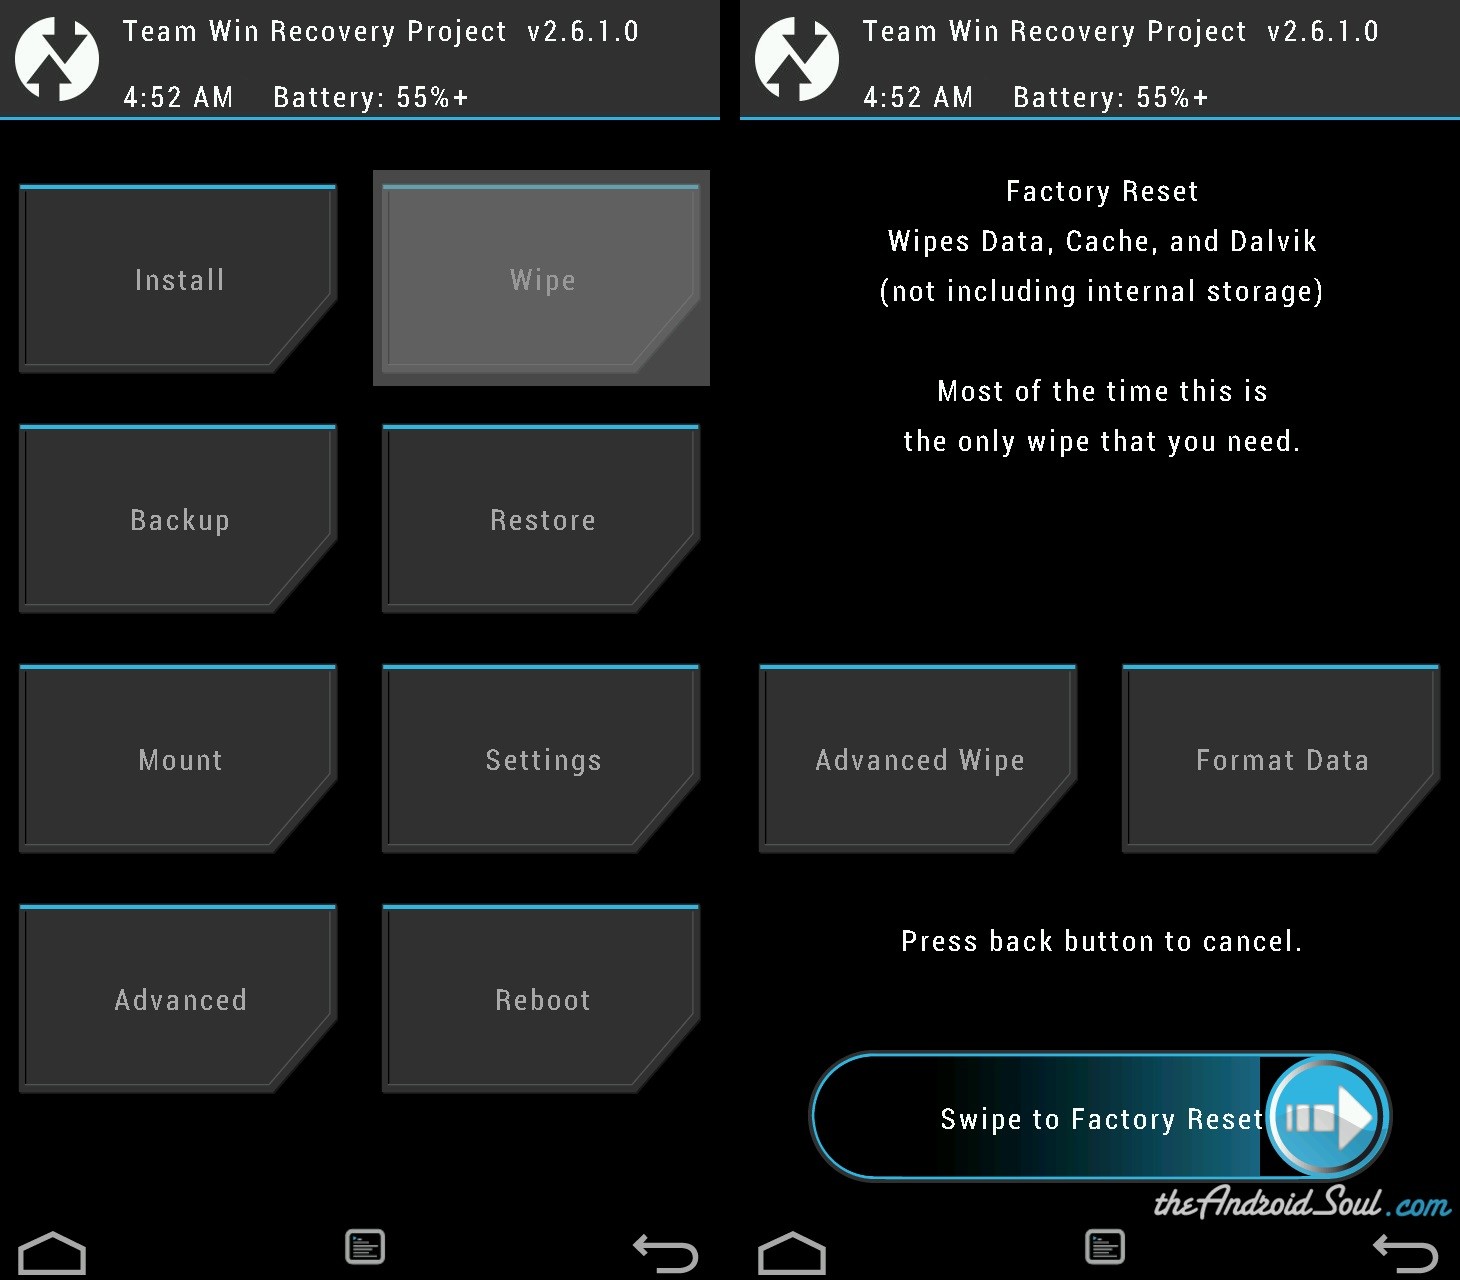
Wipe data (Factory reset from recovery)
Wipe the data and cache partitions on your phone. This will not delete the files stored on your internal memory or SD Card, but it’ll delete all your apps, contacts, messages, call logs, basically everything that’s part of the system partition so make sure you’ve taken backup if any of these things are important for you
-
Flash the ROM
Once you’ve cleaned the system partitions and cache partitions proceed to flashing the ROM’s .zip file
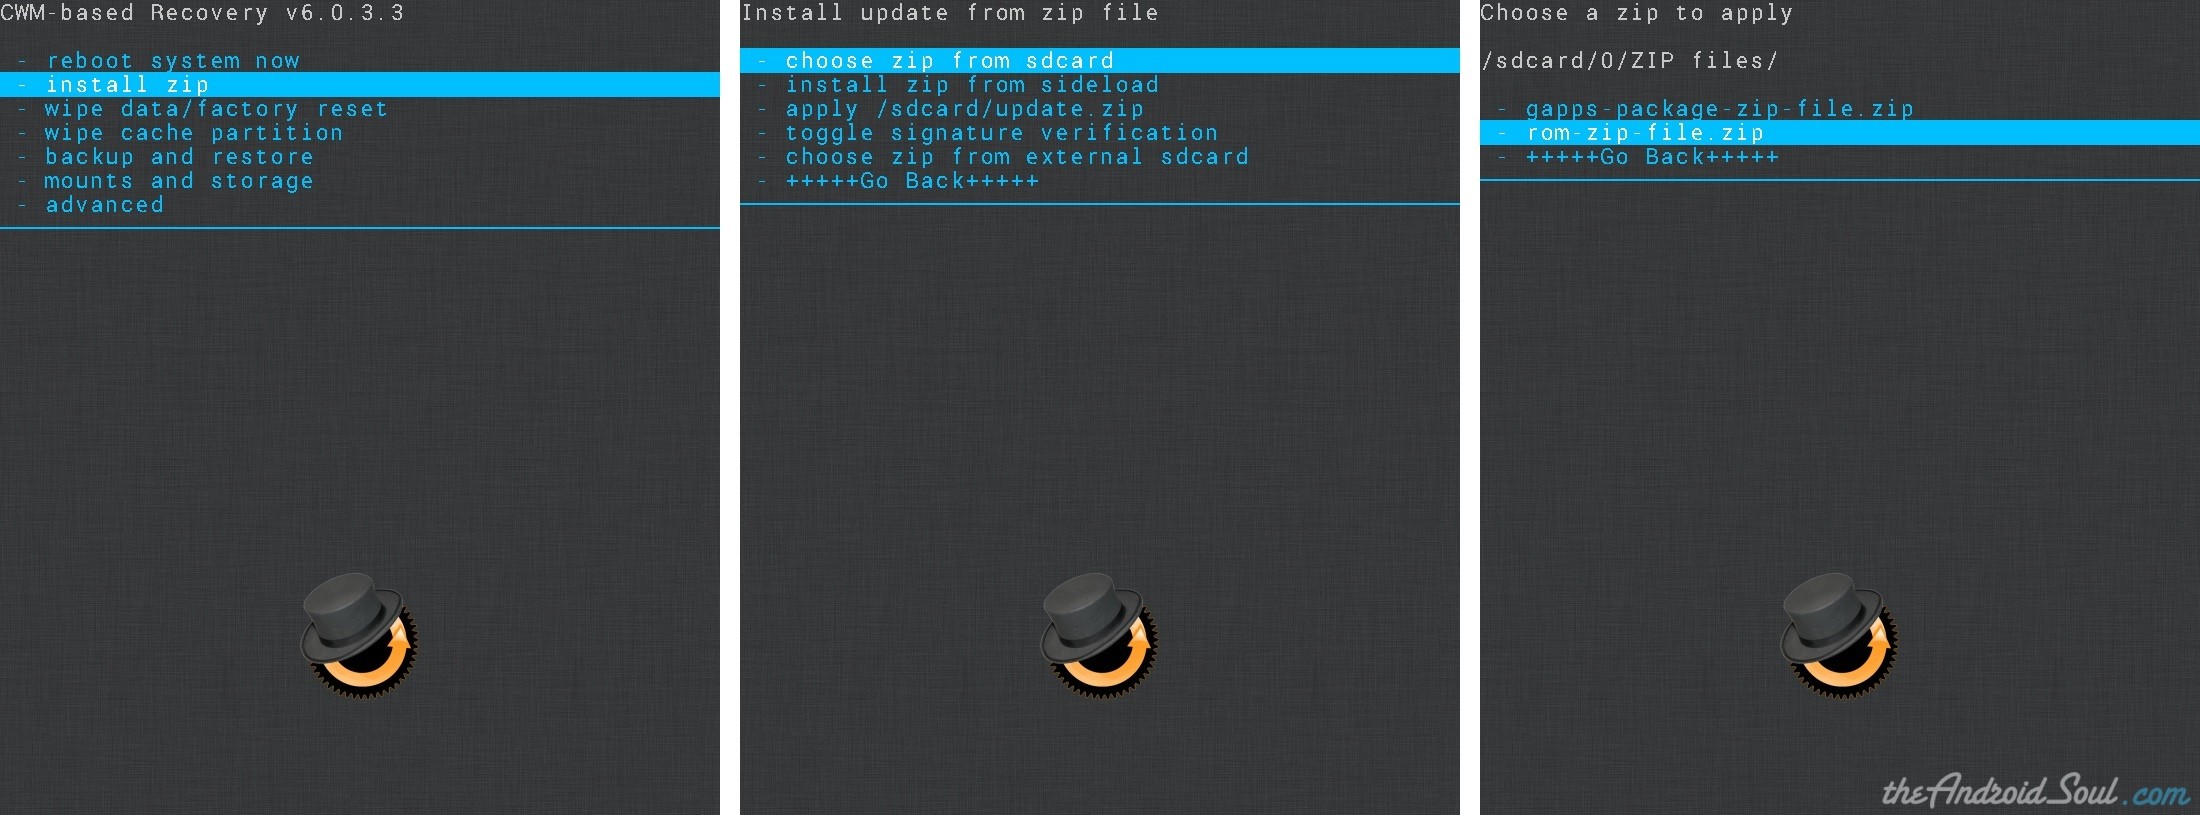
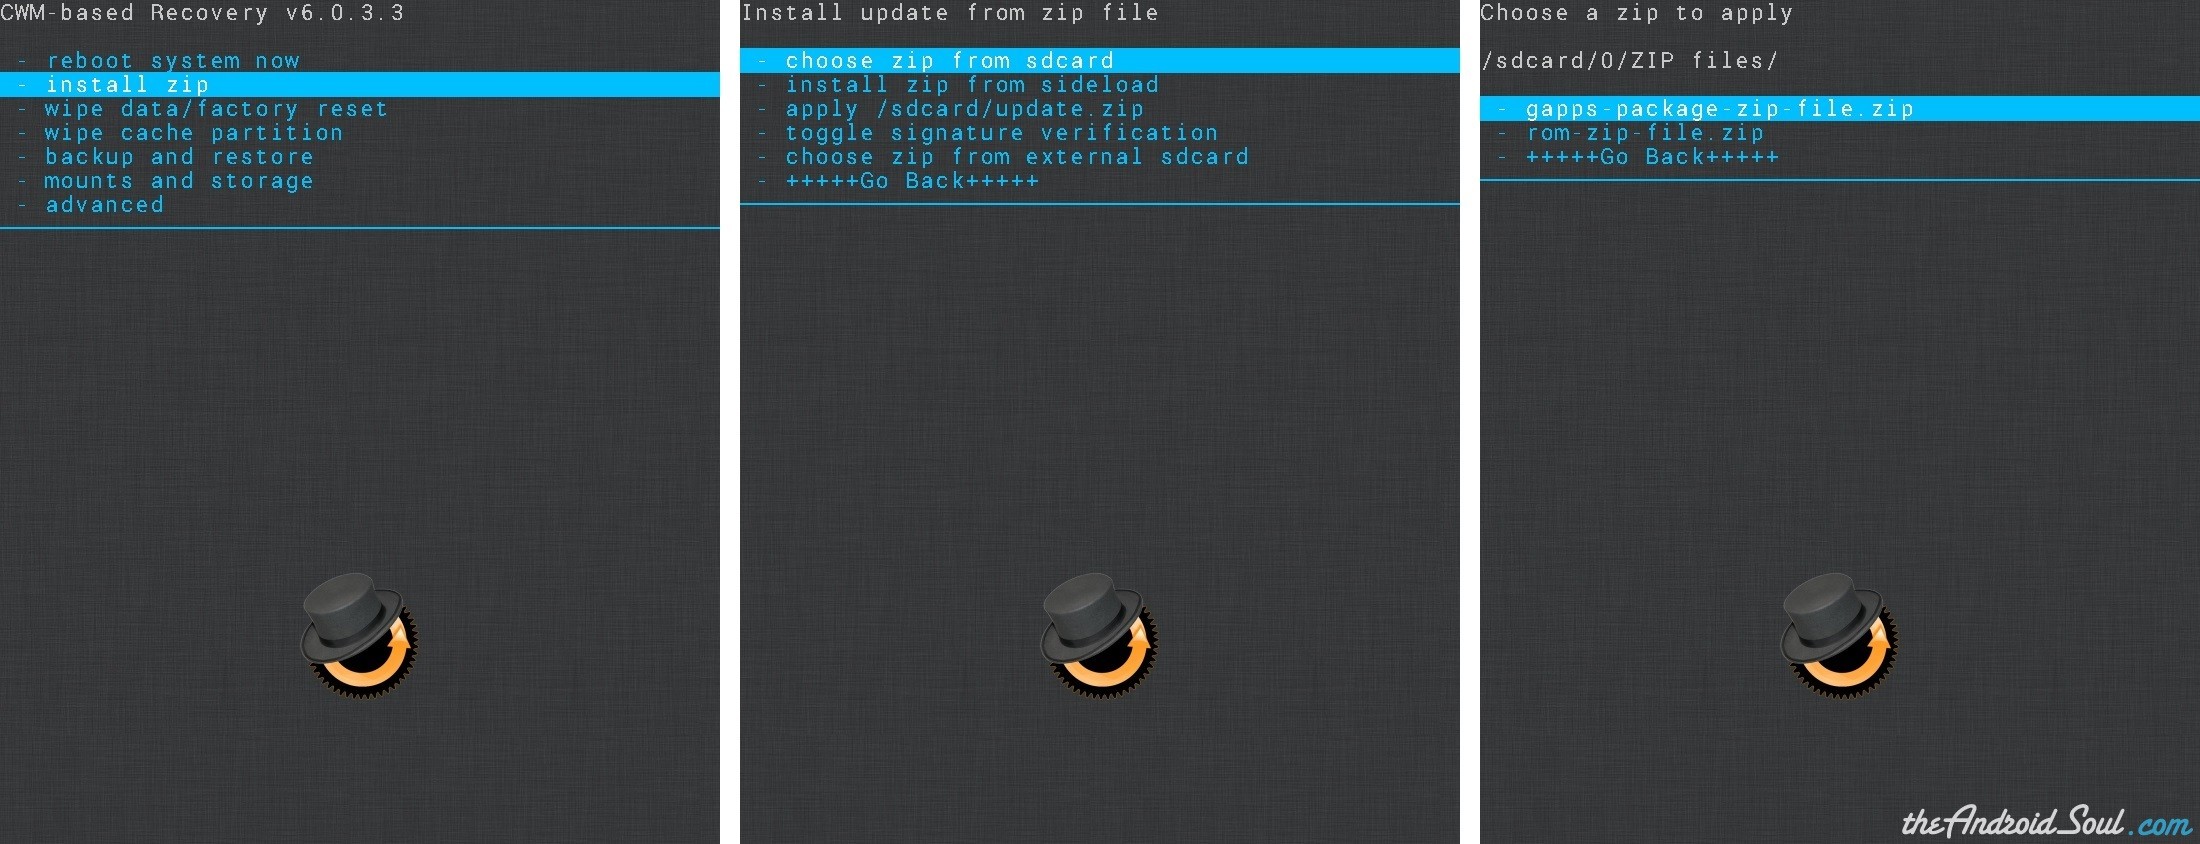
- CWM: Select “Install zip” » Select “Choose zip from sdcard” Or external sdcard (wherever you’ve transferred and stored the files at) » browse to the location where you saved the file and select the “ROM’s .zip file” » Select “Yes” on next screen to confirm installing the file
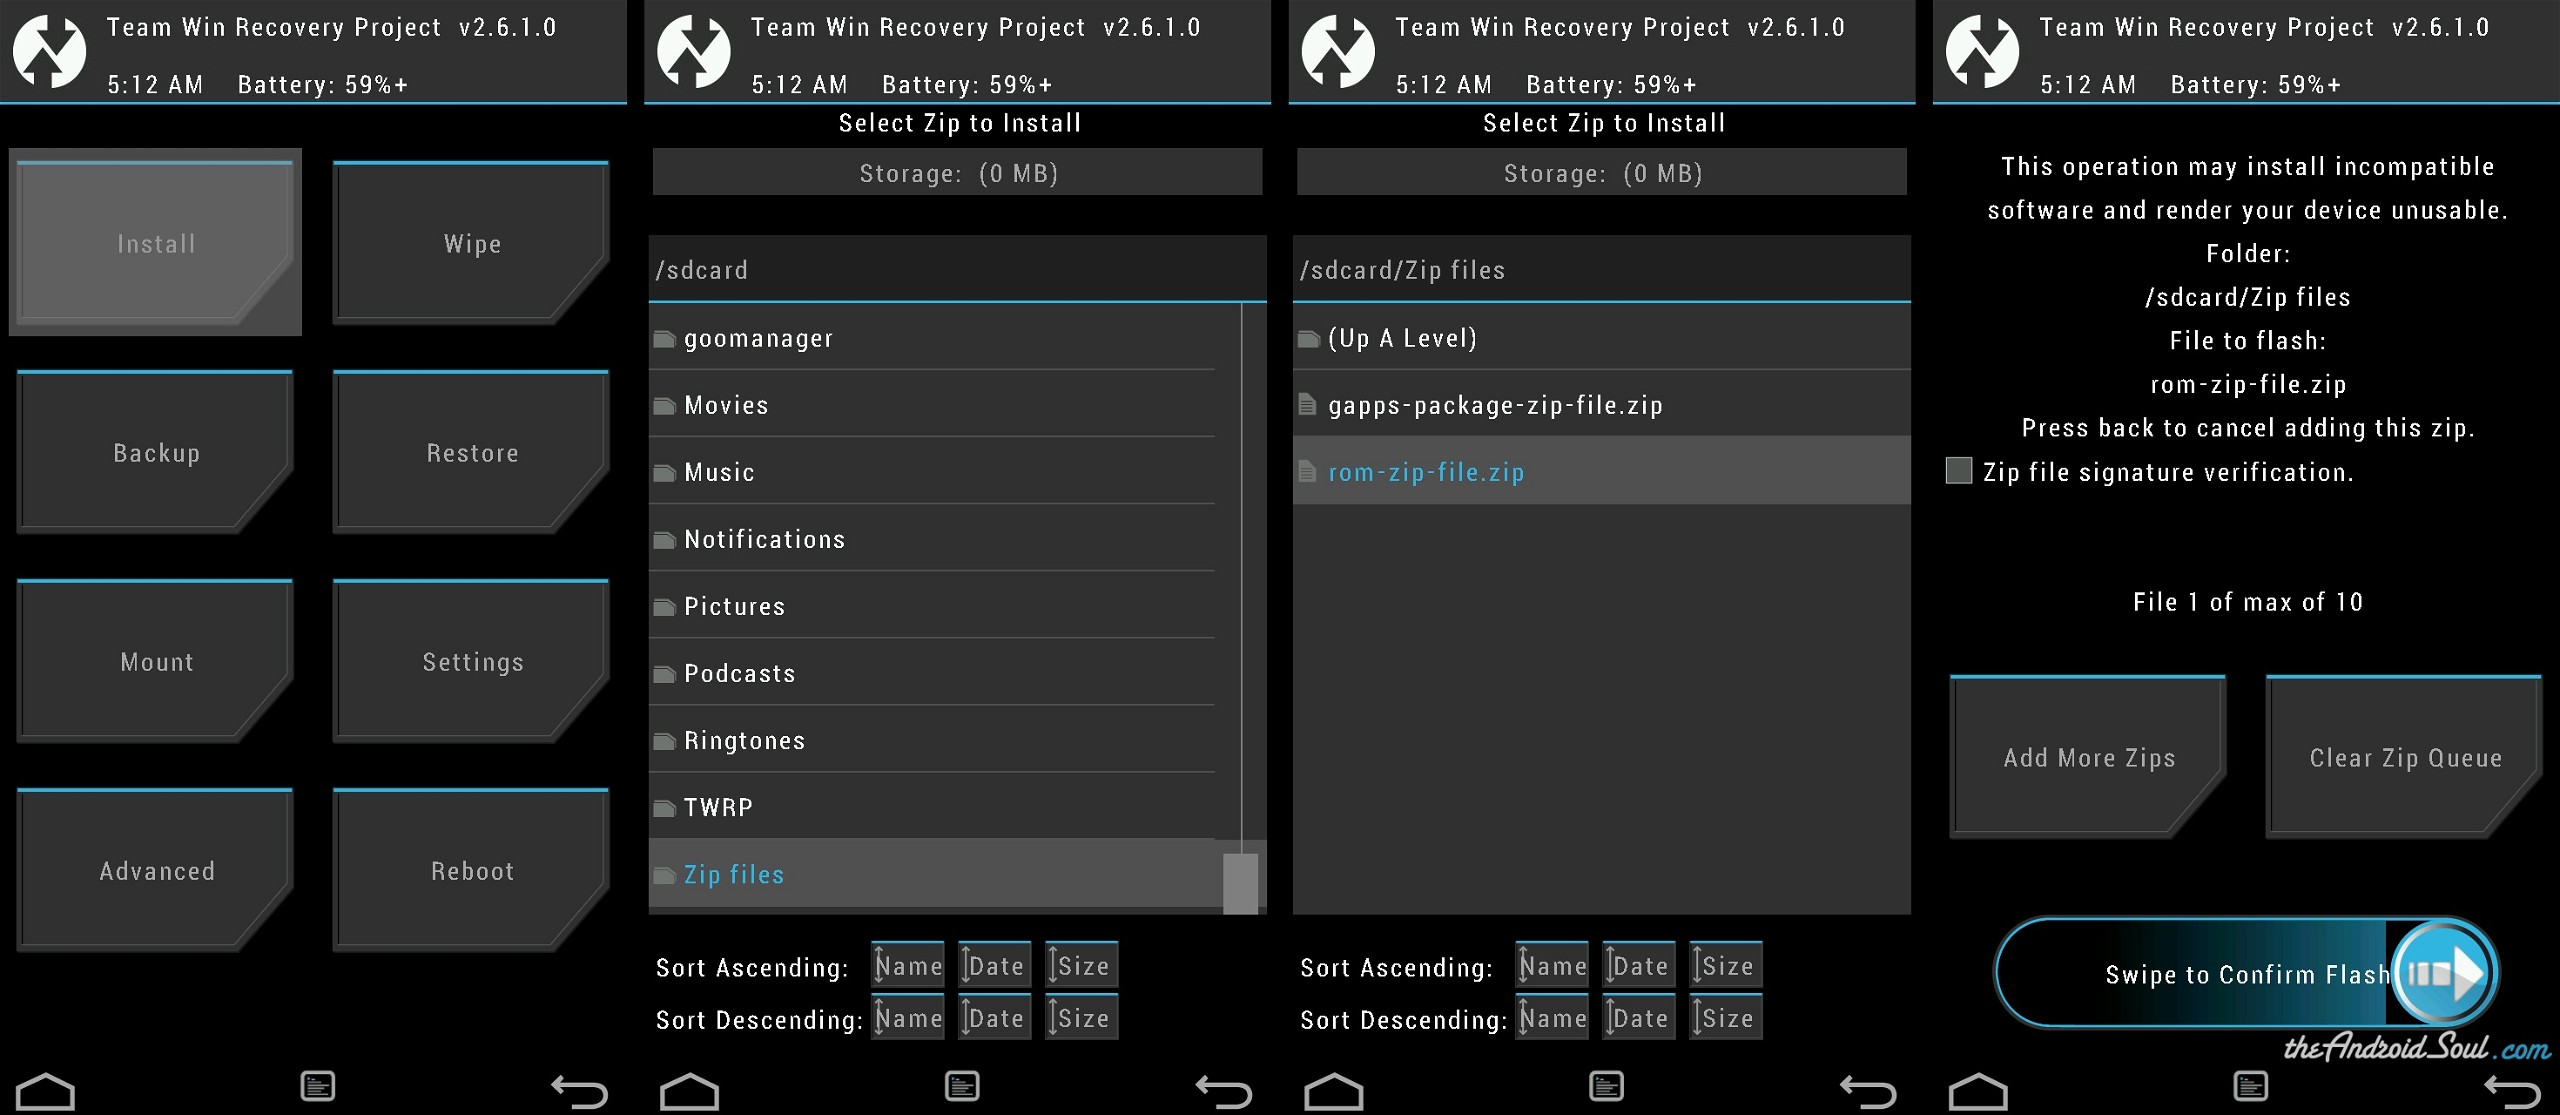
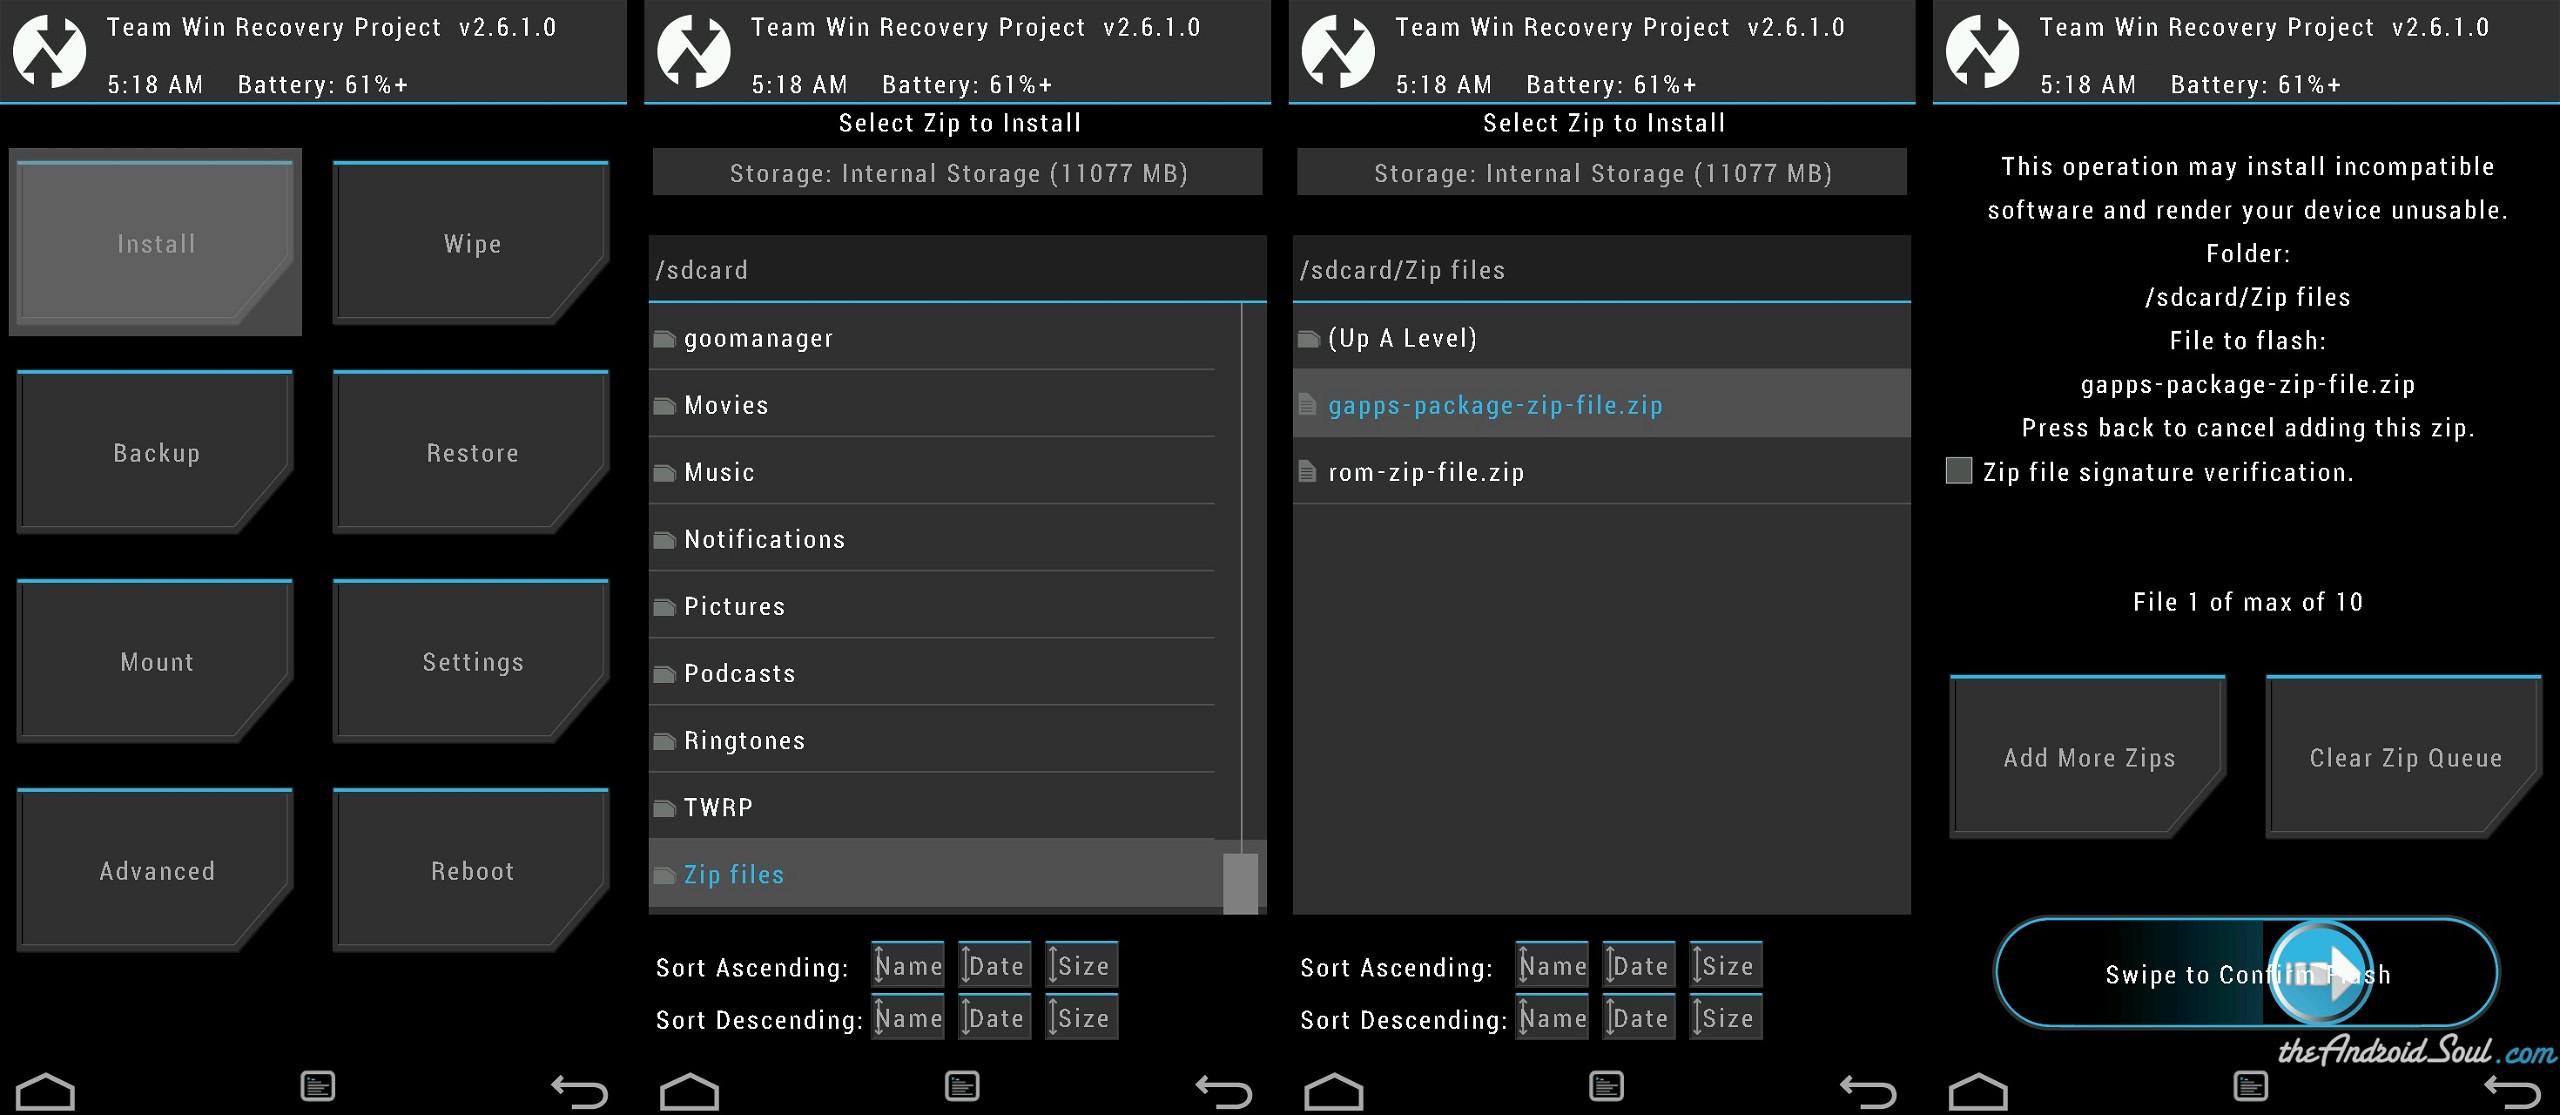
- TWRP: Tap on “Install” » browse to the location where you saved the files and tap on the “ROM’s .zip file” » now at the bottom of the screen do a Swipe on the “Swipe to confirm flash” option to begin installation
- CWM: Select “Install zip” » Select “Choose zip from sdcard” Or external sdcard (wherever you’ve transferred and stored the files at) » browse to the location where you saved the file and select the “ROM’s .zip file” » Select “Yes” on next screen to confirm installing the file
-
Flash the Gapps package file
You’d require Gapps package for using Google services on your phone. So once you’ve flashed the ROM file successfully, proceed to flash the Gapps package:
- CWM: Select “Install zip” » Select “Choose zip from sdcard” Or external sdcard (wherever you’ve transferred and stored the files at) » browse to the location where you saved the file and select the “Gapps package .zip file” » Select “Yes” on next screen to confirm installing the file
- TWRP: Tap on “Install” » browse to the location where you saved the files and tap on the “Gapps package .zip file” » now at the bottom of the screen do a Swipe on the “Swipe to confirm flash” option to begin installation
- CWM: Select “Install zip” » Select “Choose zip from sdcard” Or external sdcard (wherever you’ve transferred and stored the files at) » browse to the location where you saved the file and select the “Gapps package .zip file” » Select “Yes” on next screen to confirm installing the file
- Go back to the main menu of the recovery and select Reboot system.
That’s all! Your phone should now reboot. Complete the setup and enjoy Android 4.3 on your Xperia Z in stock Android flavor like Nexus devices.
Troubleshooting
In case something went wrong and your phone is not booting up, here are some helpful tips:
- Wipe data and cache partition again. Follow Step 3 above to perform that
- Make sure your phone’s bootloader is unlocked. Because AOSP based ROMs require unlocked bootloader to be able to flash a compatible boot image for the ROM.
If the above two tips doesn’t help your case and you’re having bootloop issues, then follow all the steps again — making sure that you follow the instructions correctly and step by step and also make sure you’re flashing the correct Gapps package for the ROM.
Feedback?
If you’ve any suggestions or tips regarding this page or need any help with the instructions given above, feel free to post it in the comments section below.

