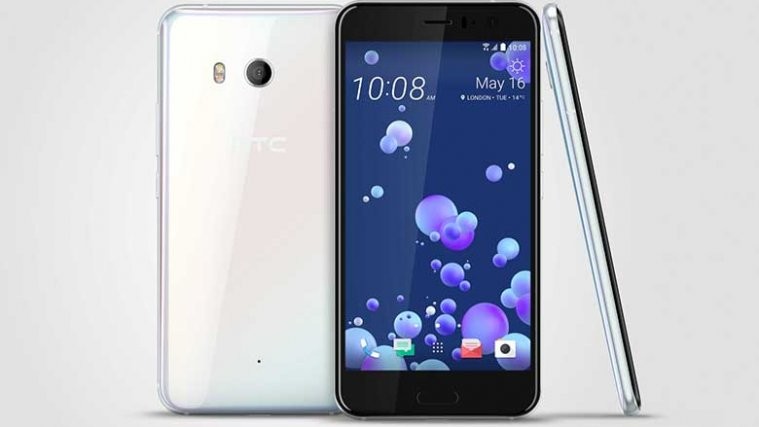
It hasn’t been long since HTC released the HTC U11 and folks over at TeamWin already have an official build of TWRP recovery available for download for the device. What this means is we can now have root access on HTC U11.
As usual, you need to get the bootloader unlocked on your device to be able to install TWRP recovery. Thankfully, HTC has an official setup to let users unlock bootloader on their HTC devices, and it supports HTC U11 as well.
Like any other Android device, once bootloader is unlocked on the HTC U11, installing a custom recovery like TWRP is a piece of cake. And once you’ve TWRP recovery installed, root access can be achieved by simply flashing either the latest SuperSU zip, or even better, the Magisk installer zip which will let you hide your phone’s root status when the need be. For example, when you want to use the Android Pay app, Magisk will let you disable root access on-the-fly to let you use Android Pay, and then enable root again when needed.
So let’s get started..
How to unlock bootloader on HTC U11
Before you begin with the instructions below, make sure your android device is adequately charged — at least 50% battery of the device.
- Install HTC drivers. First step to hacking your device begins with installing drivers, doesn’t it?
- Now, install ADB and fastboot drivers. This makes sure that your device recognizes fastboot command and get you token in step below.
- Let’s begin now. First of all you need to register and create an account on the HTCdev site here. This is HTC’s own developer site to support unlocking of bootloader.
- After completing the registration, you will need to verify your e-mail address. Go to gmail, yahoo, hotmail or wherever your email ID is, log in, and then look for a mail from htcdev.com. Open the mail, and verify by clicking on the verification link.
→ If you don’t see any mail from HTC Dev within 30 mins from registering, then be sure to check the Spam folder. - Go to the following link and login with your account here. Now, click on Unlock bootloader and click Get started to finally begin with unlocking.
- Disconnect your HTC U11 from PC and boot it into Bootloader Mode:
- Power off your device first and wait for 6-7 seconds after display is off.
- Press and hold Power + Volume down button together for like 5-6 seconds and then let go of them. You will see either a black screen with Download Mode written.
- On PC, create new folder, name it as unlock-bl and then keep it open.
- Now, open command window in the unlock-bl folder. For this:
- Left click on empty white space in the unlock-bl folder.
- Now, while holding shift key, right click on empty white space to get a pop-up as shown below.
- Now choose Open command window here option from that.
└ You will see a command window open up, with location directed to unlock-bl folder.
- Connect your HTC device to PC now. It must be in bootloader mode already as given in step 6 above.
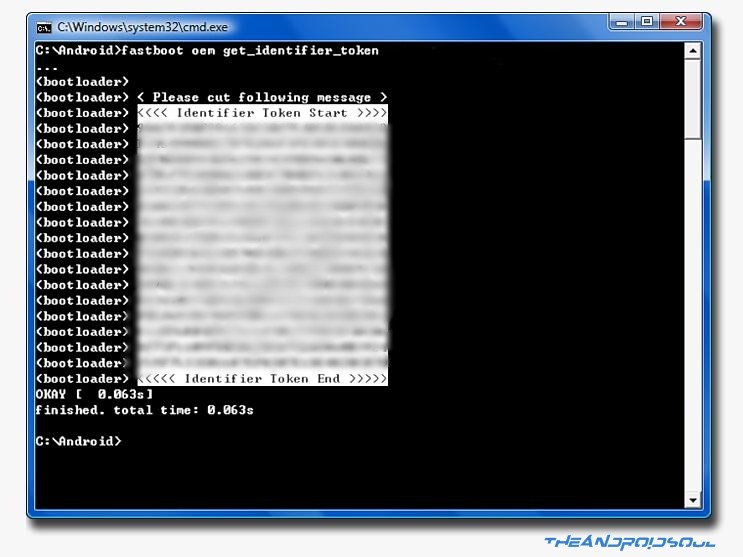
- Now, on PC, in command window, run the following command. (You can copy paste it too.) After entering text, use enter key to run it.
fastboot oem get_identifier_token
- You will see a long text of token. You have to copy it now. For this:
- First, right click on an empty space inside command window, and select Mark.
- Now, highlight the block of text starting from <<<< Identifier Token Start >>>> and ending with <<<<< Identifier Token End >>>>>.
- Right click on the highlighted text to copy it.
└ It may say <info> instead of <bootloader> but don’t worry, the procedure is the same.
- Now, provide this token to HTC, so that they hand you the unlock code via a file sent to you email. Do this.
- Go to the following link here.
- Scroll down to the bottom where it says My Device Identifier Token and paste the previously copied token here. And then click on Submit.
└ Copy and paste the token directly from Command Prompt window to the web page. DO NOT try coping it somewhere else first (Example: Notepad) and then pasting from there to web page.
- If you did it alright, HTC will receive your token code, and will send you an e-mail with your Unlock_code.bin attached to the e-mail.
- Download the Unlock_code.bin and transfer it to unlock-bl folder, where you have the command window pointing location to.
- Close the command prompt window for once, and then open it again in the unlock-bl folder as above (step 6). And then run the following command.
fastboot flash unlocktoken Unlock_code.bin
- Look at your HTC U11 now. A screen will appear on your device now asking you to confirm the bootloader unlock. Use Volume Up button to highlight Yes and select it using Power button.
- Your HTC U11 will now reboot and the bootloader will be unlocked to fulfill all your flashing and modding needs. You can disconnect your U11 from computer once it fully boots up.
- To confirm if your bootloader is unlocked boot into Bootloader Mode (Step 4), it should say *** UNLOCKED *** at the top of the screen.


How to Install TWRP recovery on HTC U11
Downloads:
Instructions:
- Get the latest build of TWRP recovery from either of the download links provided above and save the TWRP recovery .img file to a separate folder on your PC.
- Setup ADB and Fastboot on your PC, follow this link [icon name=”external-link” class=”” unprefixed_class=””].
- Enable USB debugging on your HTC U11:
- Open Settings on your device.
- Go to About phone and tap seven times on Build number, this will enable Developer options.
- Now go back to Settings and you’ll see Developer options there, open it.
- Tick the USB Debugging checkbox.
- Open the folder where you saved TWRP Recovery .img file in Step 1 above.
- Now open a command window inside that folder. To do that, “Shift + Right click” on any empty white space inside the folder and then select “Open command window here” from the context menu.
- Connect your HTC U11 to the PC. And type the following into the command window we opened in Step 5 above to boot your device into bootloader/fastboot mode:
adb reboot bootloader
└ If you get a permission dialogue on your device to “Allow USB debugging”, tap OK.
- Once your device boots into bootloader mode, issue the following command into command window to flash the TWRP recovery .img file:
fastboot flash recovery twrp.img
└ Here modify twrp.img with the name of your TWRP recovery .img file, OR change your TWRP recovery filename to twrp.img and use the command above.
- Once TWRP is successfully flashed, issue the following command to reboot your HTC U11:
fastboot reboot
That’s all. TWRP recovery should be installed on your HTC U11 now. To boot into the freshly installed recovery, simply issue the adb reboot recovery command from PC command line when your HTC U11 boots into system.
How to Root HTC U11
Finally, once you’ve TWRP recovery installed on your HTC U11. We can now root your device using the Magisk systemless interface.
Downloads:
- Download Magisk Magisk-v12.0_3 (.zip)
- Download Magisk Manager v4.3.3 (.apk)
Instructions:
- Download and transfer both the Magisk zip and Magisk Manager apk files from the download link above to your HTC U11’s storage.
- Boot your U11 into TWRP recovery.
- Tap on Install and select the Magisk zip file that you transferred to your device in Step 1.
- After selecting the .zip file, do Swipe to Confirm Flash on the bottom of screen to begin the flashing process.
- Once Magisk is flashed, you’ll get Reboot System option, select it.
- Once your device reboots, open a file manager app » go to the folder where transferred the Magisk Manager apk file in Step 1 above, and install it.
- Open the Magisk Manager app and check for your device’s root status.
That’s all. Happy Androiding!


hello when i imput fastboot oem get_identifier_token i get (bootloader) [KillSwitch] : /dev/block/bootdevice/by-name/frp
(bootloader) [KillSwitch] Last Byte is 0X00, disable unlock
(bootloader) [KillSwitch] oem unlock Turn Off!
can you tell me how to work around this please
yea nevermind i figured out what i did wrong thanks though
Edit: WARNING: Going through this process will wipe your device back to factory. Be prepared for that, I had just gotten done setting up my entire device THEN did this. I’d still had done it with the warning, but, I’d have backed up my configurations lol.
The most helpful response in the world is “oh I figured it out” without how. FYI this is the OEM Unlock switch, to enable this you need to first enable developer options (if you don’t know how to do this, go to settings, scroll to the bottom and go to about -> software information -> more, tap build number 7 times, should say developer mode unlocked, hit the back button and should be right above the about options).
Check both OEM Unlock and USB Debugging.
Another thing, this guide says “bootloader” over and over, just use the download mode. Works great even with S-ON, if you try to use bootloader option at any point you’ll get confusing errors, the two I got is Command failed when trying to unlock, when trying to flash twrp I got FAILED: Product Product when in bootloader. But it works fine in the download mode, make sure you are in the download mode!
Finally, to reboot into twrp you will need to be in bootloader (LOL), so when you go to do the magisk stuff, download the zips onto your phone, turn it off, boot to bootloader when the first screen comes up, reboot to bootloader, down volume till you see recovery, power to select, then read the warning, slide the slider to modify, click install, find your magisk zip, slide the slider to install it, you will be prompted to install the twrp app, I choose to, I doubt you need to and it’s on the play store if you want to get it at any point.
And that’s where it is, missing a few pieces of information and using the wrong verb is a bit confusing (bootloader instead of download). But otherwise 4.8stars great guide :D!
Do you have a guide to restore system image back to stock with twrp to take ota?
HTC Drivers link its 404 🙁
and magisk files are dead too 🙁
Anyway, great guide! excellent that you included the undetected root way since lot of new app will not run on rooted phones (like snaptchat) Thanks again
fastboot oem get_identifier_token only returns (bootloader) [KillSwitch] : /dev/block/bootdevice/by-name/frp
(bootloader) [KillSwitch] Last Byte is 0X00, disable unlock
(bootloader) [KillSwitch] oem unlock Turn Off!
OKAY [ 0.020s]
finished. total time: 0.020s
No token…
you need to enable Oem unlock in developer options
What if phone has frp how do I enable without being able to get into dev mode
fastboot oem get_identifier_token only returns (bootloader) [KillSwitch] : /dev/block/bootdevice/by-name/frp
(bootloader) [KillSwitch] Last Byte is 0X00, disable unlock
(bootloader) [KillSwitch] oem unlock Turn Off!
OKAY [ 0.020s]
finished. total time: 0.020s
No token…
What do I do.?
If I unlock the bootloader can I network unlock it too so I can use it with another carrier?
Nope.