What to know
- Windows lets you change wallpaper in several ways. The most popular method is from the ‘Personalization’ Settings page and the image context menu.
- Apps like Photos and Paint and even terminal apps like PowerShell and CMD can also help you change the wallpaper.
Changing wallpapers on Windows 11 is a cinch. But if you’ve been having a hard time doing so, then use any one of the nine methods below to change your background.
9 Ways to change the wallpaper on Windows 11
Windows 11 has numerous ways to change your wallpaper. Here’s a look at them.
Method 1: Using Desktop
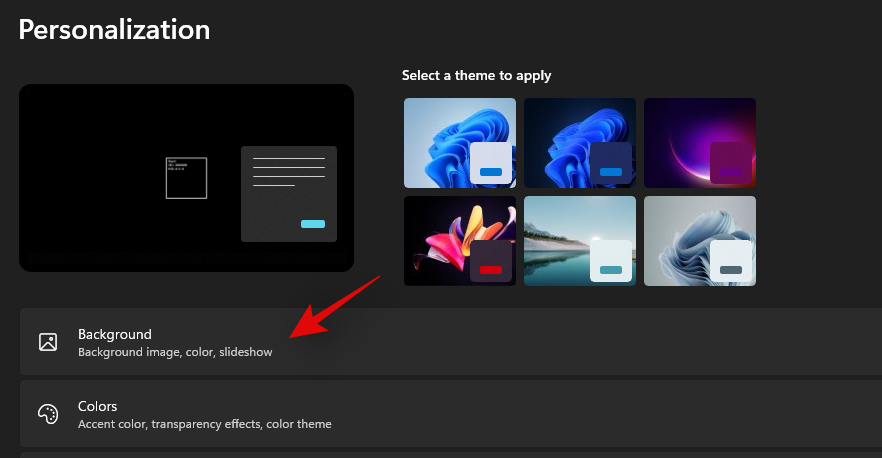
- Right-click on an empty area on your desktop and click on ‘Personalize’.
- Now click on ‘Background’.
- Select the type of background you wish to have using the drop-down menu at the top.


- Picture
- Slideshow
- Solid Color
If you selected Picture
- If you selected ‘Picture’ then click on ‘Browse Photo’ at the bottom to select an image as your background from your local storage. You can also select a recent background from the thumbnail previews at the top.
- Now navigate to the desired location on your local storage and click and select a background. Once selected, click on ‘Choose Picture’.


And that’s it! The selected picture will now be set as your wallpaper in Windows 11
If you selected Slideshow
- Click on ‘Browse’.
- Now navigate to the folder with all the wallpapers you wish to use as your slideshow and click on ‘Choose folder’.
- The selected folder will now be used for your desktop background slideshow and the first image should now be set as your wallpaper. Click on the drop-down arrow beside ‘Change picture every’ and select the frequency for your background slideshow.
- Turn on the toggle for ‘Shuffle the picture order’ if you wish to shuffle your pictures and set them randomly as your background at the set frequency.
- Similarly, turn on the toggle for ‘Let slideshow run even if I’m on battery power’ if you wish for Windows 11 to keep changing your background regardless of your current power plan.
Note: This option will only be available on laptops and portable systems. - Lastly, click on the last drop-down arrow now and select the type of fit you wish to have for your background when the image will need to be resized.


And that’s it! The selected set of images will now be set as a slideshow background for your Windows 11 PC.
If you selected Solid Color
- If you selected, ‘Solid color’ as your background choice, click and choose the desired color you wish to set as your background.
- You can also set a custom color as your background by clicking on ‘View colors’ and selecting the desired color. You can also click on ‘More’ and add custom RGB or HEX values to get the desired color.

The selected color should now be automatically set as your background in Windows 11.
Method 2: Using File Explorer
You can also set a desktop background directly from the file explorer in Windows 11 in two ways. This is by far the fastest and easiest way to change your background in Windows 11. Follow one of the methods below that best fits your current needs and requirements.
Method 2.1
- Open the File Explorer and navigate to the image you wish to set as your background.
- Click and select the image and an option to set it as your background will automatically show up in the toolbar at the top.
- Simply click on this option and your Windows 11 desktop background will be immediately changed.

Method 2.2
- Open the File Explorer and navigate to the desired image that you wish to set as your background. Click and select the image once it shows up on your screen.
- Now click on ‘Picture Tools’ at the top of your screen.
- Click on ‘Set as background’.


And that’s it! You will now have changed your background directly from the File Explorer itself.
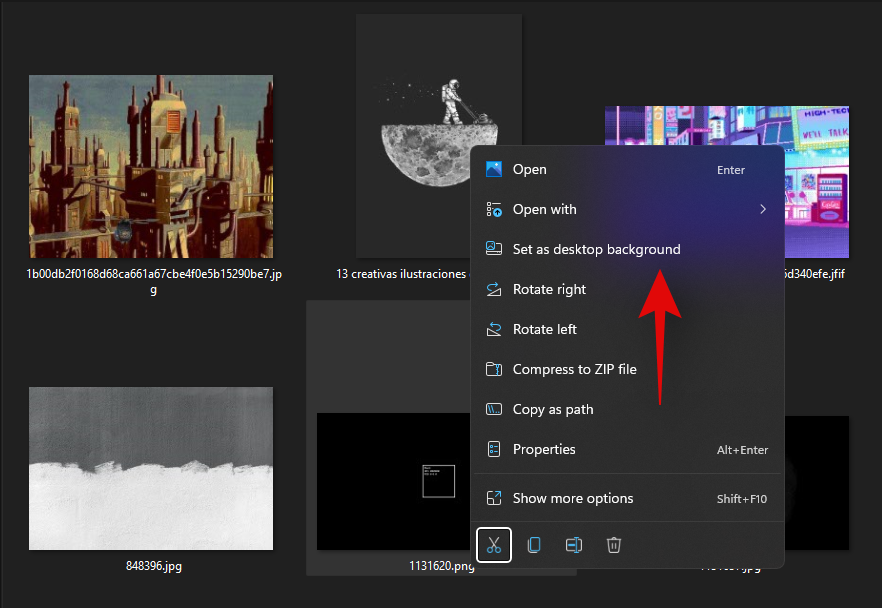
You can also set a background easily from the right-click context menu as well. This is also a swift way to change your background, however, it only works with popular image formats. Obscure image formats that are not that common might not be recognized by Windows and hence the option to set them as your background won’t show up in your right-click context menu. Simply right-click on an image of your choice and select ‘Set as desktop background’ as shown below.
Method 4: Via Settings
This is the traditional way to change your Windows wallpaper. If you can not change your wallpaper using the above-stated methods, then you should give this method a try.
- Press
Windows + ion your keyboard to open the Settings app. Now click on ‘Personalization’ on your left.
- Click on ‘Background’ on your right.
- Select the desired type of background from the drop-down menu and then select your background below.
Once selected, the changes should be reflected on your desktop immediately.
Method 5: Using the Photos app
The Photos app provides another quick way for you to change the wallpaper. Here’s how to go about it:
- Open the wallpaper image that you want to set as wallpaper in the Photos app.
- Click on the three-dot icon at the top.
- Select Set as > Background.


And just like that, you would have changed the wallpaper using the Photos app.
Method 6: Using Paint
- Open your wallpaper file in Paint.
- Then select File.
- Select Set as desktop background and choose how you want the wallpaper to fill the desktop.


Method 7 Via CMD
You can also change your wallpaper via CMD however, this method only works for .bmp images. If you wish to set a .jpg, .jpeg or.png as your background image then you can use one of the above-stated methods instead. Follow the guide below to get you started.
- Press
Windows + Son your keyboard and search for CMD. Click on ‘Run as administrator’ once it shows up in your search results.
- Enter the following command and replace ‘PATH’ with the path to your wallpaper in your local storage.
reg add "HKEY_CURRENT_USER\Control Panel\Desktop" /v Wallpaper /t REG_SZ /d PATH /f
- Once the command is run successfully, copy and paste the command below and press ‘Enter’ on your keyboard to run it.
RUNDLL32.EXE user32.dll,UpdatePerUserSystemParameters


This command will help refresh your desktop wallpaper immediately. Your wallpaper should now be changed on your PC.
Method 8: Via PowerShell
We will be using a PowerShell function to change your wallpaper which creates a registry value and uses SystemParameterInfo in User32.dll to change your wallpaper. All credit to the original creator for the creation of this function.
- Navigate to the image you wish to set as your wallpaper and right-click on it. Select ‘Copy as path’.
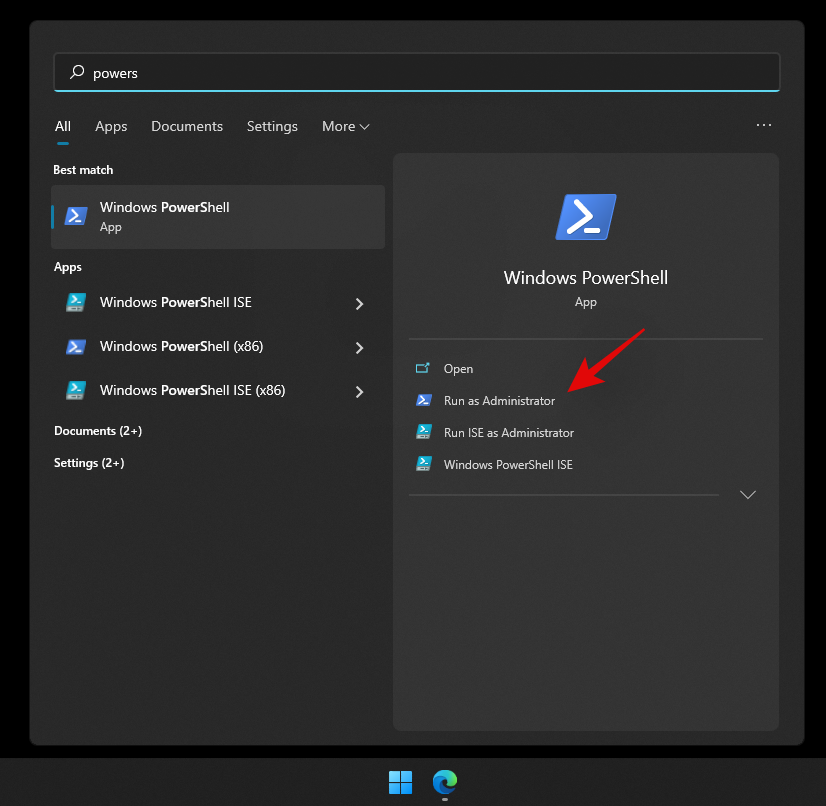
- Now press
Windows + Son your keyboard and search for PowerShell. Click on ‘Run as administrator’ once it shows up in your search results.
- Copy and paste the function below in your PowerShell window. Replace the path in the last line with the path to the image we copied to your clipboard.

Function Set-WallPaper {
<#
.SYNOPSIS
Applies a specified wallpaper to the current user’s desktop
.PARAMETER Image
Provide the exact path to the image
.PARAMETER Style
Provide wallpaper style (Example: Fill, Fit, Stretch, Tile, Center, or Span)
.EXAMPLE
Set-WallPaper -Image “C:\Wallpaper\Default.jpg”
Set-WallPaper -Image “C:\Wallpaper\Background.jpg” -Style Fit
#>
param (
[parameter(Mandatory=$True)]
# Provide path to image
[string]$Image,
# Provide wallpaper style that you would like applied
[parameter(Mandatory=$False)]
[ValidateSet(‘Fill’, ‘Fit’, ‘Stretch’, ‘Tile’, ‘Center’, ‘Span’)]
[string]$Style
)
$WallpaperStyle =Switch ($Style) {
“Fill” {“10”}
“Fit” {“6”}
“Stretch” {“2”}
“Tile” {“0”}
“Center” {“0”}
“Span” {“22”}
}
If($Style -eq “Tile”) {
New-ItemProperty -Path “HKCU:\Control Panel\Desktop” -Name WallpaperStyle -PropertyType String -Value $WallpaperStyle -Force
New-ItemProperty -Path “HKCU:\Control Panel\Desktop” -Name TileWallpaper -PropertyType String -Value 1 -Force
}
Else {
New-ItemProperty -Path “HKCU:\Control Panel\Desktop” -Name WallpaperStyle -PropertyType String -Value $WallpaperStyle -Force
New-ItemProperty -Path “HKCU:\Control Panel\Desktop” -Name TileWallpaper -PropertyType String -Value 0 -Force
}
Add-Type -TypeDefinition @”
using System;
using System.Runtime.InteropServices;
public class Params
{
[DllImport(“User32.dll”,CharSet=CharSet.Unicode)]
public static extern int SystemParametersInfo (Int32 uAction,
Int32 uParam,
String lpvParam,
Int32 fuWinIni);
}
“@
$SPI_SETDESKWALLPAPER = 0x0014
$UpdateIniFile = 0x01
$SendChangeEvent = 0x02
$fWinIni =$UpdateIniFile -bor $SendChangeEvent
$ret =[Params]::SystemParametersInfo($SPI_SETDESKWALLPAPER, 0,$Image,$fWinIni)
}
Set-WallPaper -Image “PATH” -Style Fit

Press ‘Enter’ on your keyboard to execute the function. And that’s it! Your wallpaper should now be changed immediately.
Method 9: Using a third-party app
There are numerous third-party apps that provide a treasure house of wallpapers as well as the ability to set them on Windows 11.
- A simple search on Microsoft Store or Google will yield a variety of results.
- Simply pick one that catches your fancy and install it.
- In most cases, all you’ll need to do is choose a wallpaper image and set it as your wallpaper.


Apart from these, you can also set GIFs as wallpapers and even set two different backgrounds on dual monitors on Windows 11.
We hope you were able to easily change your wallpaper on Windows 11 using all the above-stated methods. If you face any issues with your system, feel free to reach out to us using the comments section below.