Chainfire just released cf-auto-root for the Verizon Galaxy Note 4 developer edition, which comes with unlocked bootloader. The device went on sale yesterday only with the price tag of $699. The developer edition Verizon Galaxy Note 4 comes with model number SM-N910VMKEVZW.
This root will not work on the Verizon Galaxy Note 4 carrier locked variant, as the device will have a locked bootloader. You might have to wait longer than you can imagine to get root for the non-dev edition Verizon Note 4. The last generation Galaxy Note 3 device took good 4-6 months to get root, that too with a bounty of around $2000.
Both Verizon and AT&T tend to lock bootloader on their devices to stop people from gaining root access and customize their devices with custom ROMs or remove the pre-installed bloatware. Gaining root access on devices with locked bootloader isn’t possible unless someone finds out a whole new root exploit. The Note 3 and Galaxy S5 variants of Verizon and AT&T were rooted with Towelroot exploit, which was discovered by renowned hacker/developer Geohot. The Towelroot exploit could root any Android device, not just Samsung devices. But, Towelroot has now been patched by Samsung and other manufacturers so it’s of no use on the newer firmwares from Samsung.
Anyway, being able to root is one of the reasons why people consider purchasing a developer edition of Verizon Galaxy Note 4. So without furtherado, let’s download cf-auto-root for Verizon Galaxy Note 4 and root the thing.
READ: Root Galaxy Note 4: The Benefits, Risks and Rooting Instructions
[rominfo]
ROOT PACKAGE INFO
| Name | CF Auto Root |
| Warranty | Void Warranty. |
| Stability | Stable Without Any Issues |
| Root Manager App | SuperSU. It manages root permissions for apps on the device. |
| Credits | Chainfire. |
[/rominfo]
[ad1]
Downloads
Download link | Filename: CF-Auto-Root-trltevzw-trltevzw-smn910v.zip (25.17 MB)
How to Root Verizon Galaxy Note 4 Dev Edition (SM-N910VMKEVZW)
WARNING: Warranty may be void of your device if you follow the procedures given on this page. You only are responsible for your device. We won’t be liable if any damage occurs to your device and/or its components.
Important Note: Backup important files stored on internal SD card of your device, so that in case a situation occurs requiring you to do a factory reset after rooting, which might delete internal sd card too, your files will remain safe on your PC.
Android Backup and Restore Guide: Apps and Tips
- Make sure your device is Verizon Galaxy Note 4 developer edition, SM-N910VMKEVZW.
- Extract/Unzip the CF-Auto-Root-trltevzw-trltevzw-smn910v.zip file that we downloaded above on your PC (using 7-zip free software, preferably). You’ll get the following files:
- CF-Auto-Root-trltevzw-trltevzw-smn910v.tar.md5
- Odin3-v3.07.exe
- Odin3.ini
- tmax.dll
- zlib.dll
- Disconnect your Galaxy Note 4 from PC if it is connected.
- Double-click the Odin3-v3.07.exe file to open Odin.
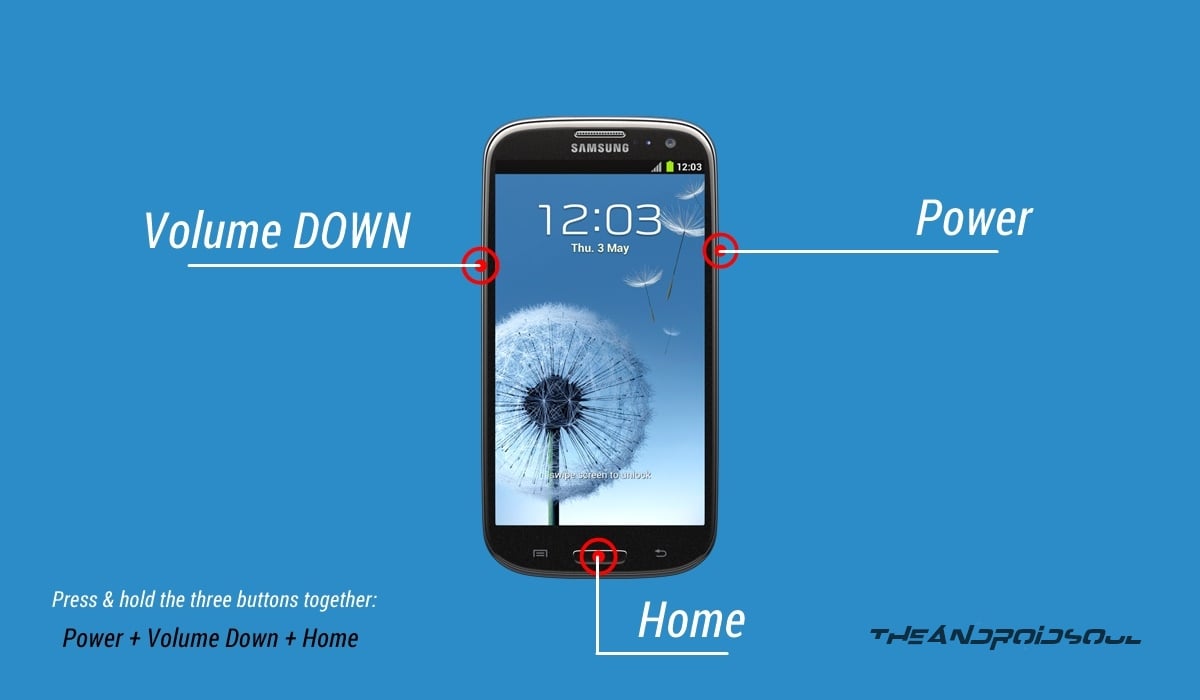
- Boot your Galaxy Note 4 into Download Mode:
- Power off your phone first and wait for 6-7 seconds after display is off.
- Press and hold these 3 buttons together until you see Warning! screen: Volume Down + Power + Home.
- Press Volume Up now to continue to Download Mode.
└ For further help, check out our post on Galaxy Note 4 Download Mode →

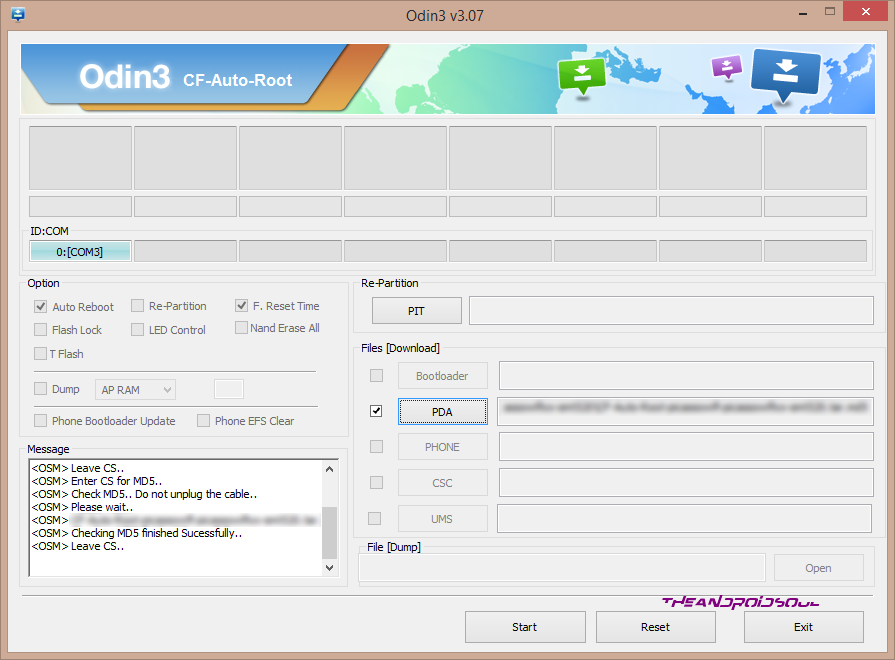
- Connect Galaxy Note 4 to PC. Odin window will show an Added!! message in bottom left box. Odin’s screen would look like this:

If you don’t get the Added! message, here are some troubleshooting tips:- Make sure you have installed driver for Galaxy Note 4 as said above.
- If you have already installed driver, then uninstall them and reinstall back.
- Connect using a different USB port on your PC.
- Try a different USB cable. The original cable that came with your phone should work best, if not, try any other cable that’s new and of good quality.
- Reboot phone and PC and then try again.
- Load the recovery file (extracted in Step 2) into Odin as instructed below:
- Now in the Option section of Odin, make sure that Re-Partition box is unchecked. (Auto Reboot and F. Reset Time boxes remain checked, while all other boxes remain unchecked).
- Double check the above two steps.
- Click the Start button to begin flashing CF-Auto-root on your Galaxy Note 4, and wait until you see a PASS! message in Odin’s top left box.
- When you get either RESET! or PASS! message, your phone will reboot into recovery and root your Galaxy Note 4 and again restart automatically. You can then disconnect your phone from PC.

If you see FAIL message instead of the RESET or PASS in Odin’s top left box, that’s a problem. Try this now: disconnect your Galaxy Note 4 from PC, close Odin, remove phone’s battery and put it back inside in 3-4 seconds, open Odin and then repeat from Step 3 of this guide again.
Also, If device is Stuck at setup connection or on any other process, then too, try this: disconnect your Galaxy Note 4 from PC, close Odin, remove phone’s battery and put it back inside in 3-4 seconds, open Odin and then repeat from Step 3 of this guide again.
NOTE: It may happen that your phone doesn’t automatically boot into recovery and root your phone. In that case follow the following above procedure except that in Step 7, Auto Reboot option is un-checked and then the instructions below:
- Pull out the battery and re-insert it.
- Boot your Galaxy Note 4 into Recovery Mode: Press and hold these 3 buttons together: Volume Up + Power + Home.
- Now, this will start the rooting process and will reboot the phone automatically when the process is done.
That’s all. Enjoy!


Proud owner of a Galaxy Note 4 Developer Edition
try after try I get the following:
ODIN MODE (HIGH SPEED)
PRODUCT NAME: SM-N910V
CURRENT BINARY: Samsung Official
REACTIVATION LOCK(KK): OFF
QUALCOMM SECUREBOOT: ENABLE (CSB)
RP SWREV: S1, T1, R1, A1, P1
SECURE DOWNLOAD : ENABLE
UDC START
SECURE CHECK FAIL : recovery
anyone get this to work?
say secure c heck fail : recovery
computy say : Added!!
Removed!!
Added!!
Enter CS for MD5..
Check MD5.. Do not unplug the cable..
Please wait..
CF-Auto-Root-trltevzw-trltevzw-smn910v.tar.md5 is valid.
Checking MD5 finished Sucessfully..
Leave CS..
Odin v.3 engine (ID:8)..
File analysis..
SetupConnection..
Initialzation..
Get PIT for mapping..
Firmware update start..
SingleDownload.
recovery.img
NAND Write Start!!
cache.img.ext4
FAIL! (Auth)
Complete(Write) operation failed.
All threads completed. (succeed 0 / failed 1)
Removed!!
Added!!
how to d it? why? can u help me?
You sure your device is a Verizon Galaxy Note 4 “Developer Edition”?
Please provide OSX directions (not using windows)
Please provide OSX directions (not using windows)
Please provide OSX directions (not using windows)
Please provide OSX directions (not using windows)
Please provide OSX directions (not using windows)
How to root Note4|N910V VZW-N910VVRU1ANJ5 this one? help me please!
How to root Note4|N910V VZW-N910VVRU1ANJ5 this one? help me please!
How to root Note4|N910V VZW-N910VVRU1ANJ5 this one? help me please!