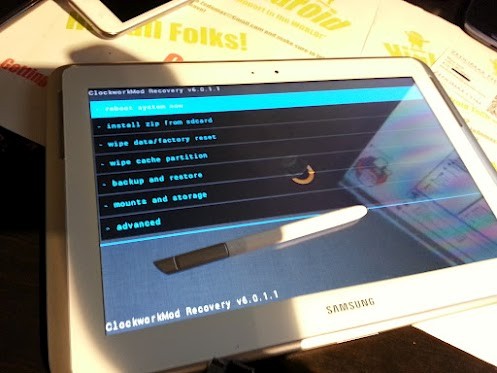
The Galaxy Note 10.1 hasn’t gone on sale yet, but root access has already been achieved on it and ClockworkMod recovery – which lets you flash custom ROMs on the device – has also been released. This is all thanks to XDA Senior Member zedomax who got his hands on the tablet before its release and has successfully rooted it and made ClockworkMod (CWM) recovery for it. The guide below will help you root as well install CWM recovery (CWM recovery is required to get root) on your Galaxy Note 10.1, whenever you’re able to buy one.
This procedure will increase the binary flash counter on your device which voids warranty. However, Chainfire, maker of the TriangleAway app which resets the counter will surely be supporting the Galaxy Note 10.1 when it is released, so you don’t need to worry too much about the flash counter.
You can use the procedure below on both the Wi-Fi variant as well as the Wi-Fi + 3G variant, aka model numbers N8013 and N8000. So join us as we take you through the steps to root and install ClockworkMod recovery on the Galaxy Note 10.1.
Compatibility
This guide below is compatible only and only with the Galaxy Note 10.1 Wi-Fi/Wi-Fi+3G variants, model numbers N8013/N8000. It’s not compatible with any other device. Check your device model in Settings » About phone.
Warning!
The methods and procedures discussed here are considered risky and you should not attempt anything if you don’t know completely what it is. If any damage occurs to your device, we won’t be held liable.
How to Root and Install ClockworkMod Recovery Galaxy Note 10.1
Part I: Flashing ClockworkMod recovery
- Backup your Apps and important data — bookmarks, contacts, SMS, APNs (internet settings), etc. This Android backup guide would help you. This is just in case something goes wrong during the process.
- Download and install the drivers for the tablet on the computer.
Download Drivers - Download the root package.
Download Link | Filename: RootGalaxyNote10.1.zip - Extract the RootGalaxyNote10.1.zip file to a convenient location on the computer, to get the following files:
- odin3 v1.85.exe
- Odin3.ini
- HighOnAndroidCWMRecoveryGTN8000.tar
- CWM-SuperSU-v0.94.zip
- Copy the CWM-SuperSU-v0.94.zip file to the internal SD card on the tablet.
- Now, double-click on the odin3 v1.85.exe file to start Odin, the flashing software needed to flash ClockworkMod (CWM) recovery.
- In Odin, click on the PDA button, then select the HighOnAndroidCWMRecoveryGTN8000.tar file obtained in step 4. Important! Do not make any other changes in Odin except selecting the required file in PDA. Leave all other options as they are.
- Then, turn off the tablet. Then boot into ODIN download mode on the tablet by holding down Power and Volume Down buttons (volume down is the button next to the power button) together till you get a Warning!! screen. Here, press Volume Up to continue to enter download mode.
- Connect your tablet to PC now with the USB cable. You should get the message “Added!” under Odin’s message box in the bottom left.
If you don’t get this message, then probably there is a problem with drivers. Make sure you’ve proper drivers installed (check step 2). - Now, hit the Start button in Odin to start flashing CWM recovery. After the process is complete, the tablet will reboot automatically, and you will get a PASS! message in Odin. You can then disconnect the tablet from the computer.
- CWM recovery is now installed on your tablet, which will let you flash custom ROMs on it. You can boot into CWM recovery by turning off the tablet, then holding down Power and Volume Up buttons together. When the screen turns on, let go of the power button but keep holding down the volume up button till the device boots into ClockworkMod recovery.
Part II: Rooting
- Make sure you copied the CWM-SuperSU-v0.94.zip file (obtained in step 4 above) to the tablet as told in step 5 above. If not, then you can copy it now.
- Turn off the tablet. Then boot into ClockworkMod recovery on the tablet by holding down Power and Volume Up buttons together. When the screen turns on, let go of the power button but keep holding down the volume up button till the device boots into ClockworkMod recovery.
Use volume keys to scroll up and down between options and power key to select an option in recovery. - Select install zip from sdcard, then select choose zip from sdcard. Scroll to the CWM-SuperSU-v0.94.zip file on the SD card and select it. Confirm installation by selecting Yes on the next screen to install the root package.
- After installation is complete, select go back then select reboot system now to reboot the tablet.
- When the tablet boots up, connect to the internet (via Wi-Fi or 2G/3G), then open the app SuperSU from the apps menu. Then, click on Continue when prompted, then click OK. Close SuperSU after that.
- Now, whenever you use an app that requires root, you can grant it root access by pressing the Grant button when prompted.
[Optional] Part III: Installing Stock Recovery to get Official Over the Air Updates
After flashing ClockworkMod recovery, you will not be able to get official updates. So if you want to get official updates after rooting the device, you can follow the steps below to flash stock recovery, after which official updates will work.
- Download stock recovery
Download Link | Filename: N8000_StockRecovery.tar - Now, to flash the stock recovery downloaded in step 1, simply follow steps 6 to 10 of Part I of the guide, but instead of selecting the HighOnAndroidCWMRecoveryGTN8000.tar file, select the N8000_StockRecovery.tar file. In short, the procedure to flash CWM recovery and stock recovery is the same, you just need to select the stock recovery file in Odin, instead of the CWM file.
- After the flash is complete, your device will be able to get over the air official updates.
If all went well, your Galaxy Note 10.1 will have root access as well as ClockworkMod recovery installed so you can flash custom ROMs on it. You will also be able to flash back to stock recovery in order to get updates if required. Have fun!


