Sony recently started officially updating the Xperia Arc S to Ice Cream Sandwich Android 4.0 in some Nordic countries. We posted an installation guide on how you can manually install the official Ice Cream Sandwich update on your Xperia Arc and the Arc S. Now, you can get root access on the firmware by following this rooting guide.
Unfortunately, this rooting procedure requires that you unlock the bootloaders on your phone. Bootloader unlocking, while officially allowed, prevents you from getting further official updates through Sony, so if you’re not keen on unlocking the bootloaders on your phone, skip this rooting method and wait for a method that allows rooting on locked bootloaders to come along.
Compatibility
This ROM and the guide below are compatible only and only with the Sony Ericsson Xperia Arc and Arc S, model number LT15i/LT18i. It’s not compatible with any other device and may render an incompatible device unusable. Check your device model in Settings » About phone.
Warning!
The methods and procedures discussed here are considered risky and you should not attempt anything if you don’t know completely what it is. If any damage occurs to your device, we won’t be held liable.
How to Root Ice Cream Sandwich Firmware on Xperia Arc/Arc S
- Your phone must be running the official Ice Cream Sandwich firmware. Install it by following the guide → here.
- Important! Your Xperia Arc must have an unlocked bootloader. You can unlock your bootloader officially → here.
- Install ADB on your computer using the guide → here. This is required to flash the requisite kernel on your phone. (Skip if you already have ADB installed on your PC).
- Download the root package file.
Download Link | Filename: Superuser-3.0.7-efghi-signed.zip - Transfer the downloaded zip file in step 4 to the SD card on your phone.
- Download the kernel required to flash the root package on the phone. This kernel will not actually be flashed on to your device, but only booted into once to flash the root package.
Download Link | Filename: ARC-DooMKernel-ICS-BETA-v04-lower-boot.img - Download fastboot, which will be used to flash the kernel downloaded in step 6.
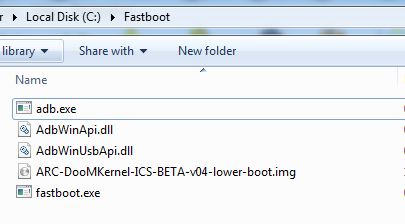
Download Link | Filename: Fastboot.zip - Extract the Fastboot.zip file to the C: drive on your computer to get a folder named Fastboot with four files inside it.
- Copy the ARC-DooMKernel-ICS-BETA-v04-lower-boot.img file downloaded in step 7 to the Fastboot folder. You should have 5 files in the Fastboot folder now, as shown in screenshot below:

- Now, connect your phone to the computer in fastboot mode. To do this, first plug the USB cable to PC, then pick up your phone and hold the Menu key (key at the bottom right on your Arc/Arc S), and then, while holding the Menu key, connect the USB cable to your phone.
- Open Command Prompt on your computer from Start » All Programs » Accessories.
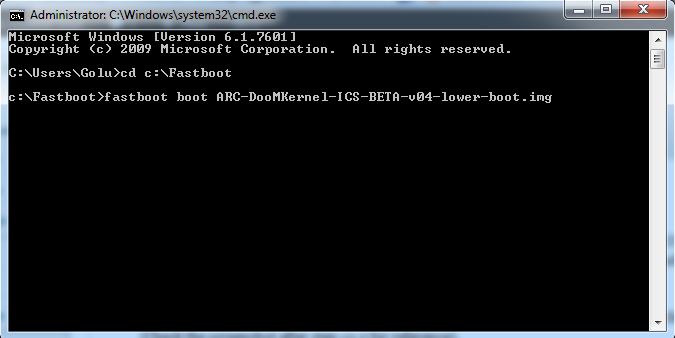
- (Read step 13 before doing this step as you have to perform step 13 as soon as step 12 is complete) In Command Prompt, type the following commands to flash the kernel, pressing Enter after each command (Check the screenshot after step 12.2 for reference).
- Important! Once the kernel is flashed, the phone will reboot. As soon as the Sony logo shows up and the blue LED lights up, start pressing the Back button on the phone continuously till you enter Clockworkmod Recovery. In recovery, use Volume buttons to navigate and Home button to select options.
- Select install zip from sdcard, then select choose zip from sdcard. Scroll to the Superuser-3.0.7-efghi-signed.zip file on the sdcard and select it. Confirm installation by selecting Yes – Install Superuser-3.0.7-efghi-signed.zip on the next screen.
- After installation is complete, go back to the main recovery menu by pressing the Back button on the phone, then select reboot system now to reboot the phone.
- After the phone boots up, we need to install busybox, which is required by many apps to use root access properly. Install the BusyBox Installer app on your phone from the Play Store (Android Market).
- Open the BusyBox Installer app on your phone, press the Allow button to grant it root access, then press OK on the pop-up screen. Then, press the Install button at the bottom to download and install busybox.
That’s it. Following the above procedure, you can obtain root access on the official Ice Cream Sandwich firmware on your Xperia Arc/Arc S. Do let us know how it works out for you, in the comments below.


After step 12.2 i keep getting do you know what could be the source of this?
Same here
After step 12.2 i keep getting do you know what could be the source of this?
Same here
After step 12.2 i keep getting do you know what could be the source of this?
Same here
try to get into the blue notofocation mode one more time
try to get into the blue notofocation mode one more time
try to get into the blue notofocation mode one more time
…:(((
same thing happen to me
any1 can fix this pls?
same problem here but I flashed the .img without problems using Sony Ericsson Xperia flasher (by Bin4ry & Androxyde) alias X10 flashing tool. hope this will help you 😉
@ Step 10…before plugging the phone…should we turn it off ??? normally it should be off.!!!
…:(((
same thing happen to me
any1 can fix this pls?
same problem here but I flashed the .img without problems using Sony Ericsson Xperia flasher (by Bin4ry & Androxyde) alias X10 flashing tool. hope this will help you 😉
…:(((
same thing happen to me
any1 can fix this pls?
same problem here but I flashed the .img without problems using Sony Ericsson Xperia flasher (by Bin4ry & Androxyde) alias X10 flashing tool. hope this will help you 😉
@ Step 10…before plugging the phone…should we turn it off ??? normally it should be off.!!!
@ Step 10…before plugging the phone…should we turn it off ??? normally it should be off.!!!
my wifi can’t turned on after rooting. Somebody help me..
did ou get it to work please tell me
my wifi can’t turned on after rooting. Somebody help me..
did ou get it to work please tell me
my wifi can’t turned on after rooting. Somebody help me..
did ou get it to work please tell me
waiting for ever……
waiting for ever……
waiting for ever……
for this method ur boot loader should be unlocked moreover as of my knowledge custom kernel wont work with stock firmware this procedure tested one working properly?
for this method ur boot loader should be unlocked moreover as of my knowledge custom kernel wont work with stock firmware this procedure tested one working properly?
for this method ur boot loader should be unlocked moreover as of my knowledge custom kernel wont work with stock firmware this procedure tested one working properly?
pls help me
when i did the above procedure ,the phone turns on properly but after that it says “unfortunately android.com.phone has stopped”
so icannot make calls.
and also my wi fi is also not working.
pls help me urgently
pls help me
when i did the above procedure ,the phone turns on properly but after that it says “unfortunately android.com.phone has stopped”
so icannot make calls.
and also my wi fi is also not working.
pls help me urgently
pls help me
when i did the above procedure ,the phone turns on properly but after that it says “unfortunately android.com.phone has stopped”
so icannot make calls.
and also my wi fi is also not working.
pls help me urgently
wont work it just says waiting for device? anyone have a clue why?
wont work it just says waiting for device? anyone have a clue why?
wont work it just says waiting for device? anyone have a clue why?
thanks…it worked for me… 🙂
thanks…it worked for me… 🙂
thanks…it worked for me… 🙂