If you’ve owned and used an iPhone for a long time, your device may have acquired a chunk of data, some of which may be sensitive and you wouldn’t want others to see. This accumulation may sometimes affect your device’s performance at which point you have two choices – reset your iPhone to factory settings or sell it to purchase another one.
Regardless of what you decide, it’s always safe to wipe your iPhone so that all of your personal data is erased from the device so that no one else can access it in the future. In this post, we’ll explain to you everything you need to know about wiping an iPhone, why and when you should do it, and what you need to know before you reset your iPhone back to factory settings.
- Why and when should you wipe your iPhone?
- What should you do before wiping your iPhone?
- How to prepare your iPhone for wiping
- How to wipe your iPhone completely [4 methods]
- What happens when you wipe your iPhone to factory settings?
- How to wipe your iPhone without a factory reset
- What should you do if you didn’t erase your iPhone properly before giving it away?
Why and when should you wipe your iPhone?
No matter how well you’ve taken care of your iPhone, there will come a point when you’ll have to wipe it back to its factory setting. If you’re wondering when you should do it, you can wipe your iPhone when:
- Your device has slowed down as it has a lot of data and apps stored in memory. If you want to improve your old iPhone’s performance, wiping it to default settings should make it fast.
- You have recently started encountering bugs and issues with the software which will need to be wiped to make your iPhone work again.
- You have a beta version of iOS running on the iPhone that you no longer want to use. In such cases, you can use Recovery Mode to wipe your phone’s data and settings and install a fresh stable copy of iOS on it.
- You’re about to sell your iPhone or give it away to someone. Others will only be able to use your device when you disable Activation Lock and wipe its contents.
▶︎ How to Remove iOS Beta Without Computer
What should you do before wiping your iPhone?
Performing a factory reset is a simple task as most of it can be done on your iPhone itself. However, before you proceed to delete its data, you must take care of the following things:
- Create a backup of your iPhone’s data on iCloud or the Mac so you can restore it on the same iPhone or a new iPhone when you need it.
- Disable your iPhone’s Activation Lock so the device can be wiped to factory settings and removed from your list of Find My devices.
- Deregister your phone number from iMessage and deactivate FaceTime so that you’re able to use it on other devices.
- Apple Watch owners will have to unpair their watches from the iPhone they’re about to wipe and connect them to another iPhone to continue using them.
- Remove your eSIM from iOS settings so you can use it on a new device.
- (Optional) Remove all the accounts you’ve signed in to on Apple apps and third-party apps you have installed on the iPhone to protect your data and privacy.
We’ll explain to you all the steps necessary to prepare your iPhone for a factory reset in the section that follows.
How to prepare your iPhone for wiping
Before you wipe your iPhone, you need to make sure all of its data has been backed up, you’ve unpaired accessories you previously connected to it, and have signed out of all the accounts that you have with Apple services and other apps on your iPhone. You can check out our dedicated guide to preparing your iPhone for a factory reset from the link below:
How to wipe your iPhone completely [4 methods]
There are a bunch of ways you can wipe your iPhone back to factory settings. Each of these methods can only be performed on certain devices and we’ll explain all of the steps involved for all of them. You can wipe your iPhone from your iPhone itself, or you can connect it to a Mac or Windows computer to get it erased. You can also factory reset your iPhone using another iPhone or an Apple device that’s signed into the same Apple ID as the device you’re about to reset.
Method 1: Using the Settings app on iOS
If you prefer to wipe your iPhone to factory settings, doing it on the iPhone itself is the easiest of all four methods listed in this post. This step requires that you disable Find My on your iPhone but even if you haven’t, you’ll have the option to disable it during the wiping process. After you’ve followed all the steps to prepare your iPhone for a complete wipe, you can activate the factory reset process by following the steps below.
- Open the Settings app on your iPhone.

- Inside Settings, select General.

- On the next screen, scroll down and tap on Transfer or Reset iPhone.

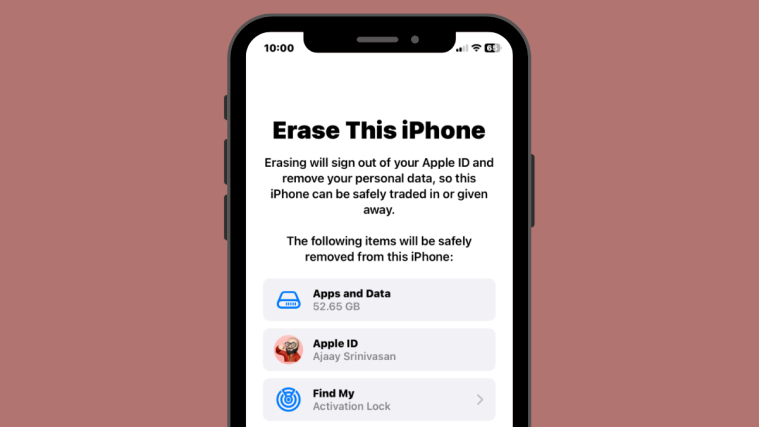
- In the Transfer or Reset iPhone screen, select Erase All Content and Settings from the bottom.

- You’ll now see the Erase This iPhone screen that shows you the list of contents that will be removed during the process. To confirm your action, tap on Continue.

- On the next screen, you’ll be asked to enter your device passcode. This is the passcode you enter when unlocking your iPhone when your Face ID or Touch ID doesn’t work.

- If you haven’t disabled Find My on your iPhone yet, you will be prompted to enter your Apple ID password so that you can turn off Find My and remove the Activation Lock from your iPhone.
- If iCloud Backup is enabled on your device, your iPhone will start creating a backup of your device data onto iCloud and then wipe your iPhone. If for some reason this backup fails, you will see this prompt on the screen. You can choose Erase Anyway to skip the backup process if you have already created a backup or tap on Don’t Erase iPhone to wait until your backup has been uploaded to iCloud.

- Your iPhone will then start wiping all of your data and may restart a couple of times during the process. This may take a few minutes or longer depending on the amount of data you have saved on the device. When the process completes, you will arrive at the “Hello” screen, the same one that shows up when you set up a new iPhone.

- From here, you can set up your iPhone as new, restore it from a backup, or switch it off if you’re planning to give it away to someone else.
Method 2: Using Finder app (Mac) or iTunes app (Windows)
If you don’t prefer using your iPhone for wiping itself, you can connect it to a Mac or a Windows PC to revert its condition to factory settings. For this method, you will need to ensure that Find My on your iPhone is disabled before you connect it to your computer. If you own a Mac, you don’t need additional software to be able to connect and wipe your iPhone. But if you’re using a Windows computer, you will first need to download the iTunes for Windows program on your desktop and install it before you can get started.
Once your Mac or Windows computer is ready, connect your iPhone to it using a USB-to-Lightning cable that came with your iPhone. When the devices are connected, open the iTunes for Windows application on Windows and click on the Phone icon at the top of this window.
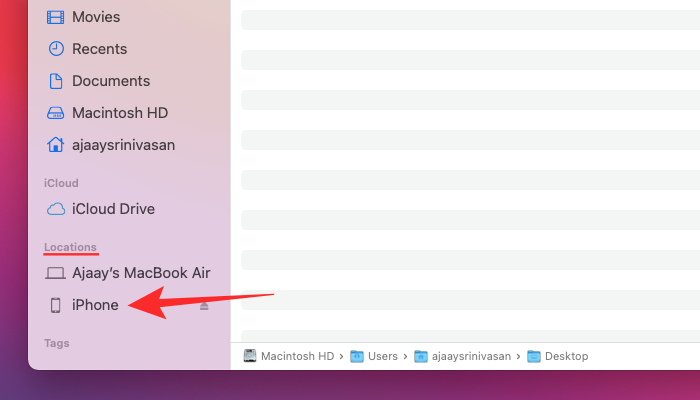
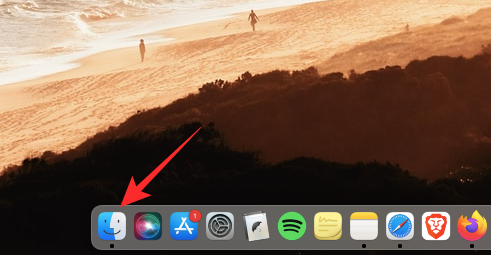
- On a Mac, open the Finder app from the Dock, Launchpad, or Spotlight.

- Inside Finder, select your device from the left sidebar.
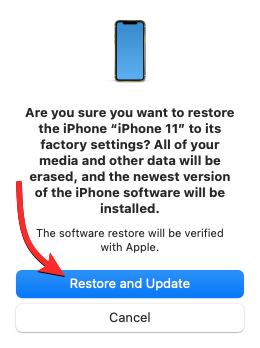
- When your iPhone’s details show up, select the General tab at the top and then click on Restore iPhone under “Software Update” at the top.

- In the prompt that appears, select Restore and Update to confirm your choice.
Your device will now be erased and a fresh build of the latest iOS will be installed on the same.
Method 3: Using the Find My app on other Apple devices
This method will be useful in case you’ve misplaced your iPhone someone or if it has been stolen from you. If you have no hope of getting this device back, the least you could do is remotely wipe all of your data from the device so that your personal and sensitive information gets removed from the iPhone and is inaccessible to anyone who has physical access to it.
To wipe your iPhone remotely, you need to make sure that Find My is enabled on your iPhone and that your current device is signed into the same Apple ID as the one on the iPhone you want to wipe. This method won’t work if you’ve already turned off Find My on the iPhone as your device won’t show up inside Find My when its Activation Lock has been disabled.
- Open the Find My app on another iPhone, iPad, Mac, or Apple Watch, or sign in to iCloud.com using your Apple ID and password. In this instance, we’ll be using the Find My app on macOS.

- When the app opens, click on the Devices tab.

- Now select the iPhone you want to wipe.

- You will see additional options right away if you’re on the iPhone, iPad, or Apple Watch. On the Mac app, you need to click on the i icon adjacent to the iPhone from inside the map.

- When a popup menu appears, click on Erase This Device at the bottom.

- In the Erase iPhone prompt, click on Continue and follow the on-screen instructions to successfully wipe the selected iPhone.

Method 4: Using Recovery mode on iPhone
When your iPhone is unusable or doesn’t boot up as it’s supposed to, you can use Recovery Mode to wipe contents from it and reset it to factory settings. This method can also be used to repair an iPhone that has started misbehaving after a beta update as this resets your device back to a stable build of iOS.
To use Recovery Mode for wiping an iPhone, you need the following things:
- A Mac or a Windows computer.
- The latest version of macOS running on a Mac or the updated version of iTunes for Windows on a computer.
- A USB-to-Lightning cable to connect your iPhone to a Mac or computer.
- An active internet connection on your Mac or computer.
Once you’ve taken care of these requirements, power on your iPhone and connect it to a Mac or Windows computer using a USB-to-Lightning cable. Once your iPhone and the computer/Mac are connected, you can go ahead and activate the Recovery Mode on the iPhone to get started. To enable Recovery Mode, you need to follow these steps in the order provided below:

- Press the Volume Up button and release it instantly.
- Press and Volume Down button and release it instantly.
- Now, press and hold down the Side button until you see the Recovery Mode screen. You shouldn’t let go of the Side button even after the Apple logo shows up but you only do when the Recovery Mode screen appears.

- The Recovery Mode screen will show a Mac icon at the center and a lightning cable at the bottom half. Once your iPhone shows this screen, you can perform the next step on your Mac or Windows computer.
- When the Recovery Mode screen shows up on the iPhone, open the Finder app on your Mac and select your iPhone from the left sidebar for it to show up. On Windows, open the iTunes app and click on the Phone icon at the top.

- Inside the Finder or iTunes window, you should now see the “There is a problem with the iPhone” prompt. To wipe your iPhone, click on Restore iPhone.
- Your Windows or Mac computer will now look for the latest non-beta software compatible with your iPhone. Once it finds the relevant update for you, you’ll see another prompt that reads “A software update is required to restore your iPhone”. Inside this prompt, click on Install to download the software and install a fresh copy of iOS on the iPhone.

- The update will now get downloaded and then installed on your iPhone and upon completion, your iPhone will now reboot to the Hello screen. From here, you can either set it as new, restore using a backup or switch off the device if you don’t intend to use it in the future.
What happens when you wipe your iPhone to factory settings?
Performing a wipe removes all of the contents on your iPhone and forces it back to its original state, the same condition your iPhone came out of the box when you first set it up. When you wipe your iPhone to factory settings,
- All your data including photos, videos, and files saved on the iPhone will be removed.
- All the apps and games you previously installed on the iPhone will be deleted.
- Your iPhone’s settings will be reset to factory default including your Wi-Fi connections, cellular data settings, VPNs, app permissions, location settings, etc.
- Any temporary data including app and system cache will also be deleted from the iPhone.
- The iPhone will be removed from the list of devices signed in to iCloud and Find My.
- This iPhone will no longer receive your iMessage texts and FaceTime calls unless you set them up again on the device.
- When method #4 is used, your iPhone’s beta firmware will be replaced by the last stable iOS build released for your device.
When your iPhone is wiped to factory settings, all data that gets removed will be unrecoverable, so we recommend taking a backup of your device before you erase it.
How to wipe your iPhone without a factory reset
Erasing your iPhone wipes its data and settings from the device and returns it to its factory state. However, you can reset specific features on your iPhone without needing to perform a factory reset. If you wish to solve an issue or want to configure your iPhone slightly different from how you initially set it up, you can reset using any of these functions:
Reset Network Settings – This option deletes all of the current network settings from your iPhone and can be useful if you’re experiencing problems connecting to a Wi-Fi or cellular network.
Reset Keyboard Dictionary – This option resets your keyboard’s dictionary and helps solve problems with autocorrect, incorrect suggestions, and typos.
Reset Home Screen Layout – If you wish to return to the original iOS Home Screen layout, this option removes your current layout and resets it to its factory preset.
Reset Location & Privacy – This option resets all the settings you configured inside your phone’s location and privacy settings. Resetting this will revoke access you’ve granted to apps installed on your iPhone unloading location and you will have control over what access is being granted when the device boots up again after the reset.
Reset All Settings – This option resets all of the above settings including your network configuration and device preferences. Doing so will not delete photos, files, and apps from your iPhone as they’ll remain intact, unlike after a factory reset.
- Open the Settings app on your iPhone.
- Inside Settings, select General.
- At the bottom of the General screen, tap on Transfer or Reset iPhone.
- On the next screen, tap on Reset.

- Now, select the reset setting you wish to perform and your iPhone will start the reset process.

Once reset, the device will reboot and you can use your iPhone again without restoring it from a backup.
What should you do if you didn’t erase your iPhone properly before giving it away?
If you forgot to wipe your iPhone before giving it away or if your device was misplaced or stolen, there are still a few things you can do to make sure the data on that device isn’t accessible to someone else. If the device you gave away has been shared with someone you know, you can request to take it back from them so that you take the necessary steps to wipe your iPhone correctly.
If you don’t expect to get your iPhone back, you can wipe it away remotely using method #3 in the guide above. In this method, we use Find My to detect your iPhone but if this device is undetectable, you can wipe it remotely.
- In the Find My app, locate the iPhone you want to wipe and then select Erase This Device in the list of options. This will wipe all of its data from the selected iPhone.

- After the wiping process is complete, you can remove this device from your Apple account by selecting Remove from Account or Remove This Device in the same list of options. Once you remove this device, it won’t appear inside Find My or on iCloud and won’t be traceable by you in the future. You can also remove a device from your Apple account from the Settings app on another iPhone/iPad or the System Preferences app on a Mac.
- If Find My was already deactivated when you misplaced your iPhone or sold it, you cannot do anything about the data that was stored on your iPhone or iCloud. If you haven’t wiped the data from your iPhone before, you won’t be able to remotely wipe it without having physical access to it.
- Instead, you can choose to protect your Apple ID and prevent someone else from accessing your iCloud data by changing your Apple ID password. To do that, go to appleid.apple.com on the web and sign in to your Apple account. Once you’re signed in, go to Sign-In and Security > Password > Change Password to set a new password to your Apple account. This way, your Apple ID will stay protected and will be inaccessible to anyone other than you.
- If the iPhone you gave it away was used to make Apple Pay transactions and you forgot to wipe its data, you can remove your saved back cards by going to iCloud.com > Account Settings > your device and clicking on Remove next to “Apple Pay”.
Your Apple ID account will now be secure and inaccessible to anyone else apart from you, even if you failed to wipe it in the first place.
That’s all you need to know about wiping an iPhone to factory settings.