Finally, the wait is over for those owning a Verizon branded Galaxy Nexus as the official Android 4.0.4 update for it has been leaked and is available for manual flashing. Android 4.0.4 brings a lot of performance improvements and stability fixes, so it goes without saying that it’s quite an important update.
This update is for both the CDMA and LTE variants. However, the procedure below is a little complex, so make sure read it very carefully before attempting to update your device.
Now let’s take a look at how you can update your Verizon Galaxy Nexus (CDMA/LTE) to Android 4.0.4.
Compatibility
This ROM and the guide below are compatible only and only with the Verizon Galaxy Nexus CDMA/LTE, model number i515. It’s not compatible with any other device. Check your device model in Settings » About phone.
Warning!
The methods and procedures discussed here are considered risky and you should not attempt anything if you don’t know completely what it is. If any damage occurs to your device, we won’t be held liable.
How to Update Verizon Galaxy Nexus to Android 4.0.4
- Very Important! You must be on the stock Android 4.0.2 ROM and stock 4.0.2 radios (baseband) on your phone. Go to Settings » About phone on the phone, and ensure that:
- Under Baseband Version, it says either EK02 or EK05 (or both) which are the stock 4.0.2 radio versions. There may be more text there, but ensure that the text includes EK02 or EK05 (or both).
- The text under Build Number includes ICL53F which is the build number of the stock Android 4.0.2 ROM.
- This procedure will wipe all your apps, data and settings (but it will NOT touch your SD cards, so don’t worry about those). Backup your Apps and important data — bookmarks, contacts, SMS, APNs (internet settings), etc. This Android backup guide would help you.
Important! Don’t forget to at least make a backup of your APN settings, which you can restore later if your data connection does not work after installing the ROM. Use the backup guide to find out how. - Important! You must unlock the bootloader on your Nexus. You can use this tool for unlocking the bootloader. You will lose all installed apps and data (but SD card data will not be deleted) by unlocking the bootloader, so make sure you have followed step 2 prior to this.
- Download and install the drivers for the phone on your computer. Skip this if you already installed the drivers while unlocking the bootloader by following step 3.
Download Drivers - Download the following files:
- Android 4.0.4 update | Alternate Link
Filename: 12f767e7a5d0.signed-mysid-IMM76K-from-ICL53F.12f767e7.zip - 4.0.4 Radio and Bootloader package | Filename: IMM76K_RADIOS_BOOTLOADER.zip
- Fastboot | Filename: Fastboot.zip
- Clockworkmod Touch recovery image | Filename: recovery-clockwork-touch-5.8.0.2-toro.img
- Android 4.0.4 update | Alternate Link
- Copy the two zip files downloaded in step 5.1 and 5.2 above to the SD card on your phone, and remember where you copy them to.
- Extract the Fastboot.zip file to the C: drive on your computer to get a folder named Fastboot with four files inside it.
- Copy the recovery-clockwork-touch-5.8.0.2-toro.img file downloaded in step 5.4 to the Fastboot folder on C drive. You should have 5 files in the Fastboot folder now.
- Enter fastboot mode. To do this, turn off the phone, then press and hold the following keys together: Power + Volume Up and Down. You will enter Fastboot mode. Then connect your phone to the computer once you are in fastboot mode.
- Open Command Prompt on your computer from Start » All Programs » Accessories.
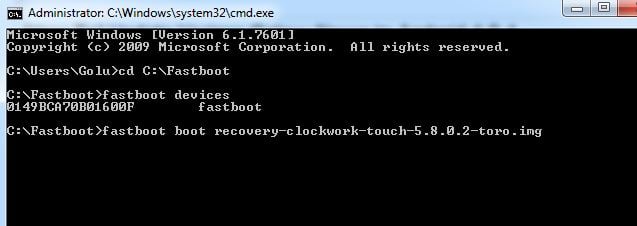
- Now, type the following commands in command prompt to boot into CWM recovery temporarily, pressing Enter after each command (Check the screenshot after step 11.3 for reference).
- cd c:Fastboot
- fastboot devices (this is to ensure the phone gets detected. A string of numbers and letters should appear if the phone is properly detected, as shown in screenshot below. Else, make sure you have the phone drivers properly installed)
- fastboot boot recovery-clockwork-touch-5.8.0.2-toro.img (if this command does not work, use fastboot boot recovery recovery-clockwork-touch-5.8.0.2-toro.img)

- The phone will now reboot into Clockworkmod recovery.
- Perform a Nandroid Backup of your existing ROM, so that you can always restore it from recovery if something does not work out with this rom. To perform a backup, select backup and restore –> On the next screen, select backup again. Go back to main recovery menu after backup is complete.
- Perform a wipe:
- Select wipe cache then select Yes on next screen to confirm.
- Select advanced, and then select wipe dalvik cache » Yes – wipe dalvik. Then go back to the main recovery menu.
- Select install zip from sdcard, then select choose zip from sdcard. Scroll to the 12f767e7a5d0.signed-mysid-IMM76K-from-ICL53F.12f767e7.zip file on the sdcard and select it. Confirm installation on the next screen by clicking on Yes to start installing the update.
- After the installation is complete, select choose zip from sdcard again, then scroll to and select the IMM76K_RADIOS_BOOTLOADER.zip file to flash the 4.0.4 radios and bootloader.
- After the installation of the radios/bootloader package is complete, select go back then select reboot system now to reboot the phone.
After the phone boots up, it will be running the latest official Android 4.0.4 IMM76K update. Do let us know how it works for you, in the comments below.


Verizon. Pffft.
Verizon. Pffft.
Thank you sooooooo much!!! This post saved my phone. I finished updating yey~~
Thank you sooooooo much!!! This post saved my phone. I finished updating yey~~