It may happen that your beautiful Zenfone 2 stops rebooting, getting stuck at boot logo and thus resulting into bootloop. Especially when you installed an OTA update on a rooted Zenfone 2 and where you went one step further into hacking your device: deleting some system apps for better performance. When an OTA is applied, and the said update couldn’t find some system apps, this causes bootloop.
Well, whatever you did, if your Zenfone 2 is bricked, and thus not restarting properly, or you are getting force close errors on apps, then here is a way to unbrick your Zenfone 2. You need to install the whole of firmware back on your device to fix this. And we got one for you here, along with installation instructions. That too a pre-rooted firmware so that you have root access for Xposed, titanium backup and stuff.
Don’t want root access though? Well, simply fire up the SuperSU app after installing the pre-rooted firmware, and tap on Unroot option under the settings. That will unroot your device, and you would be able to take OTA updates too. You have a complete stock device in hand, with everything working alright too. Successful unbrick of your Zenfone 2 isn’t that hard, you’ll see.
This also works fine if you are looking to go Back to Stock to receive OTA updates. Even though you can install any latest update manually, OTAs are short downloads and thus you may prefer them. This guide will help you with OTA fails too.
How to Unbrick Asus Zenfone 2
Downloads
- Download the firmware files. (Check your model no. in Settings > About device first.)
Download all the files from the folder mentioned for your device.
Supported devices
- ASUS ZENFONE 2, model no. ZE550ML and ZE551ML
- Don’t try this one any other device!
Tip: Check the model no. in Settings > About phone. Or, you could also find the model no. on the packaging box of the device.
Instructions
Warning: Warranty may be void of your device if you follow the procedures given on this page. You only are responsible for your device. We won’t be liable if any damage occurs to your device and/or its components.
Backup important files stored on your device before proceeding with the steps below, so that in case something goes wrong you’ll have backup of all your important files.
- Download the files of pre-rooted firmware from above. And while the download is going on, do step 2 to 6, as we will start working with files from step 7.
- Install ADB drivers.
- Install Asus Zenfone 2 drivers.
- Enable USB debugging on your Zenfone 2. Do this:
- Go to Settings > About phone, and then tap ‘Build number’ 7 times to unlock developer options.
- Go back to Settings, then choose ‘Developer options’. Find the ‘USB debugging’ option and use its toggle button to enable it. Accept warning by tapping on OK button.
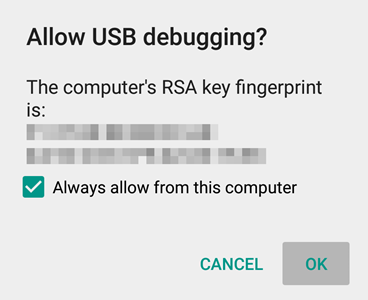
- Connect your One SV to PC now. You will get a pop-up as shown below on your phone when you connect for the first time after enabling USB debugging. Select ‘Always allow from this computer’ checkbox and then tap on OK button.

- Create a new folder on your PC, and name it as z2unbrick — so that we work only within this folder.
- Transfer all the downloaded files to the z2unbrick folder.
- Extract the system.img file from zip archive files like .zip, .z01, .z02, etc. For this, with software like 1-zip installed, right click on the .zip file and select extract here option. Or, right click on on .z01 file, and select any extract here option. You should get system.img file.
- Make sure you have all these files in z2unbrick folder:
- system.img
- boot.img
- droidboot.img
- recovery.img
- Now, open command window in the z2unbrick folder. For this:
- Left click on empty white space in the z2unbrick folder.
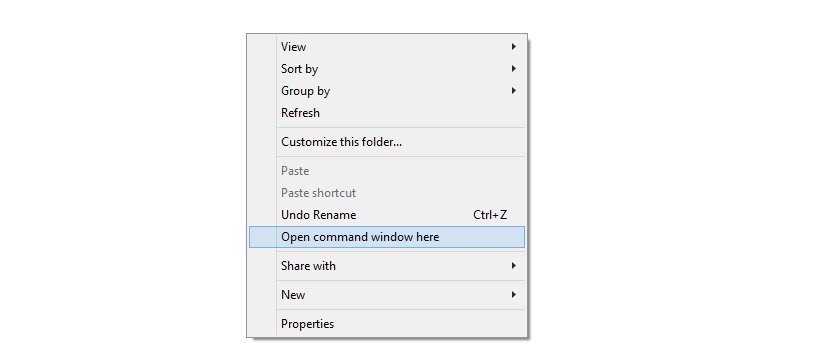
- Now, while holding shift key, right click on empty white space to get a pop-up as shown below.
- Now choose Open command window here option from that.

You will see a command window open up, with location directed to z2unbrick folder of yours.
- Boot your Zenfone 2 into fastboot/bootloader mode. For this, run the following command in command window. (You can copy paste the command and then hit enter key to run.)
adb reboot bootloader
You will see Fastboot written in the middle of the screen. Alternate way to reboot into fastboot mode is: Power off your device, and then hold Power+Volume up button together until you see Android on screen, with fastboot written.
- Test whether fastboot is working alright. In the command window, type the following and then hit enter key. (You can also copy paste the commands.)
→ Upon this, you should get a serial no. with fastboot written after it. If you don’t get fastboot written on cmd window, then it means you need to reinstall adb and fastboot drivers, or change restart PC, or use original USB cable.fastboot devices
- Install the pre-rooted firmware now.
- Flash the firmware now. Use the following commands for this. Run them one-by-one, hit enter key after each command.
fastboot flash fastboot droidboot.img
fastboot flash recovery recovery.img
fastboot flash boot boot.img
fastboot flash system system.img
→ The last command will take time, because system.img is a huge file. Wait for it to complete.
- Now, do a factory reset, so that you don’t face any force close or sluggish performance when using the device. Run the following commands one-by-one.
fastboot format userdata
fastboot format cache
- Now, reboot your device running the following command.
fastboot reboot
- Your Zenfone 2 should start alright now. It’s been unbricked now. And you should face any force close errors either. It’s already rooted, btw, remember? Well, if you wish to take OTA updates in future, or now, make sure device is unrooted. OTA don’t work on rooted devices. To unroot, open the SuperSU app, and then go to Settings tab, and look for ‘Full unroot’ option. Tap on it, and then on ‘continue’ to remove root access from device and make it OTA compatible instantly.
Let us know via comments section below if you need any help with this. Also share your experience of this guide. How cool was that to fix your device yourself?


Jazakumullah khair, my Zenfone is coming back
Jazakumullah khair, my Zenfone is coming back
on the asus logo it is loading and loading but notgoing in
what should i dooooooooo?
It takes long time. Wait for 30 minutes approximately
Btw, every fastboot flash command worked fine, right? Can you copy paste your command window here?
Hi, link to download firmware not working… Can you update? Thanks a lot!
keeps waiting for device
:/ i don’t know what to do anymore!
ADB seems to have only adb sideload enabled and it doesn’t pass a verification thing….
‘waiting for device’ error means fastboot and adb drivers aren’t installed, or installed but not working.
Install them from here first: https://nerdschalk.com/how-to-install-adb-and-fastboot-with-drivers-on-windows-quickest-setup/
Also, make sure you have USB debugging enabled. then connect your device to PC, and type this command in cmd window: adb devices
You should get a serial no.
Let me know.
How do you enable usb debugging when you’re stuck in a bootloop?
I have the same problem,… Tell me if you find anything or did you get your phone to work?
PLS. I really need help.
How do you enable usb debugging when you’re stuck in a bootloop?
I have the same problem,… Tell me if you find anything or did you get your phone to work?
PLS. I really need help.
You have saved my phone, you have saved my life. Thanks a lot. Have to read a lot of times and carefully. And it worked! 🙂
You have saved my phone, you have saved my life. Thanks a lot. Have to read a lot of times and carefully. And it worked! 🙂
My phone is stuck on the logo And I don’t know how to do the debugging option from there. I am able to get to the recovery mode by pressing vol. and power at the same time.
pls. I really need help with this. i have seen many forms like this with the same enable usb debugging.
My phone is stuck on the logo And I don’t know how to do the debugging option from there. I am able to get to the recovery mode by pressing vol. and power at the same time.
pls. I really need help with this. i have seen many forms like this with the same enable usb debugging.
Worked like a charm. Thanks for posting as I’ve been looking for this solution all day!
Worked like a charm. Thanks for posting as I’ve been looking for this solution all day!
Please update the mega link folder it’s not workin. also where do i get the system.img file?
Please update the mega link folder it’s not workin. also where do i get the system.img file?