The X-Reality engine which is used by the Sony company in their HD TV’s has been introduced to their high end smart phones. But not all devices have X-Reality included in their device. Here is a good news for all those Sony Xperia device owners running on jelly bean or above versions, the X-Reality is now ported from Xperia Z2 to all Sony Xperia devices running on JB or later versions.
X-Reality is an image processing technology that enhances the images and videos displayed on the Xperia Z2. It makes pictures look sharper, reduces noise, improves contrast, and fine tunes saturation. This option increases the sharpness and improves the colours on images and videos displayed through the native Gallery app. So here is the step by step procedure on how to get the new X-Reality engine on your Sony Xperia device.
GUIDE: X-REALITY FOR ALL SONY XPERIA DEVICE RUNNING JELLY BEAN OR ABOVE VERSIONS
STEP 0: CHECK COMPATIBILITY
To make sure your device is eligible with this, you must first confirm its android version no. in ‘About device’ option under Settings. Another way to confirm model no. is by looking for it on the packaging box of your device. It must be Jellybean or above!
Please know that this page is meant only for Sony Xperia devices. Please DO NOT try the procedures given here on any other devices. You have been Warned!
STEP 1: BACKUP YOUR DEVICE
Back up important data and stuff before you start playing around here as there are chances you might lose your apps and app-data (app settings, game progress, etc.), and in rare case, files on the internal memory, too.
For help on Backup and Restore, check out our exclusive page on that linked right below.
► ANDROID BACK UP AND RESTORE GUIDE: APPS AND TIPS
STEP 2: INSTALL THE LATEST CWM/TWRP RECOVERY
Skip this step if you already have latest version of CWM or TWRP recovery installed on your device.
A custom recovery is needed to flash the flashable zip files to embed this feature on your device. So get a custom recovery for your device by searching it on our website or remember Google will always be your best friend when it comes for searching.
STEP 3: INSTALLATION INSTRUCTIONS
DOWNLOADS
Download the file given below and transfer it to a separate folder on your phone and remember the location.
FLASHABLE ZIP FILE
DOWNLOAD LINK | File name: XperiaZ2XReality.zip (143.3 KB)
For latest version of the app, check the original page →
Be sure to transfer the zip file you downloaded above to your phone and remember the location of the file. You will need to flash them now on your device using either of ClockworkMod (CWM) or TWRP recovery.
We’ve got separate guide for CWM and TWRP recovery, so use the guide relevant to the recovery you have installed on your device.
GUIDE FOR CWM RECOVERY USERS
Example video: If you haven’t used CWM recovery before to install a .zip file of a ROM or anything else, then we suggest you first watch a video of that to get familiar with the process. Click here to watch the video
- Boot into recovery mode. If you’re rooted, the easiest way to boot into recovery mode would be using the QuickBoot app. If not rooted, then use the hardware key combinations for your device to get into recovery mode.
- Create a Nandroid Backup from recovery. It’s optional but very important to do, so that in case something goes wrong you can restore to current status easily. For making a Nandroid Backup, go to Backup And Restore » Backup.
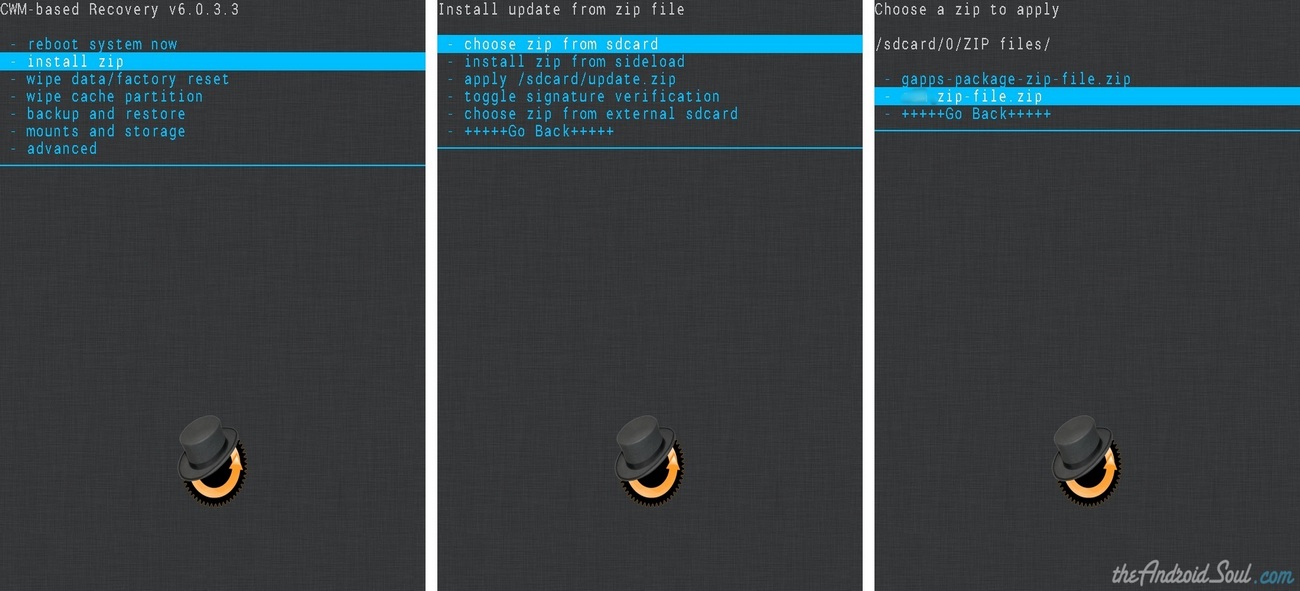
- First Install the zip file:
- Reboot your device. For this, go back to the main menu of recovery and select reboot system now.
GUIDE FOR TWRP RECOVERY USERS
- Boot into recovery mode. If you’re rooted, the easiest way to boot into recovery mode would be using the QuickBoot app. If not rooted, then use the hardware key combinations for your device to get into recovery mode.
- Create a Nandroid Backup from recovery. It’s optional but very important to do, so that in case something goes wrong you can restore to current status easily. For making a Nandroid Backup, go to Backup » and select all check boxes and swipe on the Swipe to confirm option at the bottom of the screen to confirm backup.
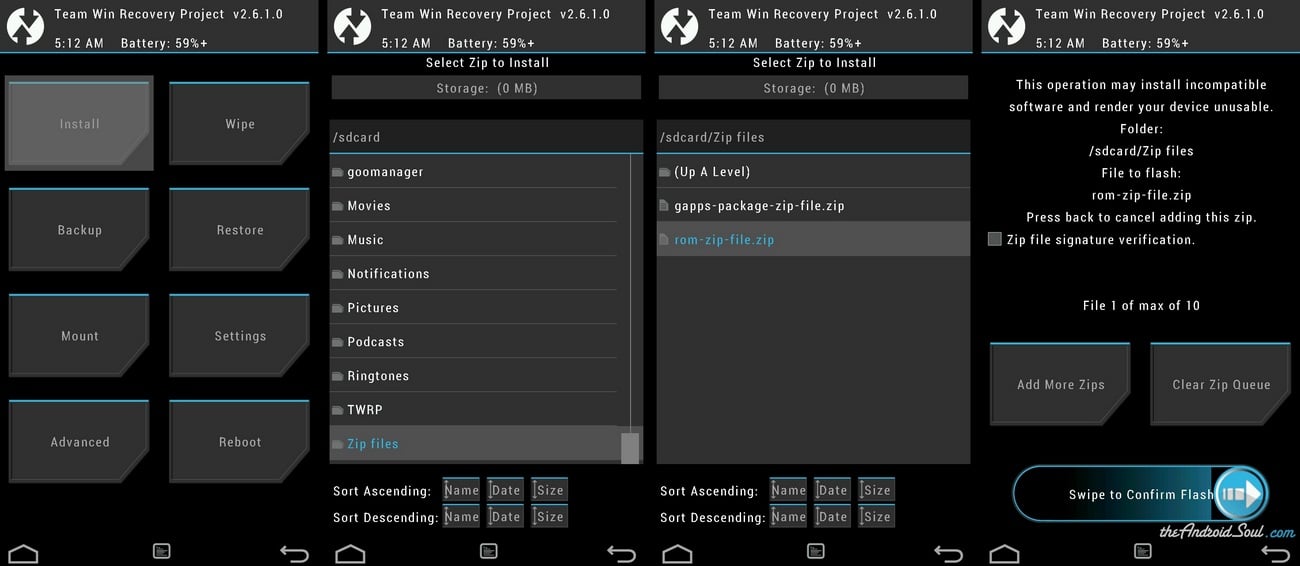
- First Install the zip file:
- Reboot your device. Go back to the main menu of recovery and tap on Reboot » then, tap on System to reboot your phone.
EDIT BUILD.PROP
- Now open the Build.Prop on your device using any text editor. The Build.prop can be found in the root of your android system directory i.e /System.
- Now navigate to the end of the build.prop file and add these two lines at the very end of the file.
ro.service.swiqi3.supported=true
persist.service.swiqi3.enable=1
- Now save and exit the build.prop editor. The device may request you for the root permissions, so grant the root access if it pops up.
- Now reboot your device again and after the reboot the X-Reality is completely installed on your device.
That’s all the X-Reality engine can be found in the Device’s Display settings after the final reboot. Enable it to enjoy the crystal sharp pictures on your device.
– via XDA


does this method works on xperia z1 unlocked bootloader 4.4.4/1.4.4.A.0.108?
does this method works on xperia z1 unlocked bootloader 4.4.4/1.4.4.A.0.108?
does this method works on xperia z1 unlocked bootloader 4.4.4/1.4.4.A.0.108?