- What to know
-
FIX: ‘Check In is not available to send to this recipient’ issue on iOS 17
- 1. Understand how ”Check In” works
- 2. Ensure both sender and receiver iPhones are running iOS 17
- 3. Turn on Full ‘Check In’ Data for Messages
- 4. Ensure cellular data is active
- 5. Ensure Location Services is enabled
- 6. Enable “Significant Locations” inside Location services
- 7. Exit and re-open the Messages app
- 8. Check if iMessage servers are down
- What are some common reasons for the ‘Check In is not available to send to this recipient’ issue on iOS 17?
What to know
- The ‘Check In’ feature requires a number of permissions to function properly, including Location Services, Significant Locations, uninterrupted mobile data connection, and Full ‘Check In’ Data for Messages.
- Ensure Location Services and Significant Locations are enabled from Settings > Privacy and Security> Location Services > System Services > Significant Locations.
- Turn on Full ‘Check In’ Data from Settings > Messages > ‘Check In’ > Data > Full.
- ‘Check In’ works only with iOS 17 devices, so make sure both the sender and receiver’s iPhones are updated to the latest iOS version.
With the release of iOS 17, Apple users can finally use all the latest features and updates the way it was intended. However, not all features seem to be working as expected. The ‘Check In’ feature, for instance, is one of those enhanced security features that is causing trouble for some users. But it’s nothing that can’t be fixed with a few adjustments.
The following guide will walk you through all the possible fixes for when you’re unable to send your ”Check In” details to a concerned friend or family member on the Messages app.
FIX: ‘Check In is not available to send to this recipient’ issue on iOS 17
When adding the ”Check In” option in a conversation, you may sometimes receive the error message ‘Check In is not available to send to this recipient’. And because the error message doesn’t tell you why this is the case or offers a quick solution, finding a single option that can quickly fix the issue is not easy. But fret not. We have listed all the possible solutions that will help you remedy the issue.
1. Understand how ”Check In” works
Firstly, it is important to know how ‘Check In’ works and what settings you need to enable for it.
‘Check In’ offers a way for you to notify your friends and family when you arrive at a location. With ”Check In” enabled, if you don’t reach your destination within the given time, your contact is sent a notification about the same.

For ‘Check In’ to be able to successfully execute all these functions, it requires access to your location as well as a few other services. When you run the ‘Check In’ wizard the first time, it should set everything up for you. But you should also have a fairly good understanding of how to get ‘Check In’ to work, especially if you changed your location services settings later.
Refer to our guide on How to use ‘Check In’ in Messages on iOS 17 to get a step-by-step breakdown of how you can start using ‘Check In’ properly.
Related: iOS 17: How to Enable “Fast” Haptic Touch on iPhone
2. Ensure both sender and receiver iPhones are running iOS 17
‘Check In’ is an iOS 17 only feature. This means that both parties – the sender and the receiver – have to have iPhones running the latest version of iOS 17.

It is further recommended that you use the stable version of iOS 17 and not the public or the developer beta since the latter tend to be buggy and may take longer to refresh location settings on Apple servers.
As an important side note, do consider with whom you’re sharing Check Ins as well. If you’re doing so with an Android user, ‘Check In’ won’t work.
Related: iOS 17: How to Enable Standby on iPhone
3. Turn on Full ‘Check In’ Data for Messages
When sharing ‘Check In’, you might also want to consider turning on full ‘Check In’ Data for Messages.
Open the Settings app and tap on Messages.

Tap on Data under CHECK IN

Select Full instead of Limited.

This will fix the issue if it is caused by insufficient access to data.
Related: How to Personalize Phone Calls in iOS 17 on iPhone
4. Ensure cellular data is active

For the location to be shared constantly and without any interruptions, make sure that you turn on your mobile data. Wi-Fi is not recommended when sharing Check Ins since you’re bound to lose the connections when moving from point A to point B.
5. Ensure Location Services is enabled

Besides ensuring internet connectivity through an active mobile data plan, you will also need to enable Location Services for the duration of the travel. So make sure to turn it on from Settings > Privacy & Security > Location services.
6. Enable “Significant Locations” inside Location services
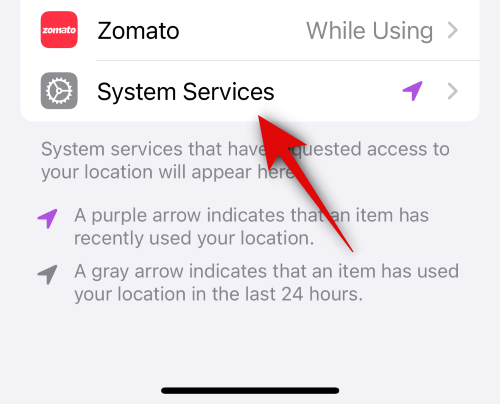
The ‘Check In’ feature requires you to turn on another setting called ‘Significant Locations’. This option resides within Location Services and can be turned on in the following way:
Open the Settings app and tap on Privacy and Security.

Select Location Services.

Tap on System Services.

Select Significant Locations.

And toggle On Significant Locations.

Related: iOS 17: How to use FaceTime Reactions on iPhone
7. Exit and re-open the Messages app
When all else fails, a soft reset of the Messages app can sometimes resolve the issue. Though it’s not always necessary, and you should consider the aforementioned fixes first, simply exiting and re-opening the Messages app can help fix minor bugs and get ‘Check In’ back in order.
8. Check if iMessage servers are down

Sometimes, you may receive the error message simply because the iMessage servers are down. Though it’s not a frequent occurrence, it’s not uncommon for iMessage services to become unavailable from time to time.
You can check if iMessage servers are down by visiting Apple’s System Status page.
What are some common reasons for the ‘Check In is not available to send to this recipient’ issue on iOS 17?
The ‘Check In’ feature requires a number of settings to be turned on for it to function properly. Everything from Location services, Significant Locations, access to Full ‘Check In’ Data for Messages, as well as an uninterrupted mobile data connection is required for the ‘Check In’ feature to function. Besides that, both the sender and receiver iPhones need to be on iOS 17.
The ‘Check In’ feature is the ideal way for Apple users to notify the status of their travels with concerned contacts. Although it may sometimes not function as well as you’d like and throw up unwanted error messages, the aforementioned fixes should resolve the issue and help you share ‘Check In’ with your contacts in Messages without any hiccups. We hope this guide proved useful in that regard. Until next time!


All this I have done, what do I yet lack? I still can’t send a checkin to someone else who has iOS 17 (they screenshotted the version to me, so I know that’s not the problem). Also re-booted. Apple really needs to improve this, including having more specific error msgs.