- What to know
- How the shield equip system works in Hytale (utility menu and off-hand)
- How to equip a shield on PC (detailed step-by-step)
- How to equip a shield on console or controller (what to look for)
- Keybinds you should check before you troubleshoot anything
- How to set up a “shield-ready” utility menu (recommended slots)
- How to swap between torch and shield without slowing down
- How to equip a shield while using tools (mining and fighting)
- Common problems and how to fix them (the ones you’ll actually hit)
- Make your shield a one-button habit
What to know
- The utility/off-hand system is opened with a hold-and-select radial menu on the default Z key, letting you swap off-hand items without opening your inventory.
- The utility menu supports four slots, so you can keep a shield and multiple light sources ready at all times.
- You assign items to the utility menu from the inventory screen by dragging them to the shield/utility icon area below your character.
- You can change the keybind for the utility selector in Settings → Controls, and many keybind lists show “Show Utility Slot Selector” as Z by default.
If you’ve ever been hit while fumbling through your inventory mid-fight, the shield equip process is the fix: put the shield into the utility slots once, and you’ll be able to draw it on demand while keeping your main-hand weapon or tool out.
Hytale treats shields as off-hand “utility” items that you equip through a separate selector rather than placing directly on your hotbar.
When you hold the utility selector key (Z by default), a radial menu appears with four slots, and you select the item you want in your left hand.
This design is meant to reduce inventory interruptions and keep the hotbar focused on primary items while still giving you quick access to situational tools like a shield or torch.
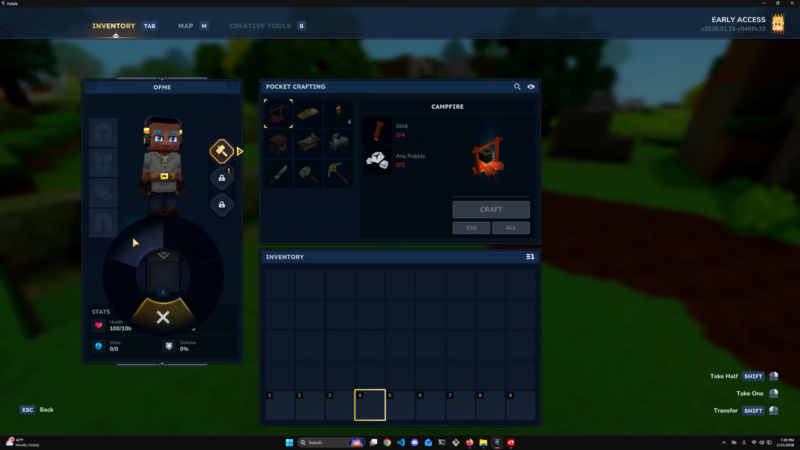
How to equip a shield on PC (detailed step-by-step)
Follow these steps once and you’ll be able to draw your shield quickly whenever you need it.
Step 1
Open your inventory screen and locate the utility/off-hand area near your character panel (often indicated by a shield icon).
Step 2
Move the shield item from your inventory into the utility menu slots by dragging it onto the shield/utility icon area and placing it into one of the available slots.
Step 3
Exit the inventory and press and hold Z to open the utility radial menu, then move your cursor toward the shield and release to equip it in your left hand.
Step 4
Practice swapping: hold Z and select your torch, then hold Z and select your shield again—this is the muscle memory that makes the system feel “instant” in real fights.
How to equip a shield on console or controller (what to look for)
The key idea is the same on any platform: you need a dedicated utility/off-hand selector that opens a four-slot wheel and equips to your left hand.
If you’re on a controller layout, look in Settings → Controls for an equivalent to “Show Utility Slot Selector,” which is Z on PC keybind lists.
Once you find that button, you’ll still assign the shield through the inventory screen and then select it from the radial menu during gameplay.
Keybinds you should check before you troubleshoot anything
If shield equip feels inconsistent, it usually comes down to controls or selection habits.
Here are controls that commonly matter for shields and the utility selector on PC:
| Action | Default key (commonly listed) | Why it matters |
|---|---|---|
| Show Utility Slot Selector | Z | Opens the radial menu used to equip the shield/off-hand item. |
| Open Settings (via pause menu) | Esc | Used to reach Settings → Controls to change utility keybinds. |
If Z doesn’t open the selector, confirm the keybind didn’t get changed (or overwritten by a custom profile).

Because you get four utility slots, you can set yourself up so you’re never stuck choosing between light and defense.
Many off-hand tutorials demonstrate keeping a torch and a shield available and swapping between them quickly using the utility selector.
A practical layout that works well early on:
- Slot 1: Shield (combat-ready default).
- Slot 2: Torch (fast cave lighting).
- Slot 3: Spare light source (or a second torch stack if the game treats them separately in your setup).
- Slot 4: Leave flexible for your current activity (exploring vs. fighting).
How to swap between torch and shield without slowing down
The off-hand system is built for quick swaps: you hold Z, point to torch, release; then hold Z, point to shield, release.
This lets you keep a main-hand tool out (like a pickaxe) while still being able to block with a shield or place a torch when needed.
Several quick guides emphasize that the swap is fast enough to use during combat—so you can light a cave, then switch back to shield before the next hit lands.
How to equip a shield while using tools (mining and fighting)
Off-hand videos show you can have your pickaxe out and still block by swapping your off-hand to a shield with the utility selector.
This is especially useful in caves: you can mine, swap to torch to place light, and then swap to shield when you hear enemies.
Some tutorials also describe equipping a torch in the off-hand so you can effectively use a tool and a light source together, which follows the same utility-slot logic as shields.
Common problems and how to fix them (the ones you’ll actually hit)
These are the issues that most often cause “my shield won’t equip” moments.
You put the shield in the hotbar, not the utility menu
If you can’t draw the shield with Z, double-check that the shield is assigned to the utility menu slots via the inventory screen (shield icon area).
Z opens nothing (or the wrong menu)
Verify the “Show Utility Slot Selector” keybind is set the way you expect, since it can be changed in controls.
You can open the wheel, but the shield doesn’t show up
The utility menu has eligibility limits and is intended for certain off-hand items (commonly shields and light sources).
If the shield is in your inventory but not selectable, remove and re-add it to a slot from the inventory screen to ensure it’s actually assigned.
Your off-hand setup feels “clunky” in combat
Use a consistent slot order (shield always in the same slot), and practice the hold-select-release motion until it’s automatic.
A quick workflow you can use every session (so you never forget)

When you load into a world or join a server, do this once and you’ll be set.
Step 1
Open inventory and confirm the shield is still assigned to the utility menu slots (four-slot wheel).
Step 2
Put a torch (or other light source) into another utility slot so you can swap without touching your hotbar.
Step 3
Test the selector: hold Z, select torch, place it; hold Z, select shield—now you’re ready for caves and ambushes.
Once your shield is assigned to the utility menu, you stop “equipping” it the slow way and start drawing it instantly from the Z radial menu whenever the situation changes.