Your experience of texting on mobile devices is directly defined by how old you are since the 90s kids certainly had a wild one back in the days. Just to get to a single alphabet on the number pad keyboard, you needed multiple clicks, and there was no autocorrect to fix those obvious typos that we take for granted today.
With the evolution of Android devices with a full-display screen, the virtual keyboard has replaced the physical one, but it wasn’t until 2016 that Google pretty much perfected what a mobile keyboard should be.
Gboard is the best keyboard app for Android
With Gboard — our winner in the best keyboard apps round-up — Google has brought in more features than you could expect from a keyboard app, and since it is a Google-made app, it integrates with the entire Android environment naturally.
Whether you’re using a stock Android device with Gboard pre-installed, or a newcomer who just got their hands on essentially the best keyboard app out there, you might want to familiarize yourself with some of the not-so-obvious features that have been blended into the app.
-
Best Gboard tips to use now!
- 1. Multilingual texting
- 2. Spacebar as a quick navigation key
- 3. Dedicated number pad
- 4. Speedy Glide typing
- 5. Make capitalization easier
- 6. Simplified One-handed mode
- 7. Create your own GIFs
- 8. Translate from Gboard
- 9. Quick Delete gesture
- 10. Frequently used words shortcuts
- 11. Permanent Number row
- 12. Stickers, GIF and Emoji search
- 13. Themes for Gboard
- 14. Remove block on offensive words
- 15. Type with your voice
- 16. Add punctuations and fractions
- 17. Floating keyboard
Best Gboard tips to use now!
At first sight, the Google’s original keyboard app seems nothing out of the ordinary, and since Google has included all of the features seamlessly, it’s easy to miss some of them when they aren’t directly highlighted.
We’ve thoroughly tested the Gboard app and comprised this list of features that we not only loved trying out but makes texting every day so much easier.
1. Multilingual texting
While this may be a feature that most Android keyboard apps feature today, Gboard blows the competition out of the water with support for over 300+ languages, which is quite impressive.
The ability to add a new language to the keyboard is in the settings, and you can actively switch between different language keyboard almost instantaneously.
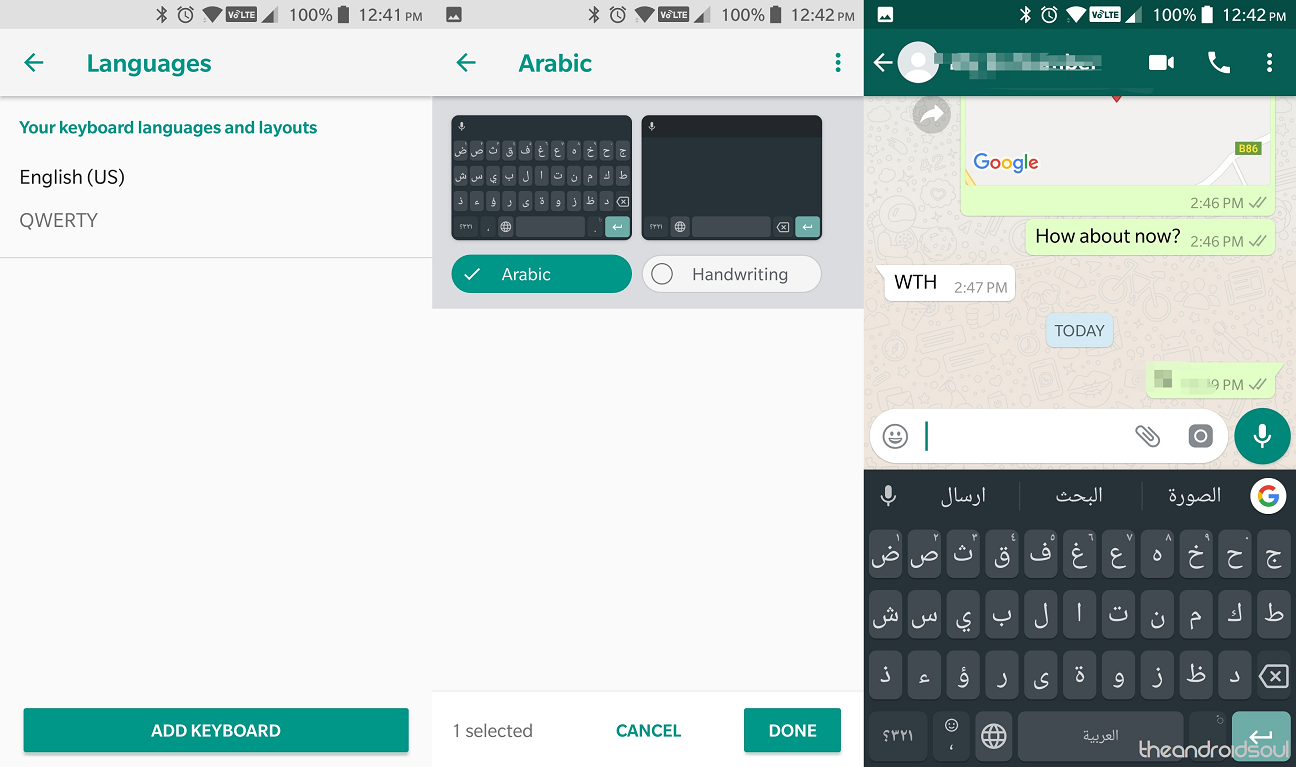
- Press the Google icon, tap on the three-dot menu button and then select the Settings
- Tap on Languages – Add Keyboard and choose a language from the list of choices available and press Done.
It is a fact of life that we as humans have errors, especially when texting on a virtual keyboard as dozens of characters a minute. Now whether you want to remove a particular letter or a word from a sentence or add something in between, you need to tap on it and try to navigate to the sentence with your admittedly fat fingers.
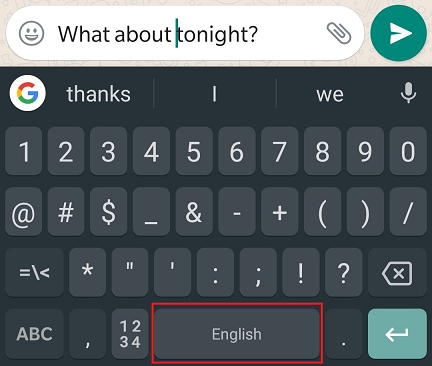
This is why Google has hidden a nifty little way to quickly navigate within the written text using the Spacebar. Once you have a sentence written in the text field, simply swipe across the Spacebar to move the cursor across the text field easily, without having to pinpoint it to the location using your finger.
3. Dedicated number pad
Just like most keyboard apps out there, Gboard also comes with the ability to enter numeric values, but don’t you just want a dedicated number pad for those times when you’re putting down calculations or creating an invoice? Gboard has you covered on this, so all you need to do is:
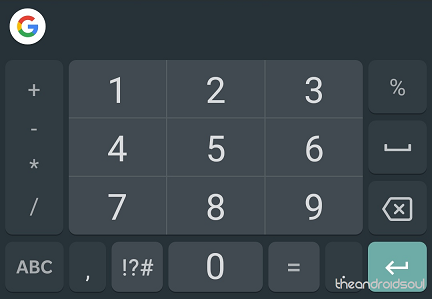
- Tap on the “?123” button at the bottom-left corner of the keyboard.
- Now press the “1234” button and you’ll have a full-sized number pad keyboard at your service with mathematical values as well.
4. Speedy Glide typing
While we have to give the credit of this feature to the SwiftKey keyboard that brought it years ago before Gboard even existed, it doesn’t change the fact that the feature has only gotten better as Google adopted it.
For all of those messy typists out there, Glide typing is a feature that allows you to simply swipe across the individual keys of the Gboard, as it automatically recognizes the words you want to type and provides spaces between them as well.
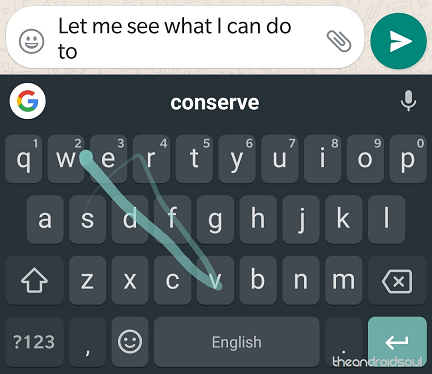
- Enable glide typing from the Settings.
- Head over to the Google icon, tap on the three-dot menu button and then select the Settings.
- Open Gboard and begin swiping across the keyboard and the app will automatically detect the words you mean to type (works best with English).
5. Make capitalization easier
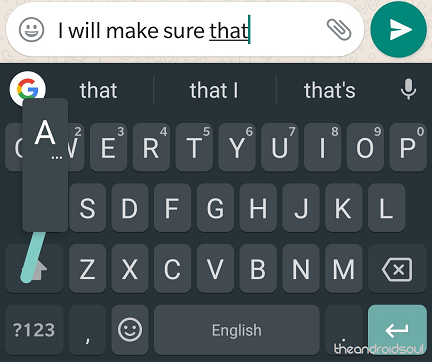
For all of the grammar Nazis out there that you’re trying not to trigger, making sure that you don’t send out typos and capitalize at the right instances can be quite important, especially when you’re putting down a work email.
Gboard makes capitalization easier with the same swiping gesture that it uses for Glide typing, but this time you need to press and swipe the capitalization button and towards the letter that you want to capitalize.
For instance, if you want to write “Andrew” in the middle of a sentence, tap on the Uppercase button and instead of pressing “A”, swipe up to the letter and it will automatically be written in uppercase without you having to manually turn it on and then off again.
6. Simplified One-handed mode
This is already a crowd-favorite feature of the Gboard app, especially for those who are dealing with a smartphone that houses a large display screen where you always need two hands to type. The one-handed mode on Gboard is especially good since it not only helps you openly customize the size of the keyboard but position it from right, left and center as well.
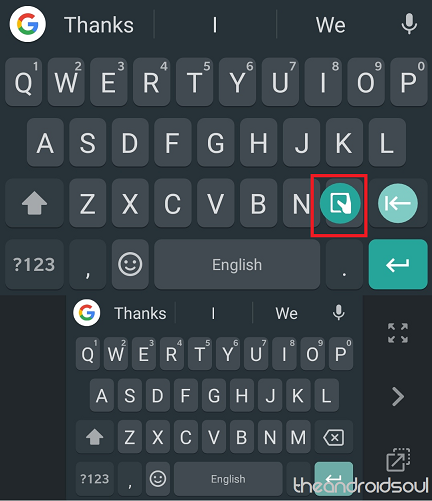
- With the Gboard open, press and hold the Enter key.
- Select the One-handed mode icon and you’ll see the keyboard size shrink.
- Using the buttons on the side, you can Resize, Move the positioning, and Enlarge the keyboard with one tap.
7. Create your own GIFs
One of the most popular features of Gboard in recent years has been the ability to find the snarkiest comebacks with the help of the built-in GIF library. However, Gboard has recently upgraded GIFs to go one step further and help you Make a GIF using the keyboard screen itself.
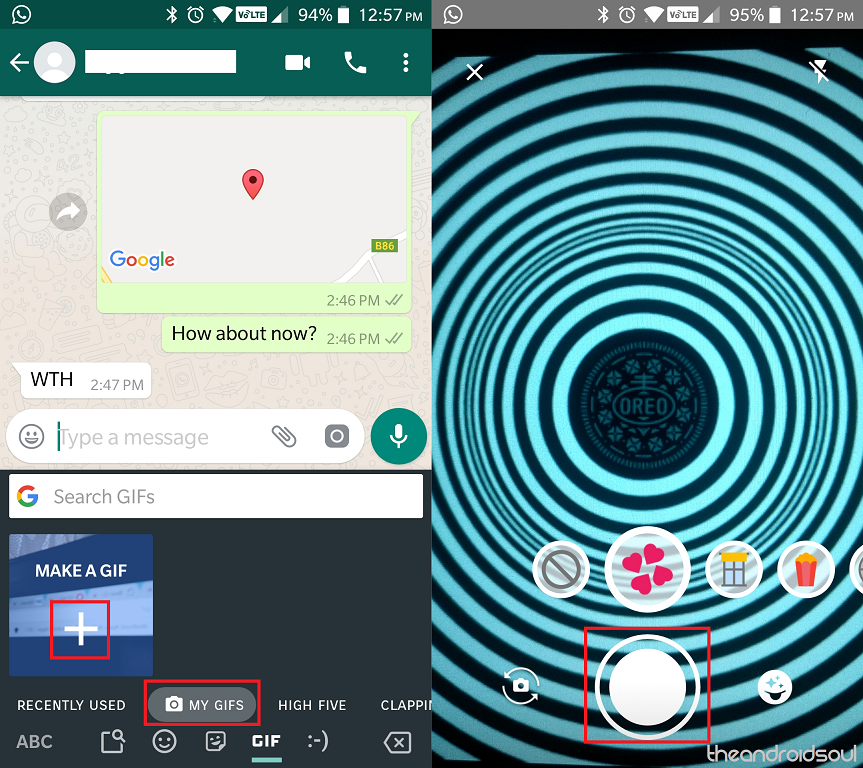
- On Gboard, tap on the Emoji icon and then on GIF option.
- Tap on My GIFs and press the + icon to Make a GIF.
- Select any of the available Filters you want to use and press the Record icon to create a 5-second GIF clip.
- The GIF will then be saved under the My GIFs tab and you’ll be able to use it at any time.
The best Keyboard apps for your Android phone
8. Translate from Gboard
Google Translate is probably the best translation app and service you’ll find online, so it makes complete sense for Google to integrate into their keyboard app. With the Google integration, you can not only translate messages that you’ve received but also write your message in a language and have it translated and ready to use right from Gboard itself.
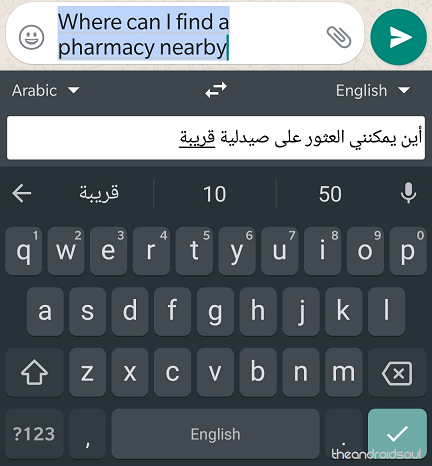
- Tap on the Google icon in the top left, and then on the Translate icon (you will know the icon once you see it).
- Accept the warning by tapping on OK button.
- Select the source language and the target language using the drop-down menu.
- Type in your sentence and it will be automatically translated into your desired language, at which point you can simply copy and paste it.
9. Quick Delete gesture
What we like the most about Gboard is how it makes even to most mundane little things about the art of texting so simplified, that it ends up making things a lot easier for you bit by bit.
For instance, you wanted to delete something you’ve written or just get rid of a paragraph entirely, you’d usually have to highlight all of it manually and hit backspace. But with Gboard, you can use the Backspace button as a gesture to highlight specific words and remove them almost instantaneously.
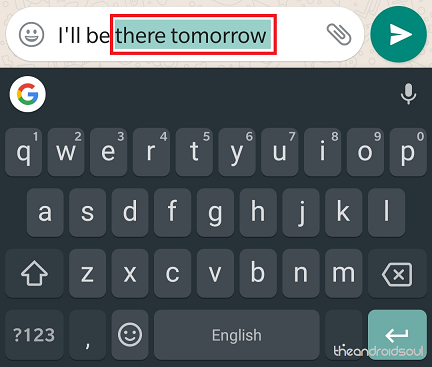
- Press and hold the Backspace button and swipe it to the left to highlight the words you want to delete.
- Once you see the words highlighted, release the Backspace button and the words will be automatically deleted from the text field.
10. Frequently used words shortcuts
There are certain words, phrases, and even sentences in the form of your email address, your phone number, or your home address that you often end up texting around. While Google has an excellent auto-fill service to help complete your regularly typed in words, there is also the ability to set up shortcut words, which would then bring up the sentences or phrases you have saved in the Personal dictionary.
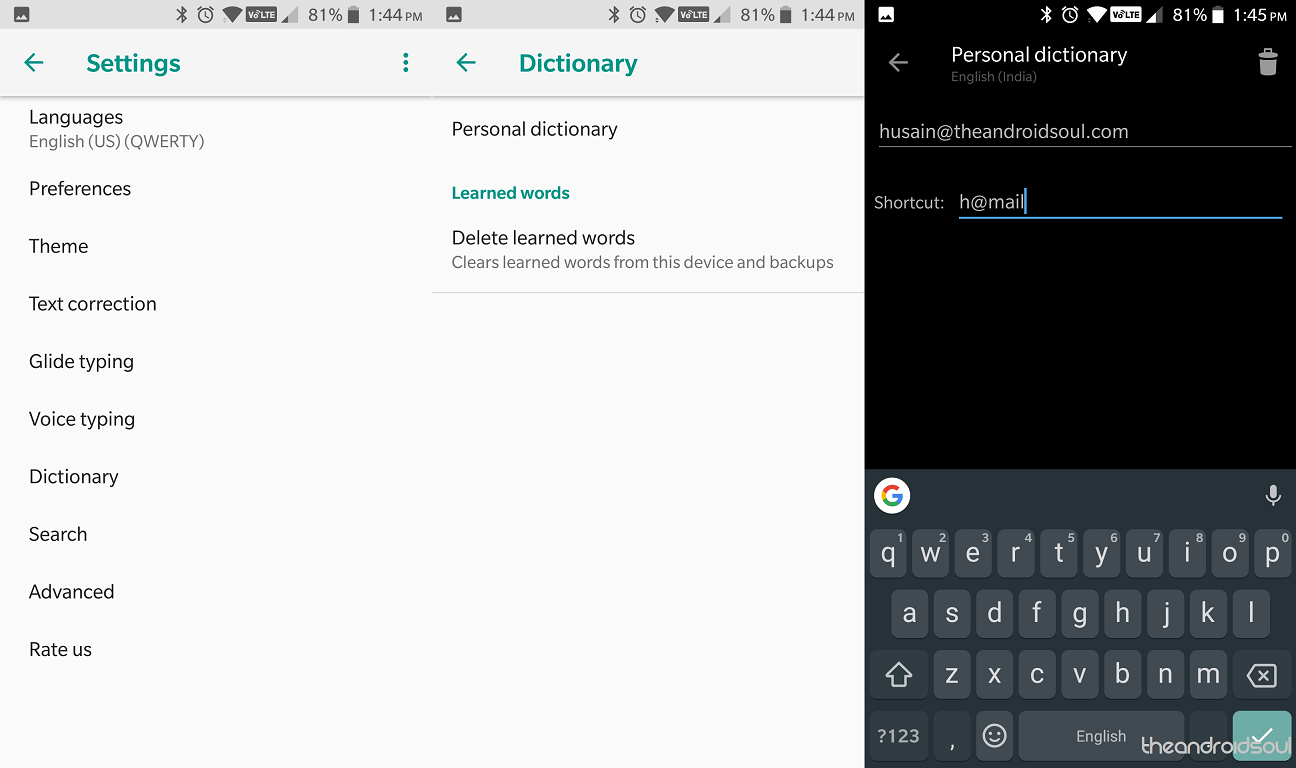
- Head over to the Google icon, tap on the three-dot menu button and then select the Settings icon.
- Tap on Dictionary – Personal dictionary and then select your default language.
- Tap on the + icon on the top-right corner, enter your sentence or phrase and then put in the Shortcut word to trigger it.
- The next time you’re texting, entering your Shortcut word will bring up the sentence or phrase you had saved it within your personal dictionary.
11. Permanent Number row
If you’re regularly opening the numeric keyboard in the Gboard, you’ll start to miss your full-sized computer keyboard where the number pad is right above the QWERTY keyboard itself. Google understands your pain, which is why the Gboard comes with the ability to add a permanent number row above the QWERTY keyboard.
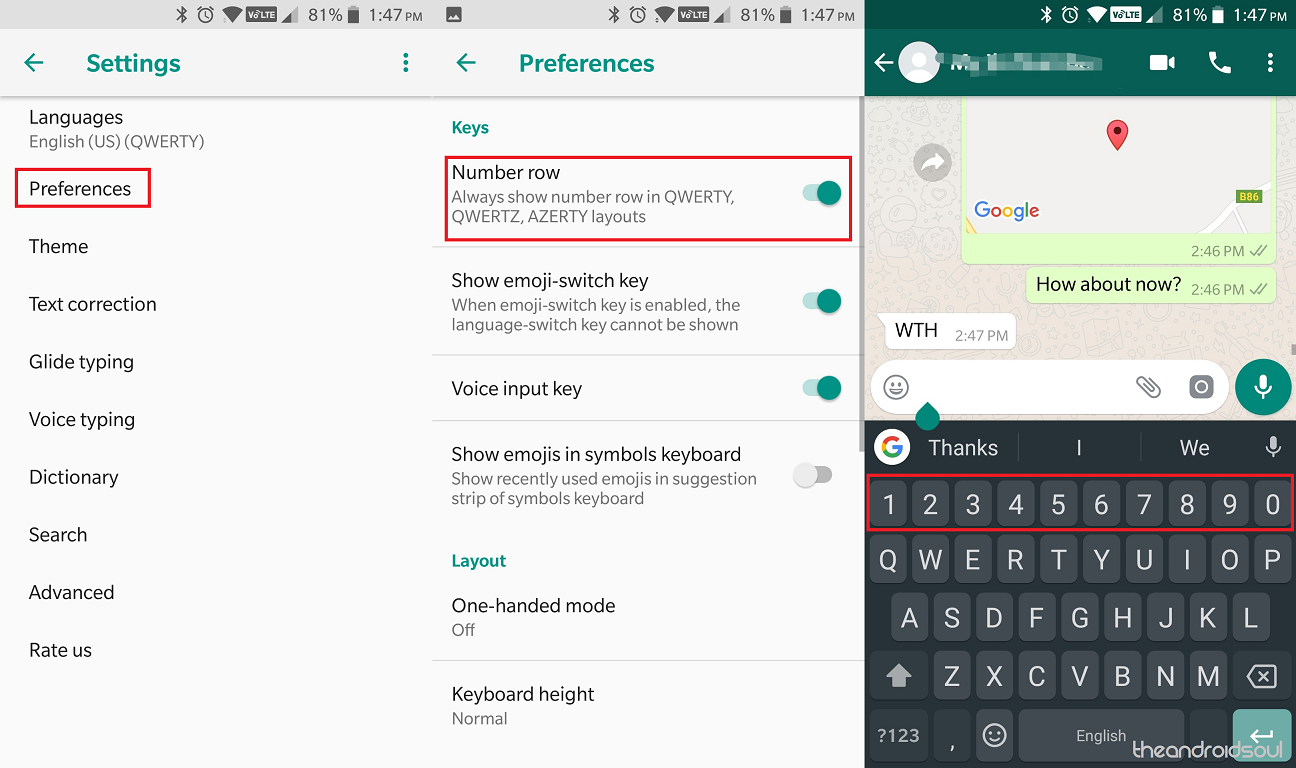
- Head over to the Google icon, tap on the three-dot menu button and then select the Settings icon.
- Tap on the Preferences option and enable the Number row toggle switch.
- Head back to any app and open the Gboard to view the newly added number row to the keyboard.
12. Stickers, GIF and Emoji search
Considering that Google is originally a search engine company, it seems fitting that they’ve included not only Google search natively into Gboard, but into other elements as well. For instance, since there are more than 70 different Emojis in Android 8.0 Oreo, and probably thousands and thousands of GIFs out there, adding the ability to use the search option to find the right Emoji and GIF is just perfect.
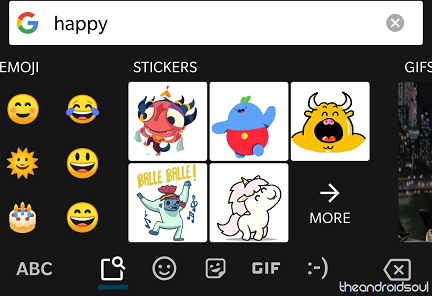
- Open Gboard tap on the Emoji icon left to the spacebar. (Press and hold the comma key left to the spacebar to reach emoji icon if you don’t see it already.)
- Tap on the Search bar at the top of the keyboard and then type in the kind of Emoji/GIF/Sticker you’re looking for.
- You’ll find relevant results on the top, limited to maximum two rows, but to see more, tap the search icon in the bottom left to find even more results. Tap on the emoji you want to use to select it.
13. Themes for Gboard
There are certain Android apps that go above and beyond when it comes to offering keyboards with heavily packed themes and color schemes. While Google’s Gboard may not be the most flamboyant keyboard app in terms of themes, there certainly is no shortage of it.
Apart from simply choosing different pre-set themes from Google, you can download themes, and even choose your very own images to be the background for Gboard.
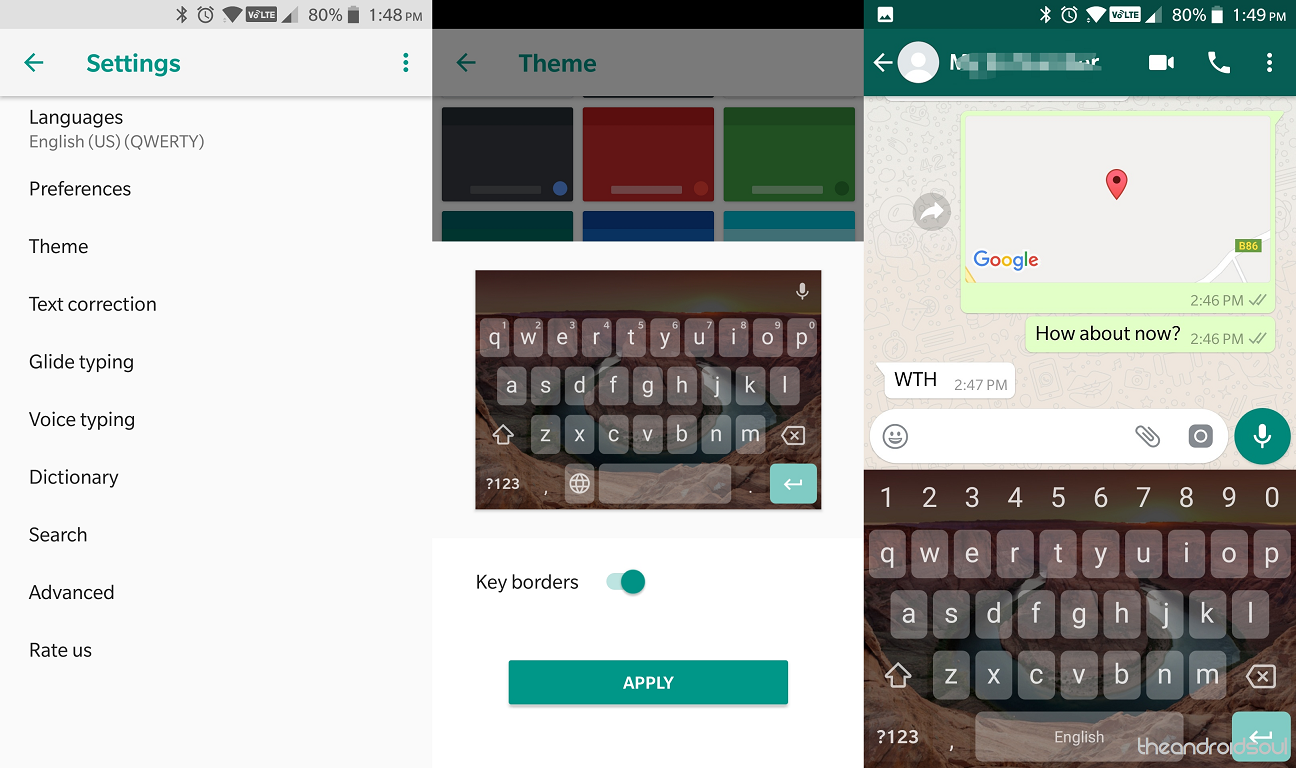
- Head over to the Google icon, tap on the three-dot menu button and then select the Settings icon.
- Tap on Theme, select one of the many options available and press Apply to confirm.
- Head back to Gboard to check out your newly-applied keyboard theme.
14. Remove block on offensive words
If you’ve been using the Google search engine long enough, you know that Google likes to keep it clean and has offensive words and phrases chalked out of regular search. The same goes for the Gboard app, where your regular use of profanity may be easily and persistently autocorrected into something that is safer for all audiences to read. However, there’s an easy way to remove the child-safe policy from Gboard right from the Settings itself.
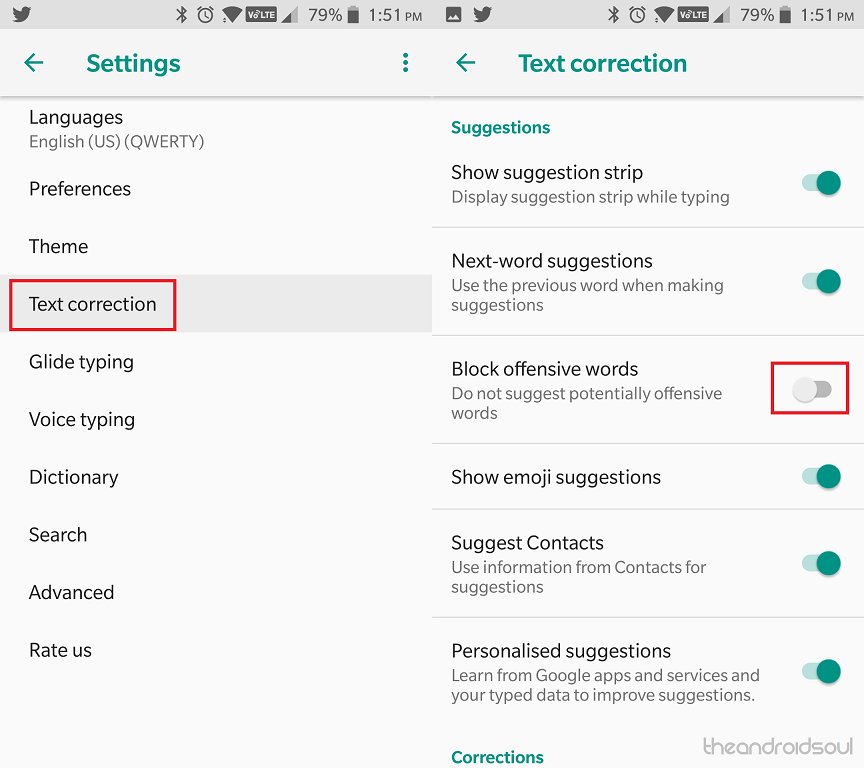
- Head over to the Google icon, tap on the three-dot menu button and then select the Settings icon.
- Tap on Text correction and toggle off the Block offensive words option.
15. Type with your voice
The voice recognition ability of Google has been around for years now, and it has only improved after being integrated into the core of the Android OS.
Apart from what marvels Google Assistant can do, the Gboard makes use of the same voice recognition feature to bring voice typing, helping you not only text hands-free in situations like when you’re driving, but also does this job with pinpoint accuracy.
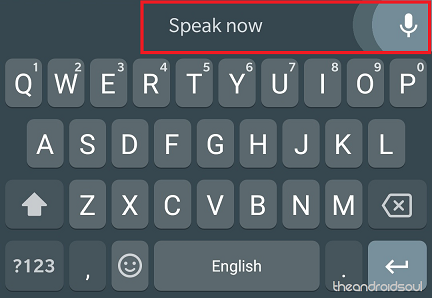
- Open Gboard and press the Microphone icon on the right corner of the screen.
- Start narrating the words and Gboard will begin typing it into the text field.
- Press the Microphone icon once again when you wish to stop narrating.
16. Add punctuations and fractions
Just like you’d expect, Gboard makes it easy to autocorrect words and capitalize the right letter, it also offers easy access to punctuations that may not be directly visible. Additionally, the keyboard also offers numeric values such as fractions, and special characters without you having to look for it under the microscope.
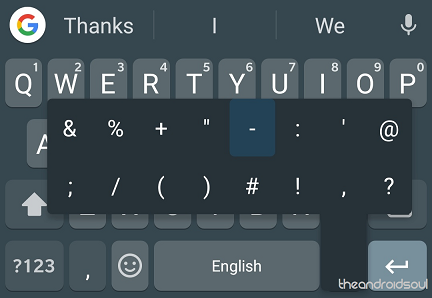
- On the Gboard press and hold the full stop button and you’ll see a range of other punctuations pop up to choose from.
- Similarly, you can access fractions by pressing and holding numeric values on the keyboard.
17. Floating keyboard
Beginning with Gboard version 7.6 (beta), Google has introduced a floating keyboard, which works just like other floating keyboards. There’s a handle at the bottom that lets you pick up the keyboard and move it around to wherever you want it on the screen. You can resize it to something that fits your needs and in case the keyboard remains idle at some place for a period of time, the opacity fades to about 50%, making it kinda transparent.
To bring to life the floating keyboard, you need to be actively using the Gboard keyboard. Tap on the “G” in the top left corner of the keyboard so that suggestions can be displayed. You should see a 3-dot menu on the suggestions’ strip than when you tap, you’ll see options that include “Floating.” Tap on this and you are good to go!
This feature is still in beta, but it should be available for everyone soon. So, if you want in the fun, make sure to grab version 7.6 beta and above via the APK Mirror.
Which one of these genius features did you first discover here, or are you a Gboard wizard who already knew each and every one of these neat tips and tricks? Be sure to let us know down below in the comments.


