Week 17 closes out the current ARC Raiders Trials season, making it the most important scoring window for players still pushing toward Cantina Legend. Unlike earlier weeks where you could spread progress gradually, this final rotation rewards efficient routing and high-value target prioritization.
The five featured Trials focus on combat-heavy objectives and interactive map events. Understanding point scaling — especially during Major Map Conditions — is critical if you want to maximize your leaderboard position or secure seasonal milestones.
Below is a breakdown of each trial, optimal strategies for solo and trio squads, and how to combine objectives in a single run.
- ARC Raiders Week 17 Trials point breakdown
- #1 Damage Wasps efficiently
- #2 Download Data in the Hidden Bunker
- #3 Damage Queens or Matriarchs
- #4 Destroy Ticks for consistent stacking
- Bonus – Open ARC Probes in Spaceport
- Combining objectives in a single run
- Solo vs Trio scoring potential
- Maximizing Cantina Legend before season reset
ARC Raiders Week 17 Trials point breakdown
| Trial Objective | Base Points | Major Map Condition Points |
|---|---|---|
| Damage Wasps | 220 per wasp | 440 per wasp |
| Download Data (Hidden Bunker) | 1,200 per terminal | Same |
| Damage Queens/Matriarchs | 16,000 | Same |
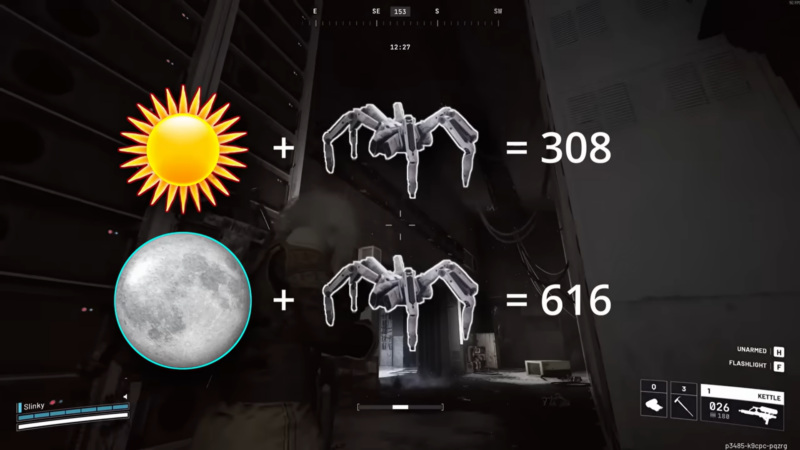
| Destroy Ticks | 308 per tick | 616 per tick |
| Open ARC Probes | 667 per probe | 1,334 per probe |
The key takeaway is clear. Queens and Hidden Bunker downloads are your largest fixed-value objectives, while Wasps, Ticks, and ARC Probes scale dramatically during Major Map Conditions.
#1 Damage Wasps efficiently
Wasps are one of the fastest stacking objectives this week. Each wasp is worth 220 points, but during a Major Map Condition that value jumps to 440 points, effectively doubling your efficiency.

Wasps can be farmed more reliably by using Snitch Scanners, which help trigger ARC activity and spawn waves more consistently. Solo players benefit from pulling Wasps into controlled open areas to avoid third-party interference. In trios, splitting slightly across nearby ARC activity zones increases spawn rate and total team output.
Because Wasps are mobile and aggressive, weapon choice matters. High-accuracy mid-range weapons allow you to eliminate them quickly before they scatter. Movement discipline is critical to avoid unnecessary damage while farming.
| Playstyle | Efficiency Strategy |
|---|---|
| Solo | Controlled pulls + snitch scanner triggers |
| Trio | Split spawns to multiply ARC activity |
During Major Map Conditions, Wasps become one of the most point-efficient repeatable objectives in the rotation.
Each data terminal inside the Hidden Bunker awards 1,200 points, making this one of the most reliable high-value objectives.
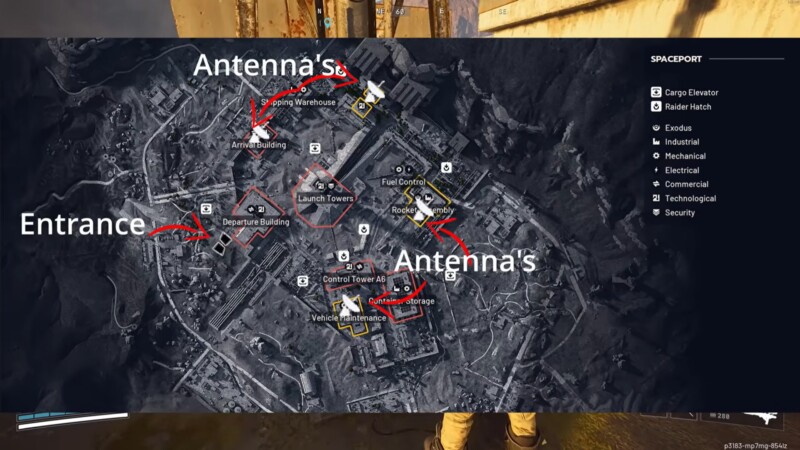
To enter the bunker, you must first activate the external antennas. Once access is granted, you will find eight data terminals distributed throughout the bunker interior.
Efficiency depends on positioning. You must remain close to the terminal while the download progresses, meaning defensive awareness is critical. Clearing nearby enemies before activating a terminal prevents interruptions.
For trios, rotating responsibility across terminals speeds up completion. Solo players should move methodically and prioritize survival over speed, as losing the run negates potential gains.
| Factor | Optimization Tip |
|---|---|
| Antenna Activation | Secure perimeter first |
| Terminal Downloads | Stay within range until complete |
| Team Play | Split across terminals once cleared |
Because these points do not scale with Major Map Conditions, bunker runs are stable scoring opportunities regardless of weather or event modifiers.
#3 Damage Queens or Matriarchs
Queens and Matriarchs are the single highest-value target this week, granting 16,000 points per successful kill.
Timing is everything. These bosses appear during specific ARC escalation events, so monitoring event cycles increases your encounter frequency.
The most effective elimination strategy currently involves Deadline Mines, which allow safe burst damage without extended exposure. Planting mines in predictable movement paths significantly reduces time-to-kill.

After elimination, immediate extraction planning is recommended. High-value boss kills attract PvP attention, and surviving the encounter is mandatory to secure points.
| Element | Recommendation |
|---|---|
| Boss Spawn Timing | Track ARC escalation cycles |
| Damage Strategy | Deadline Mines + focused fire |
| Escape Plan | Pre-plan extraction route |
Queens offer the fastest way to spike your weekly total, but they also carry the highest risk.
#4 Destroy Ticks for consistent stacking
Ticks are worth 308 points each, increasing to 616 during Major Map Conditions.
Unlike Wasps, Ticks spawn more predictably along specific patrol routes. Solo players can follow established farming loops, while trios can split sectors to increase coverage.
Ticks respawn on a timer, so rotating between two high-density areas maximizes uptime. Because they are smaller targets, close-range automatic weapons tend to eliminate them more reliably.
| Condition | Best Strategy |
|---|---|
| Normal | Route cycling |
| Major Map Condition | High-priority stacking objective |
Ticks become surprisingly lucrative during double-point windows.
Bonus – Open ARC Probes in Spaceport
Each ARC Probe opened awards 667 points, doubled to 1,334 during Major Map Conditions.
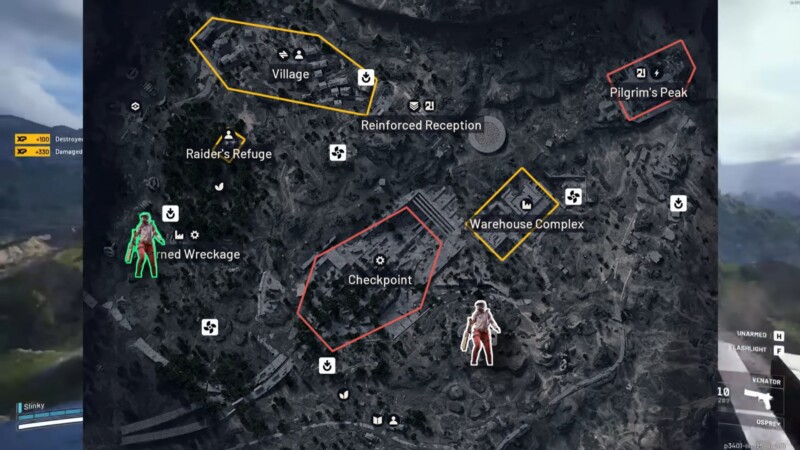
The Spaceport during Electromagnetic Storm is currently considered the most efficient farming location. Storm conditions increase crash probe visibility and spawn density.

Probes are identifiable by their crash debris and ARC glow. Staying mobile while scanning open terrain increases detection speed. Avoid lingering after activation, as probes can attract enemy attention.
| Location | Efficiency |
|---|---|
| Spaceport (Electromagnetic Storm) | Highest density |
| Other Maps | Moderate |
For coordinated trios, assigning directional lanes around Spaceport dramatically increases total probes opened per run.
Combining objectives in a single run
The optimal Week 17 strategy involves stacking objectives rather than isolating them. For example, running Spaceport during a Major Map Condition allows simultaneous ARC Probe farming and Wasp elimination.
Similarly, a Hidden Bunker run can be combined with Tick patrol routes during transit.
| Route Strategy | Objectives Combined |
|---|---|
| Spaceport Storm Run | ARC Probes + Wasps |
| Bunker Circuit | Downloads + Ticks |
| ARC Escalation Push | Queen + Wasps |
Efficiency in Week 17 is less about raw combat skill and more about routing intelligence.
Solo vs Trio scoring potential
Trios naturally outperform solos in raw output due to simultaneous objective coverage. However, solos can compensate through safer, uninterrupted bunker cycles and controlled farming routes.
| Play Mode | Strength |
|---|---|
| Solo | Controlled pacing, lower exposure |
| Trio | Objective splitting, higher volume |
For Cantina Legend, consistency matters more than single-run spikes.
Maximizing Cantina Legend before season reset
Week 17 delivers one of the most lucrative scoring rotations of the season. With 16,000-point Queens, 1,200-point bunker downloads, and doubled Wasp and ARC Probe values during Major Map Conditions, the opportunity to climb the Cantina Legend leaderboard is significant.
Week 17 is the final push. Focus on:
- High-value fixed objectives like Queens and Bunker downloads.
- Major Map Condition stacking for Wasps, Ticks, and ARC Probes.
- Efficient extraction discipline to secure earned points.
Balancing aggression with survival is essential. High-risk boss plays are powerful but only if you extract successfully.
If you prioritize routing, event timing, and safe extractions, this final week can dramatically boost your season total.