- What to know
- How expedition windows work
- How Expedition 2 requirements differ from Expedition 1
- How rewards and account buffs are changing
- How consecutive expeditions affect your buffs
- How skill points and the new catch up mechanic work
- How to prepare your account for Expedition 2 skill points
- How to farm coins quickly before the next reset
- Locations to target for high loot density
- How to use your pre reset keys effectively
- What you keep and what you lose on reset
- How to use the trophy display event around the reset
- How blueprint loot pools and conditions really work
- How to approach blueprint grinding after the reset
- Where ARC Raiders expeditions are headed next
What to know
- Expedition windows are optional 60-day resets, but missing them now has bigger consequences for your long-term account buffs.
- Expedition 2 changes required items, reward values, and how many coins you need per skill point, making the grind more manageable.
- A new catch up mechanic lets you reclaim missed skill points from Expedition 1 if you participate in both expedition cycles.
- Planning your loot routes, event timing, and blueprint hunting before and after the reset massively affects how fast you bounce back.
ARC Raiders is moving from a one-off experimental expedition to a clearer seasonal rhythm where each reset shapes your next 60 days of progression. Expedition 2 keeps the same core idea but changes requirements, reward values, and how missing or joining expeditions affects your account over time.
| Aspect | Expedition 1 | Expedition 2 and beyond |
|---|---|---|
| Reset cadence | Optional reset window every 60 days | Same schedule, but skipping now has bigger cost |
| Required collection items | One specific set of crafting components | Different item set tuned for Expedition 2 |
| Skill point cost per point | 1,000,000 combined stash plus coin value | 600,000 combined stash plus coin value |
| Total value for five skill pts | 5,000,000 | 3,000,000 |
| Account buffs (XP, scrappy etc) | First tier unlocked if you departed once | Higher tier if you depart again, lost if you skip |
| Catch up mechanic | Not present | Lets you buy back missed Expedition 1 skill pts |
| Long-term rewards | Skill points, stash space, cosmetics | Same, plus clearer system for future changes |
How expedition windows work
Expeditions are optional account resets that open on a fixed window roughly every 60 days. During that window, you can either commit to a reset or ride out the cycle and stay where you are. The important catch is that you cannot change your mind mid-cycle; if you decide not to depart and the window closes, you must wait for the next expedition window to reset.
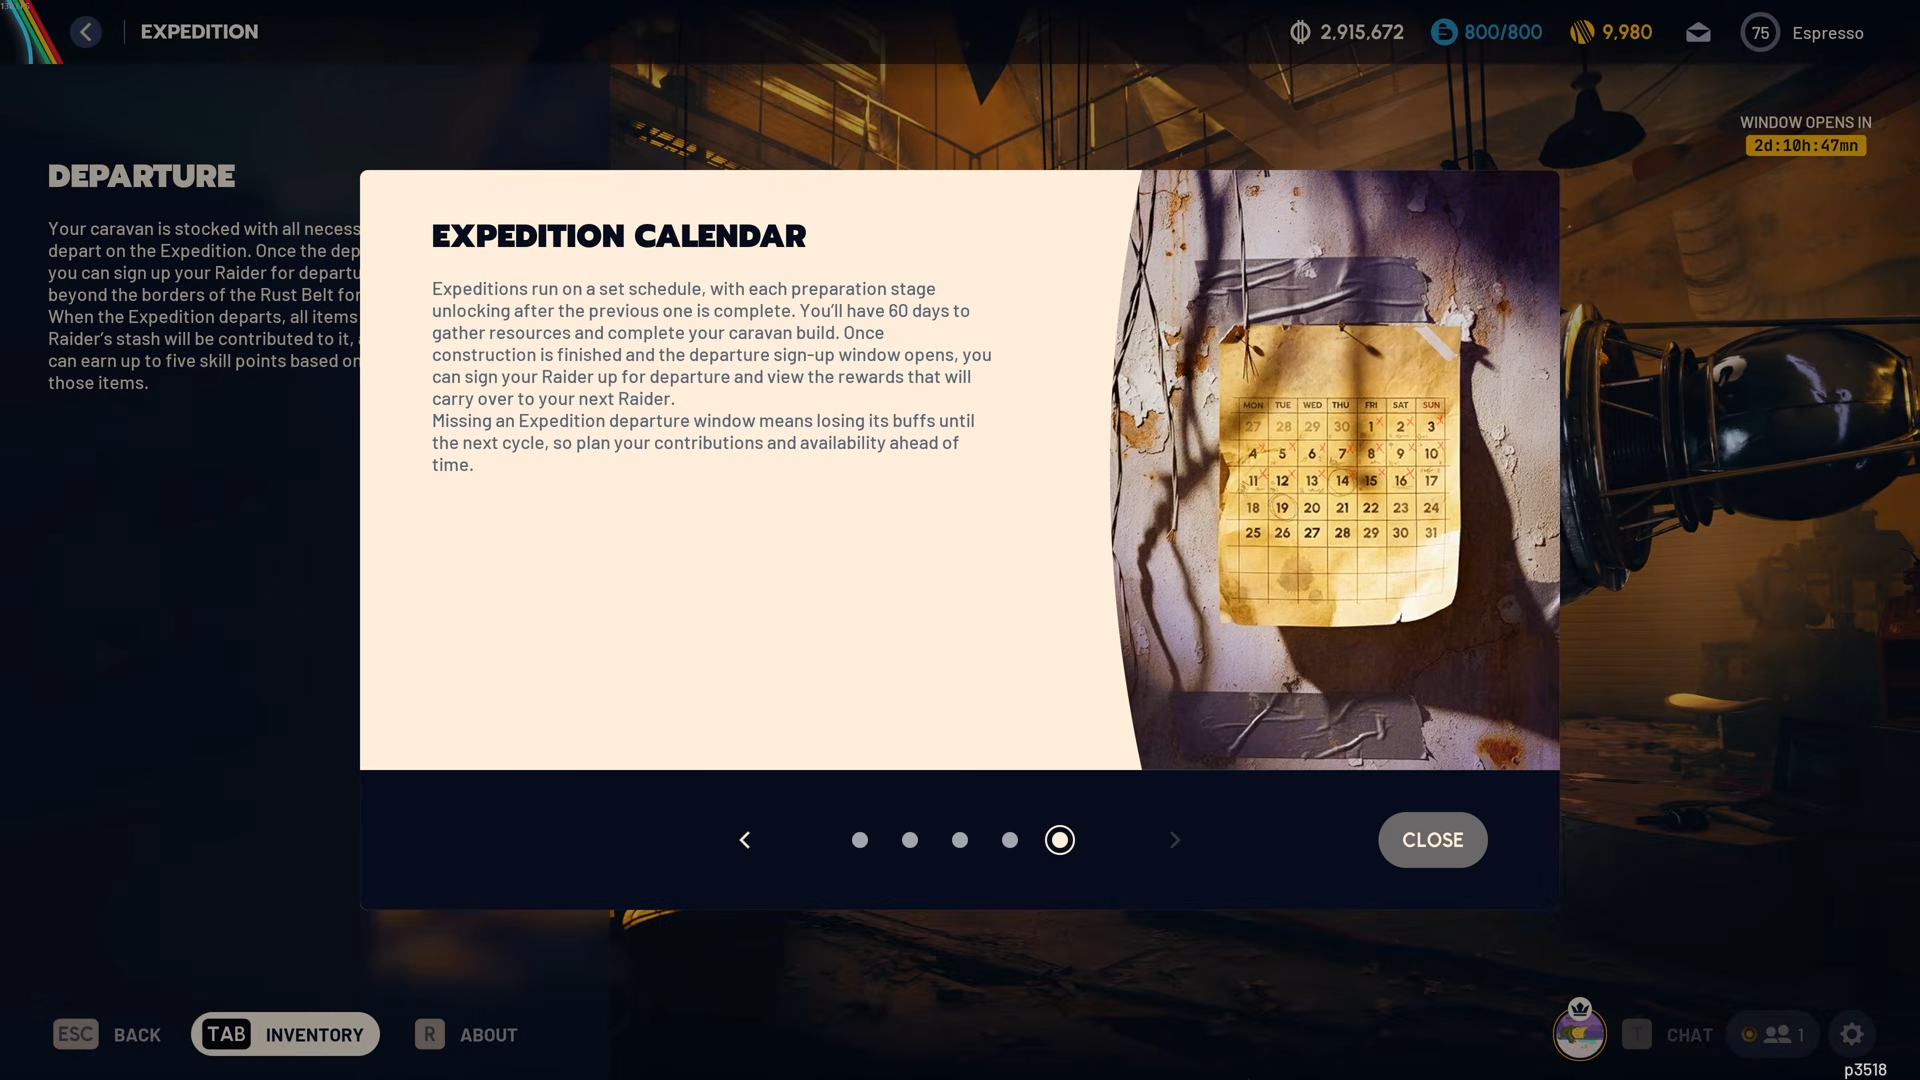
Originally, expeditions could feel like a try it if you want system, but with Expedition 2 the consequences for skipping are sharper. Certain buffs now only stick around if you keep chaining expeditions together, so each decision to depart or stay has a real impact on your next season of play.
How Expedition 2 requirements differ from Expedition 1
The basic shape is the same: you complete a project with multiple phases that ask you to contribute specific items and total value before the reset. What changes between Expedition 1 and 2 is the list of items the system wants and how your personal checklist looks depending on which expedition number you are on.
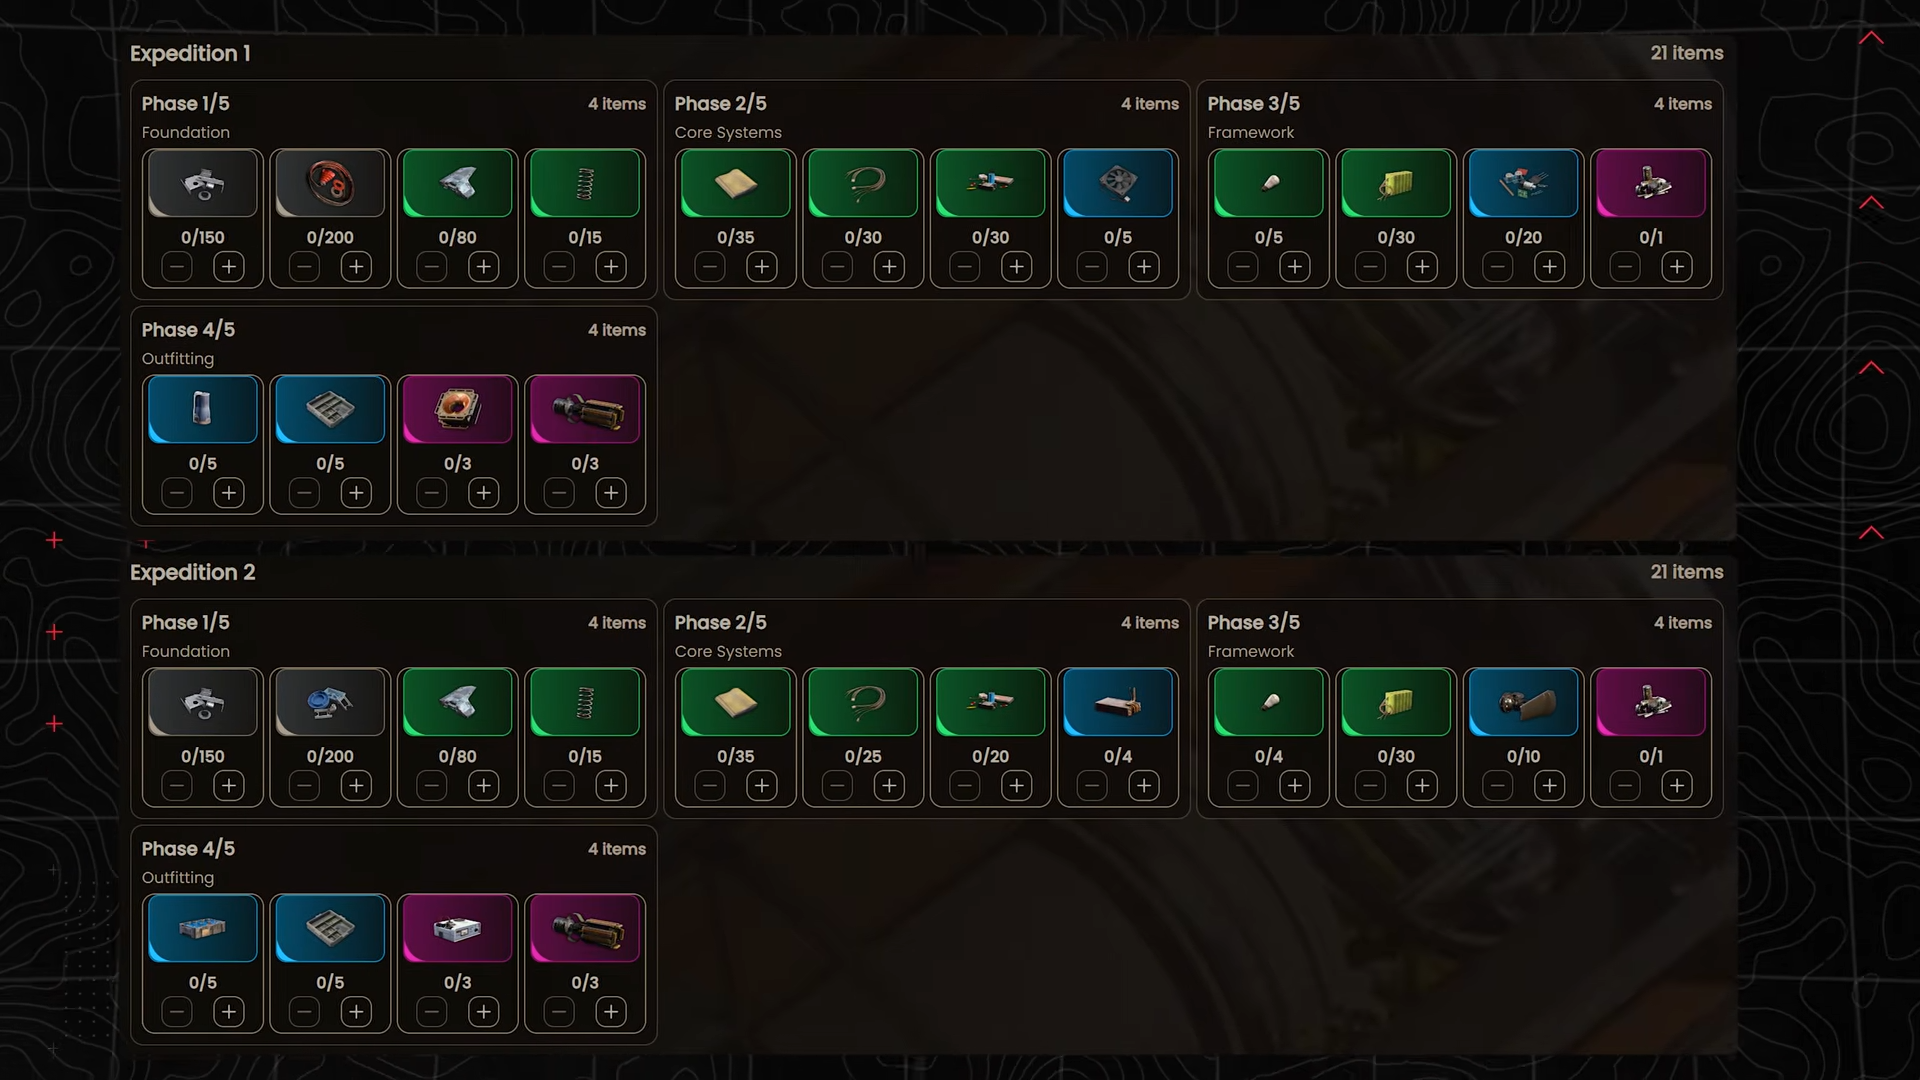
In Expedition 1, the collection focus was on components such as rubber parts, cooling fans, sensors, humidifiers, and magnetic accelerators. In Expedition 2, that list shifts to a different set, including plastic parts, cooling coils, shredder gyros, frequency modulation boxes, and ion sputters. The total value per category remains comparable, but you are not just redoing the exact same grind.
Your personal expedition number also matters: a player on their first expedition will see a slightly different checklist compared to someone entering Expedition 2. The structure is the same, but the specifics of what you have to gather and turn in adjust based on your stage in the expedition chain.
How rewards and account buffs are changing
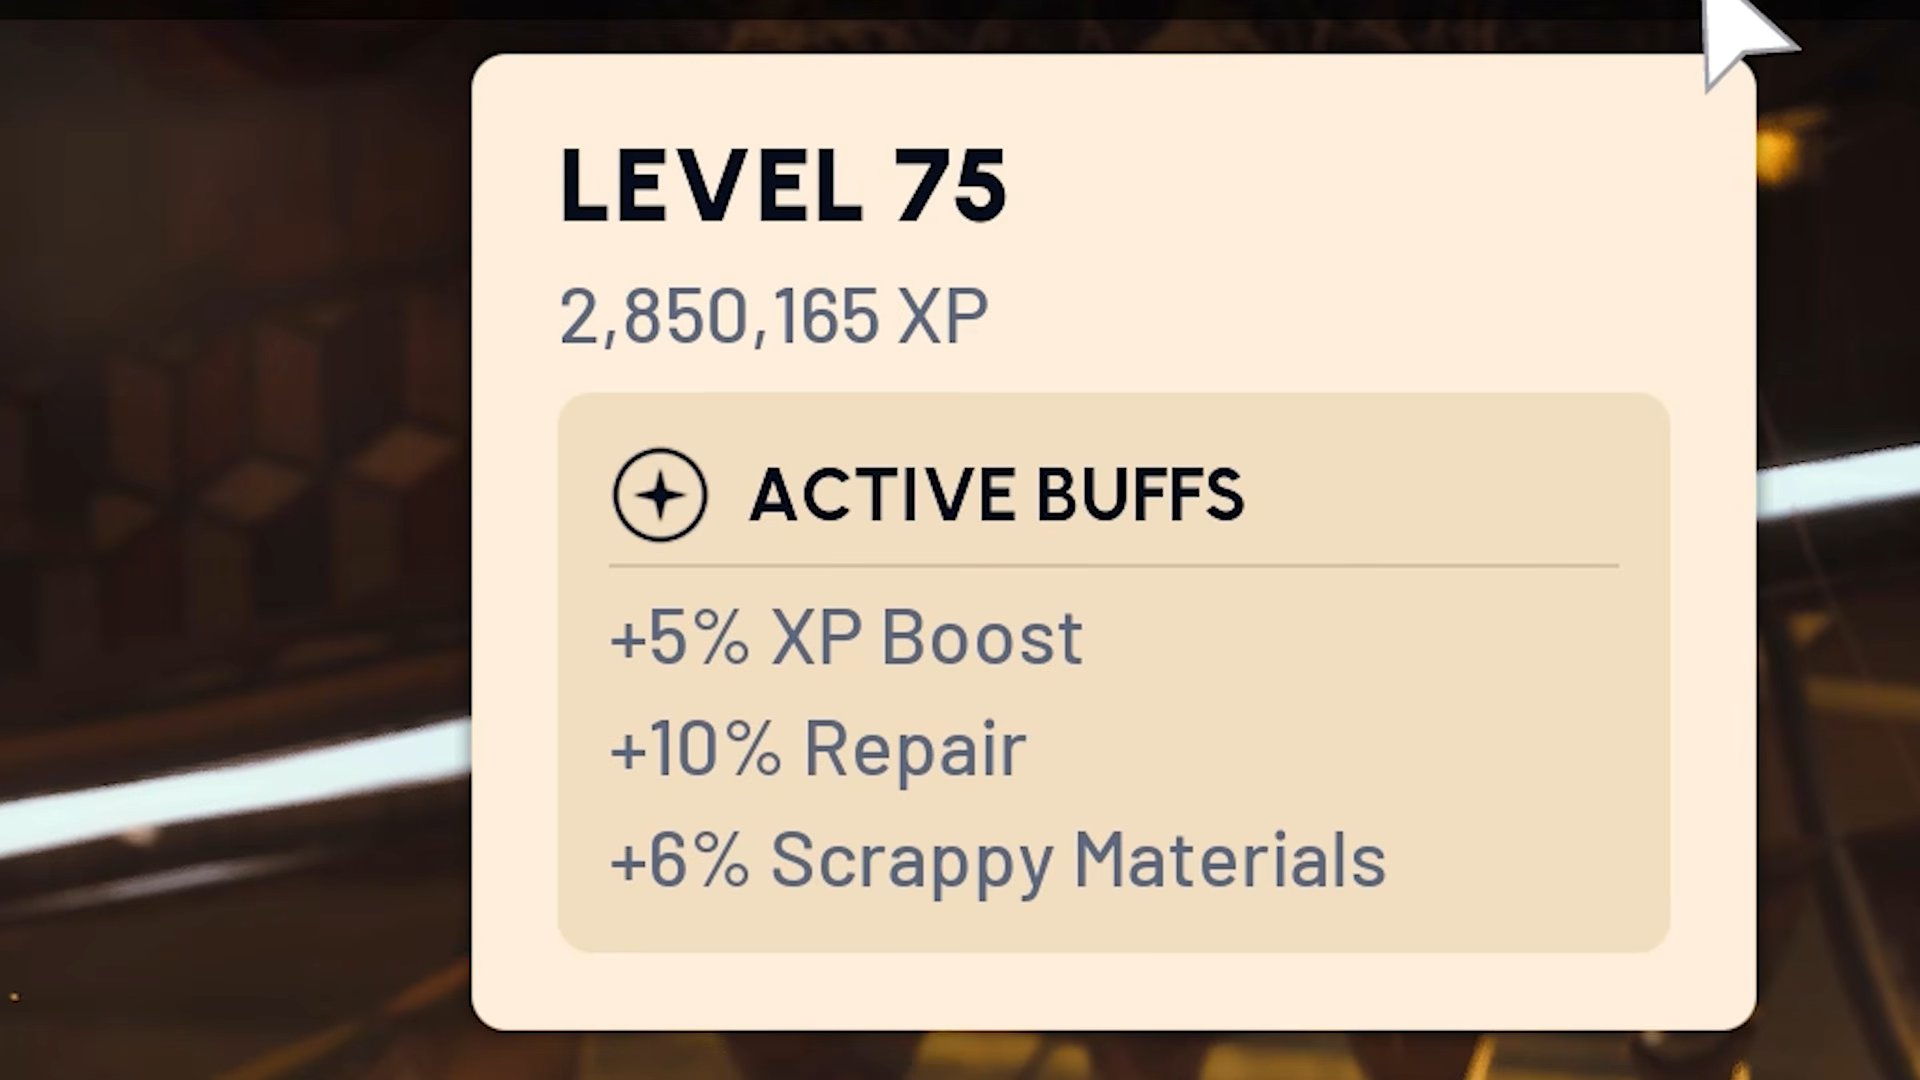
Expeditions are not only about wiping your progress; they are about securing long-term buffs that carry into the next cycle. These buffs apply across your entire account for the duration of the next season.
Key reward changes include:
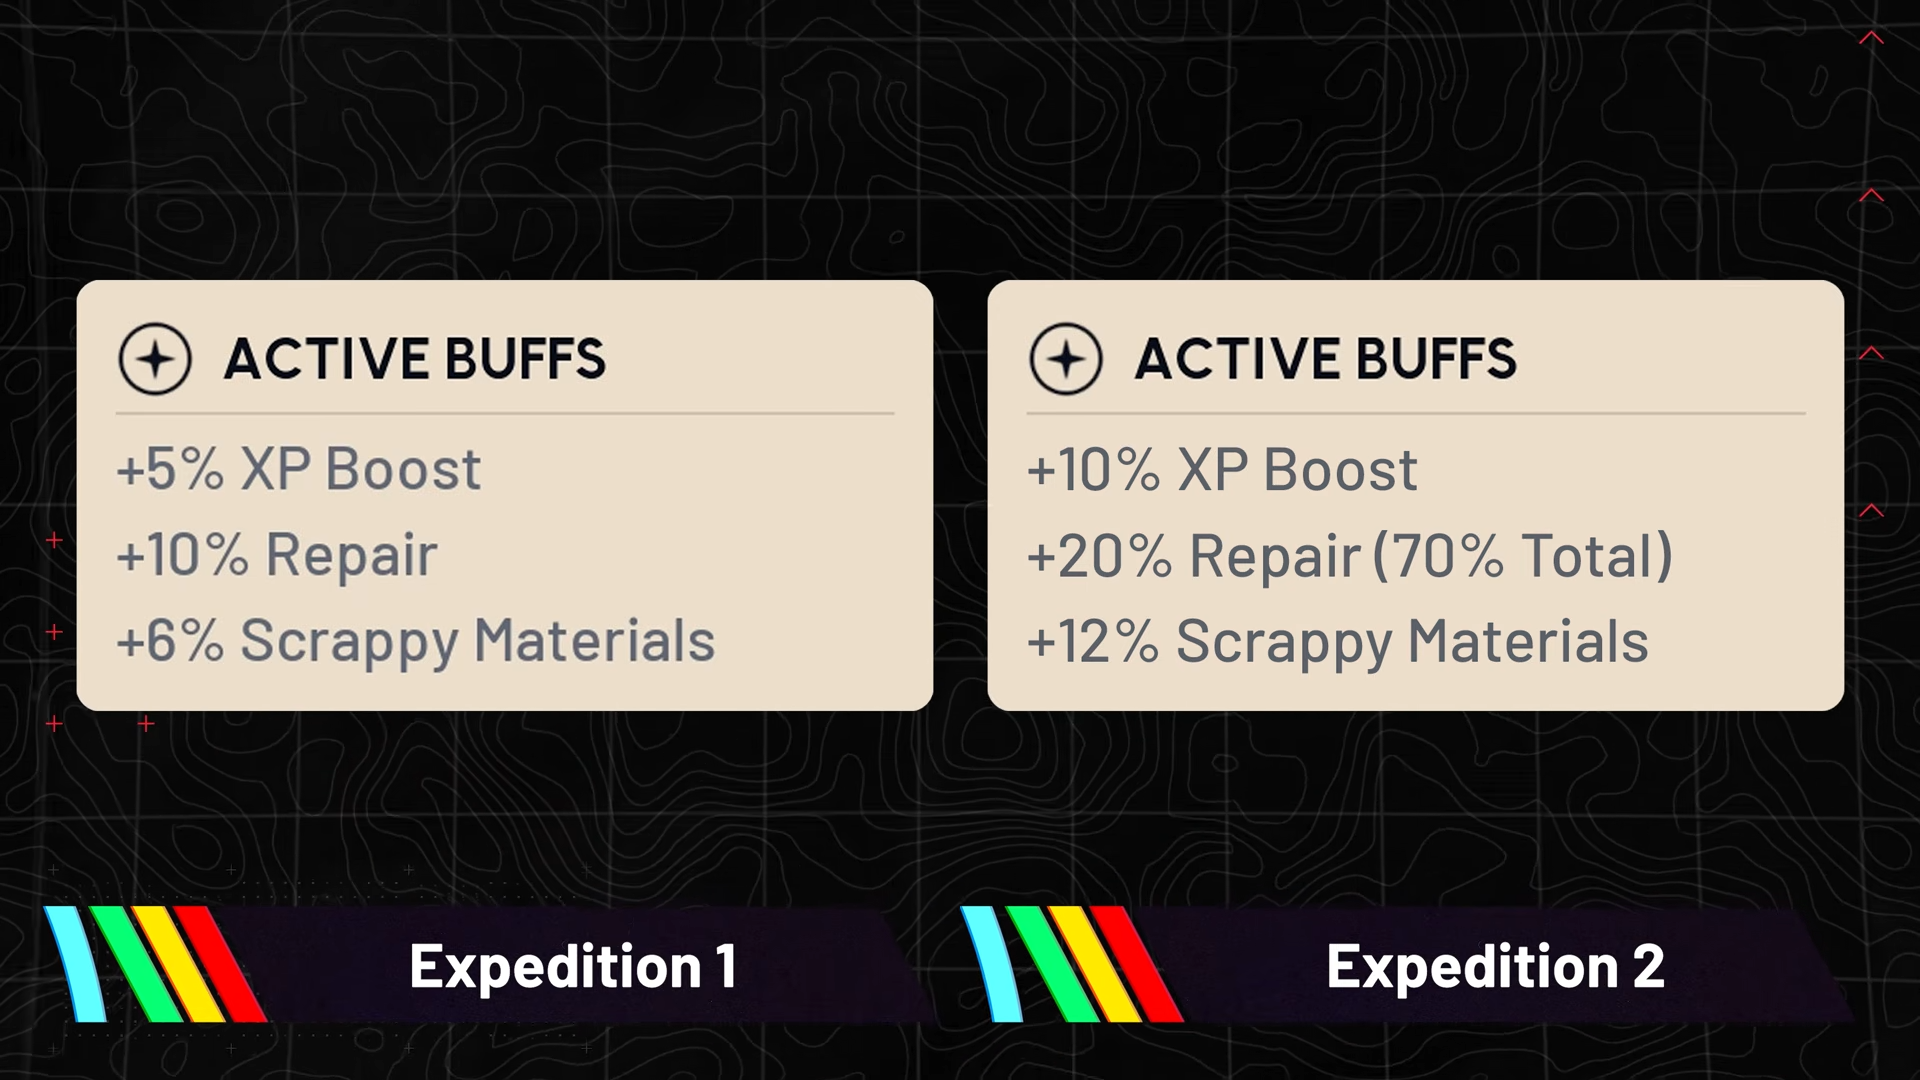
- XP boost
- First expedition completion grants a 5 percent XP bonus for everything you do.
- Second expedition completion increases that to a 10 percent XP bonus.
- Scrappy material gain
- First expedition: 6 percent bonus scrappy materials.
- Second expedition: 12 percent bonus scrappy materials.
- Repair value bonuses
- First expedition: around 60 percent repair value bonus.
- Second expedition: around 70 percent repair value bonus.
- Stash size
- First expedition: 12 extra stash slots.
- Second expedition: 24 extra stash slots.
- These stack with each expedition you complete and are tied to how many expeditions you have done, not whether they are consecutive.
Cosmetic rewards also layer on top. The first expedition gives you the patchwork outfit and related scrappy looks, and Expedition 2 adds further cosmetic variants plus an expedition indicator visible above your name. These are flavor rewards, but they help visually mark your expedition history in the game world.
How consecutive expeditions affect your buffs
The major shift with Expedition 2 is how the game treats your buffs if you skip a departure. Some bonuses are now explicitly consecutive dependent, while others are purely cumulative based on total expeditions completed.
Consecutive dependent buffs (lost if you skip):
- XP boost across activities.
- Scrappy material bonus.
- Repair value bonus.
If you complete Expedition 1 and then choose not to depart in Expedition 2, those buffs will not carry forward into the next cycle.
When you eventually depart again, you will re-enter at the lower tier that matches your current chain rather than where you left off.
Non-consecutive cumulative rewards (never lost once earned):
- Extra stash slots from earlier expeditions.
- Extra skill points gained from expedition completions.
- Cosmetic expedition rewards.
These elements are locked into your account as permanent progression markers based on how many expeditions you have done in total, regardless of whether they were back to back.
How skill points and the new catch up mechanic work
Skill points remain the most important expedition reward because they directly expand your build options. Expedition 2 changes both the cost per skill point and adds a way to reclaim points you may have missed in Expedition 1.
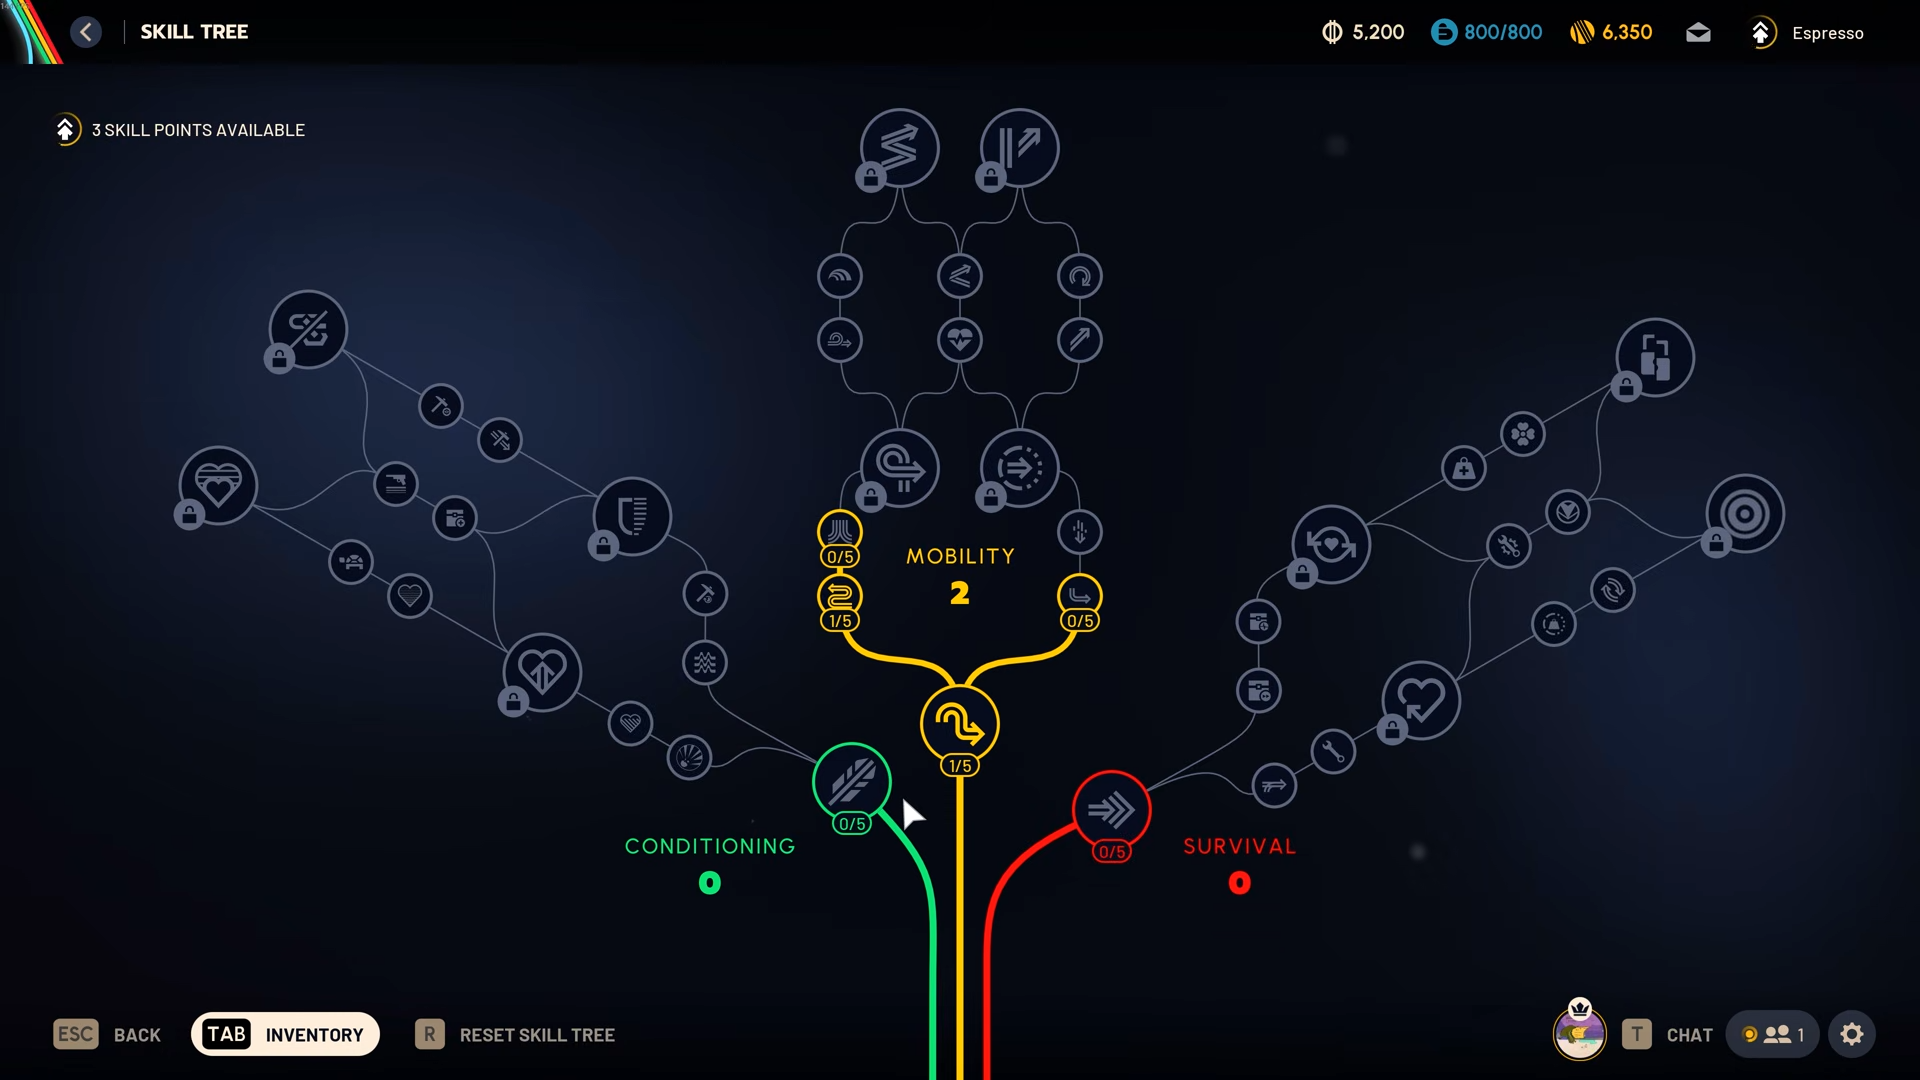
In Expedition 1, each of the five expedition skill points required 1,000,000 combined value in stash and coins, for a total of 5,000,000 value if you wanted all five. Expedition 2 lowers that bar to 600,000 value per skill point, making the full set of five cost 3,000,000 combined value instead. This makes the grind significantly more manageable over the shorter lead-in time.
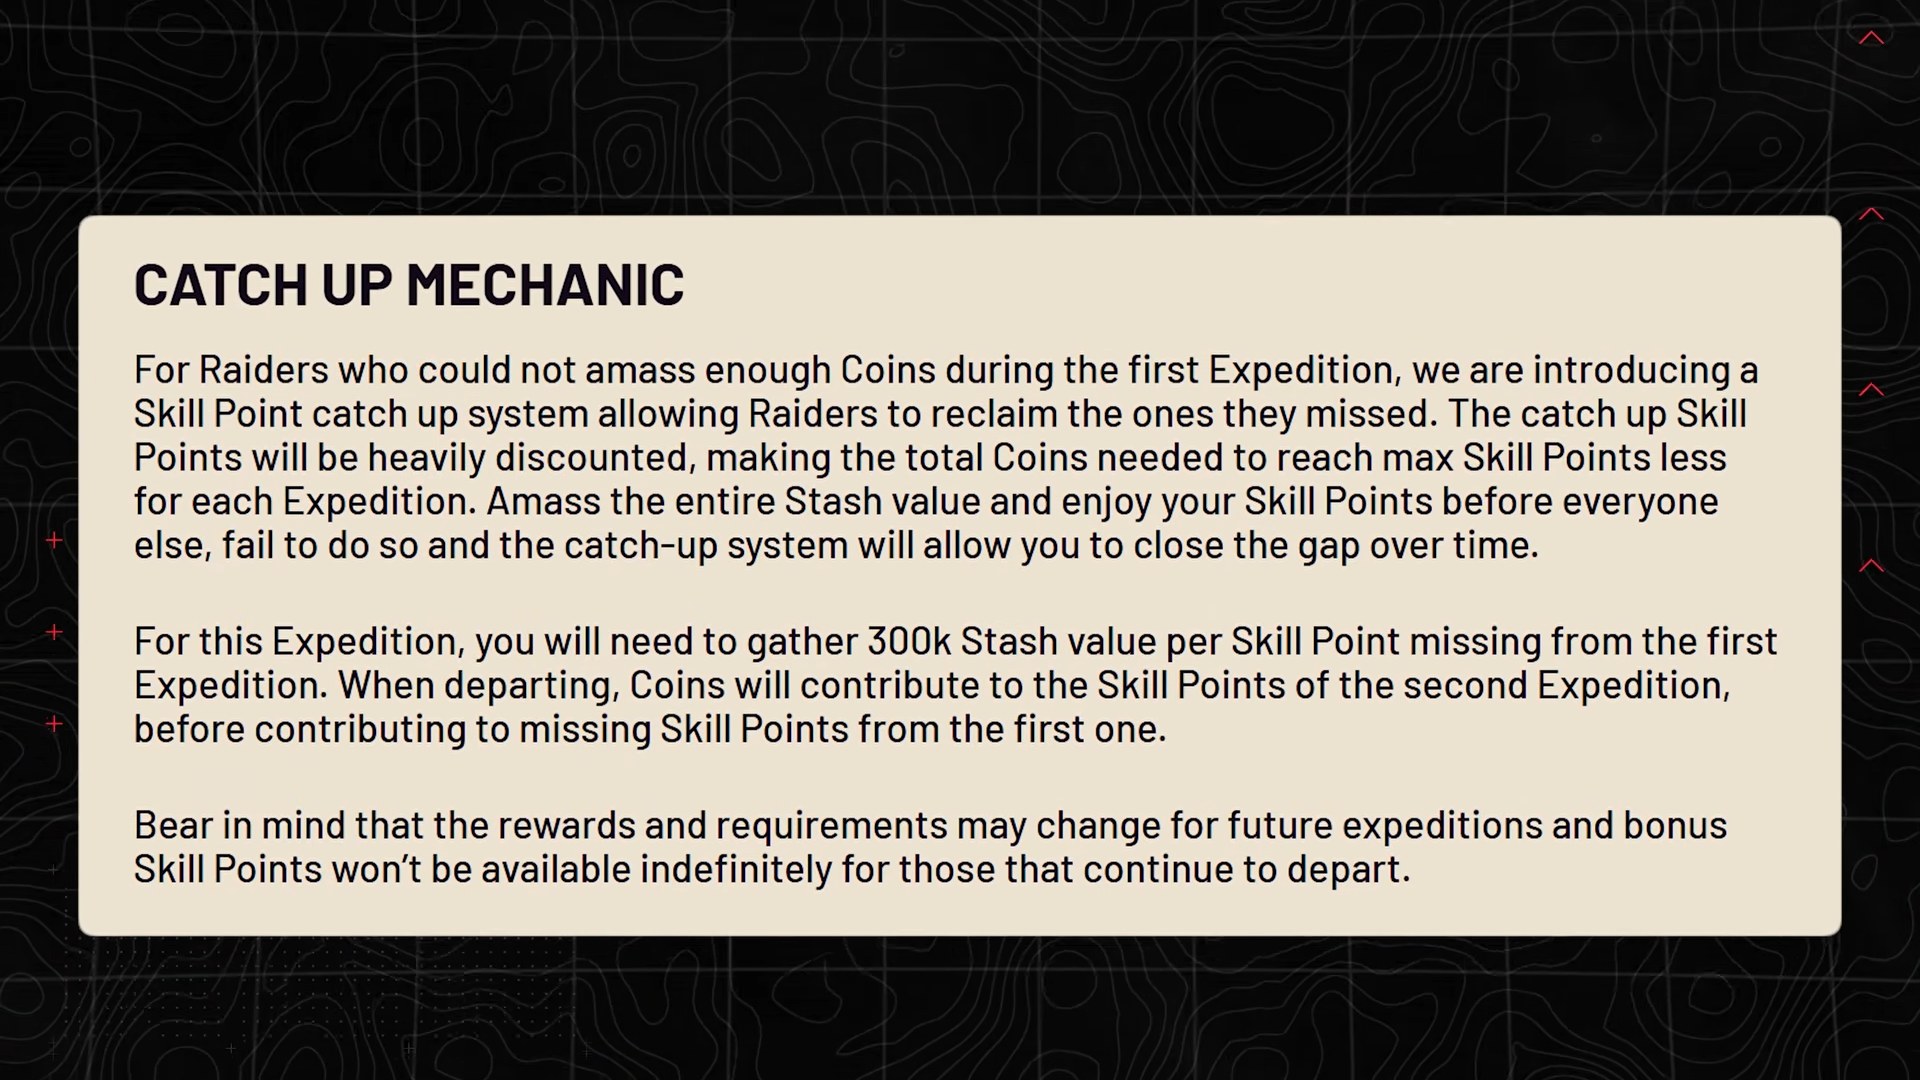
On top of that, Expedition 2 introduces a catch up mechanic:
- It only applies if you participated in both Expedition 1 and Expedition 2.
- Any skill points you missed in Expedition 1 can be purchased after you finish the five points for Expedition 2.
- Each of those catch up points costs an additional 300,000 value.
For example, if you got three out of five skill points in Expedition 1 and then secure all five in Expedition 2 (3,000,000 total), you can buy back the missing two from Expedition 1 for an extra 600,000 value. That lets you exit this expedition cycle with up to 10 bonus skill points available after the reset.
Long term, design leadership has indicated that expeditions are not meant to be a straight shot to fully max every single skill purely through this system. If you did the math, it would take roughly the high teens in expedition count to reach that total, and the intention is to introduce other reward types before it ever gets to that point.
How to prepare your account for Expedition 2 skill points
Step 1
Set a clear target: decide if you aim for all five Expedition 2 skill points plus any catch up points, or if you are comfortable stopping earlier. This lets you calculate exactly how much combined value you need.
Step 2
Audit your stash and coins to see how close you already are to 3,000,000 value. Keep in mind that both coins on hand and the value of items in your stash count toward the requirement.
Step 3
Plan your farming sessions across the days leading up to departure. With focused play, you can reach the 3,000,000 total in a few hours of efficient looting, especially if you follow dense routes.
Step 4
If you previously missed skill points in Expedition 1 and intend to use the catch up mechanic, factor the extra 300,000 value per missing point into your target, so you do not come up short at the last minute.
Step 5
Stop turning in or dismantling items that would reduce your total value right before the departure. Consider holding on to high-value items until the game snapshots your value for expedition skill points at reset.
How to farm coins quickly before the next reset
Efficient coin farming is now more about loot density and route efficiency than simply picking any high tier zone on the map. The goal is to hit clusters of containers and high value trinkets that can quickly stack up your total.
Key principles for fast farming:
- Prioritize areas where many containers are packed into small spaces.
- Favor buildings with multiple floors of lootable desks, drawers, cabinets, and lockers.
- Focus on trinkets and rare components that sell for strong amounts or break down into valuable items.
- Use your accumulated keys now instead of hoarding them, since they do not survive the reset.
Different maps have viable routes, but Buried City stands out as an especially strong choice because some areas combine multi-floor structures with dense container layouts. If you can secure those spots uncontested, your income per raid becomes much more reliable.
Locations to target for high loot density
If you want concrete places to start your runs, focus on dense urban and industrial locations that stack containers vertically and horizontally. In Buried City, Grandioso Apartments is a standout example because it packs many trinket spawns across several floors, with drawers and cabinets in almost every room. Nearby U-shaped apartment complexes and breachable rooms under the highway also offer concentrated loot without excessive travel time.
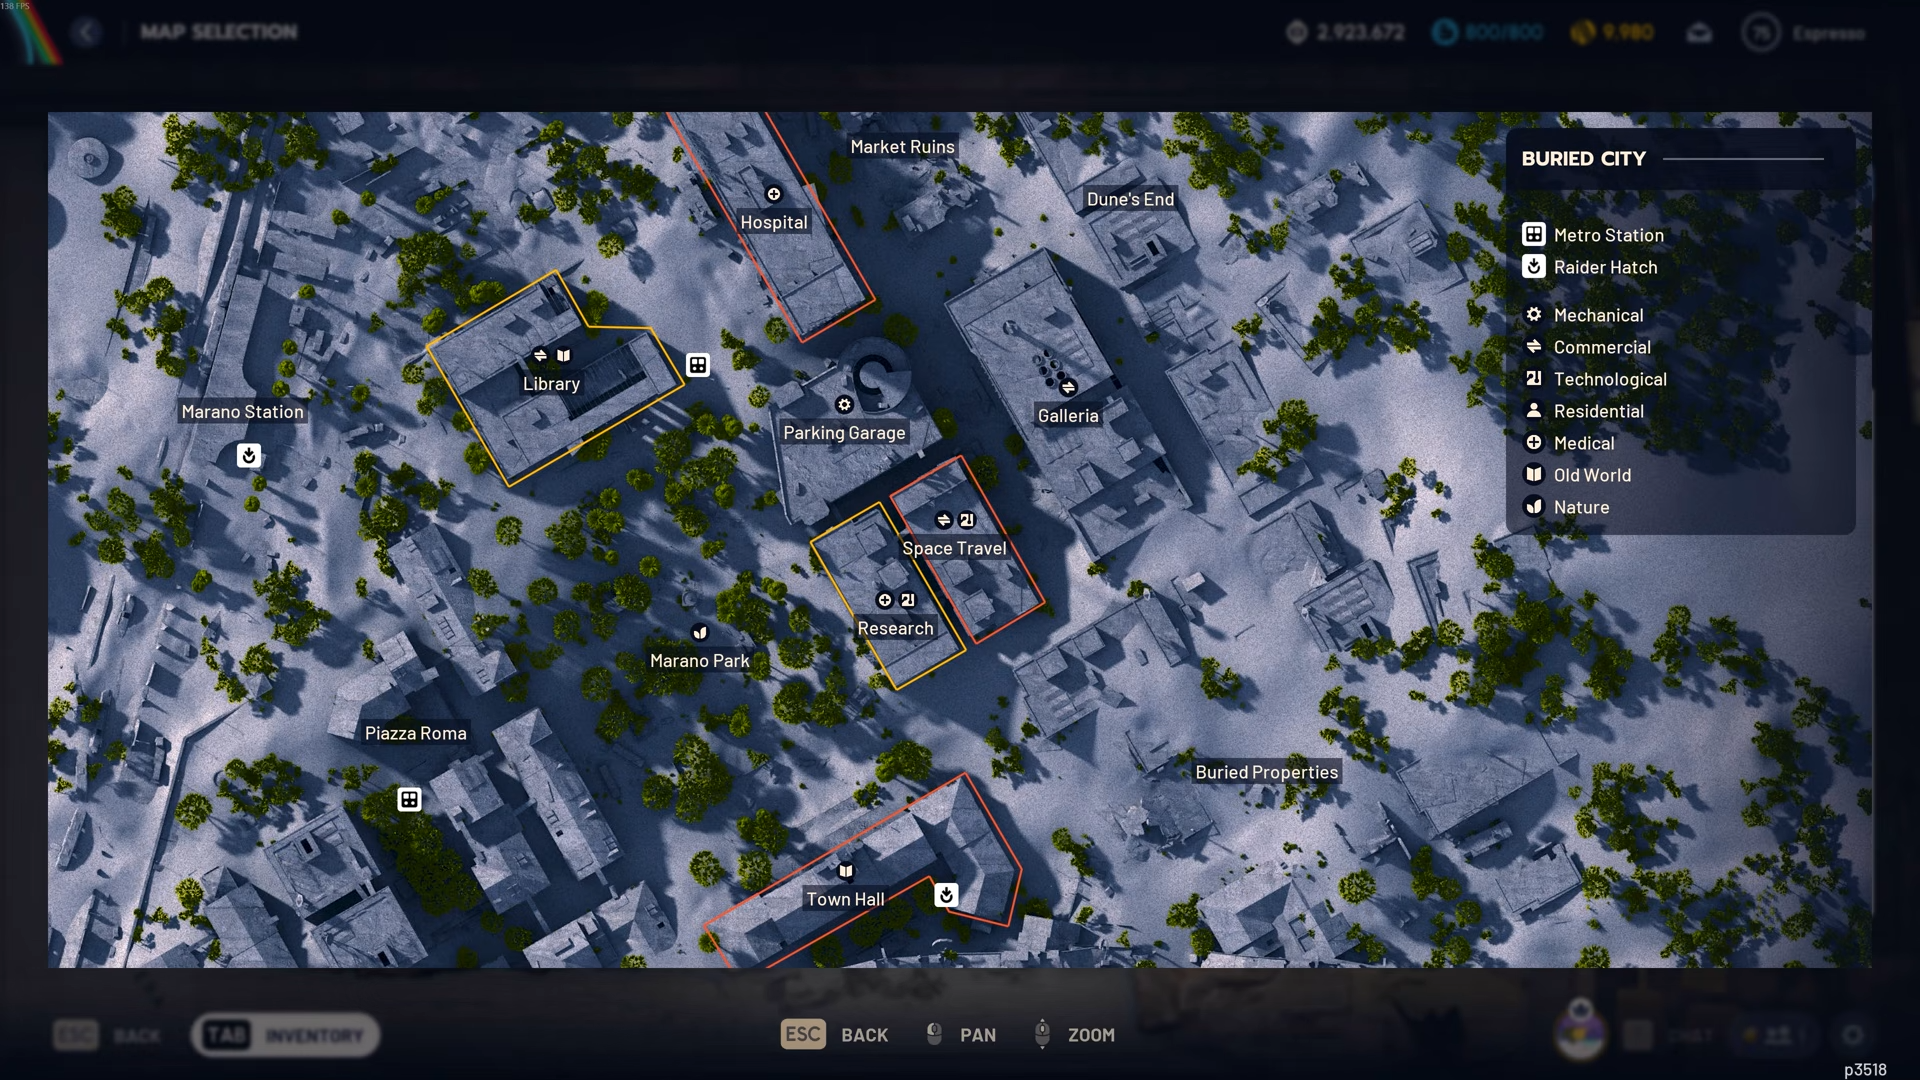
Further along, buildings themed around space travel and research, plus an adjacent hospital, provide several floors of lootable desks and lockers, often adding up to well over a hundred containers in a compact radius. These zones work best when you treat them as tight loops, clearing one building after another before extracting, rather than spreading your run across a wide portion of the map.
How to use your pre reset keys effectively
Step 1
Open your key inventory and identify any keys you have been sitting on, especially those tied to high tier loot rooms and locked gates you have avoided using in PvP-focused sessions.
Step 2
Schedule dedicated runs whose sole purpose is using these keys before the reset. Treat each key as a guaranteed injection of extra value toward your expedition targets.
Step 3
Pair key runs with your high density routes. For example, weave a locked room into an existing Buried City path so you do not waste extra time just traveling from one point to another.
Step 4
Avoid hoarding keys for hypothetical future conditions like ideal night raid setups. Once you commit to the expedition reset, those keys are wiped, so any unused key is effectively lost value.
Step 5
Track which keys consistently lead to strong returns and prioritize them if you are running low on time before the expedition window closes.
What you keep and what you lose on reset
The expedition reset is a heavy wipe of your current progression, but it does not delete everything. Understanding what survives versus what disappears helps you decide whether the trade is worth it for you.
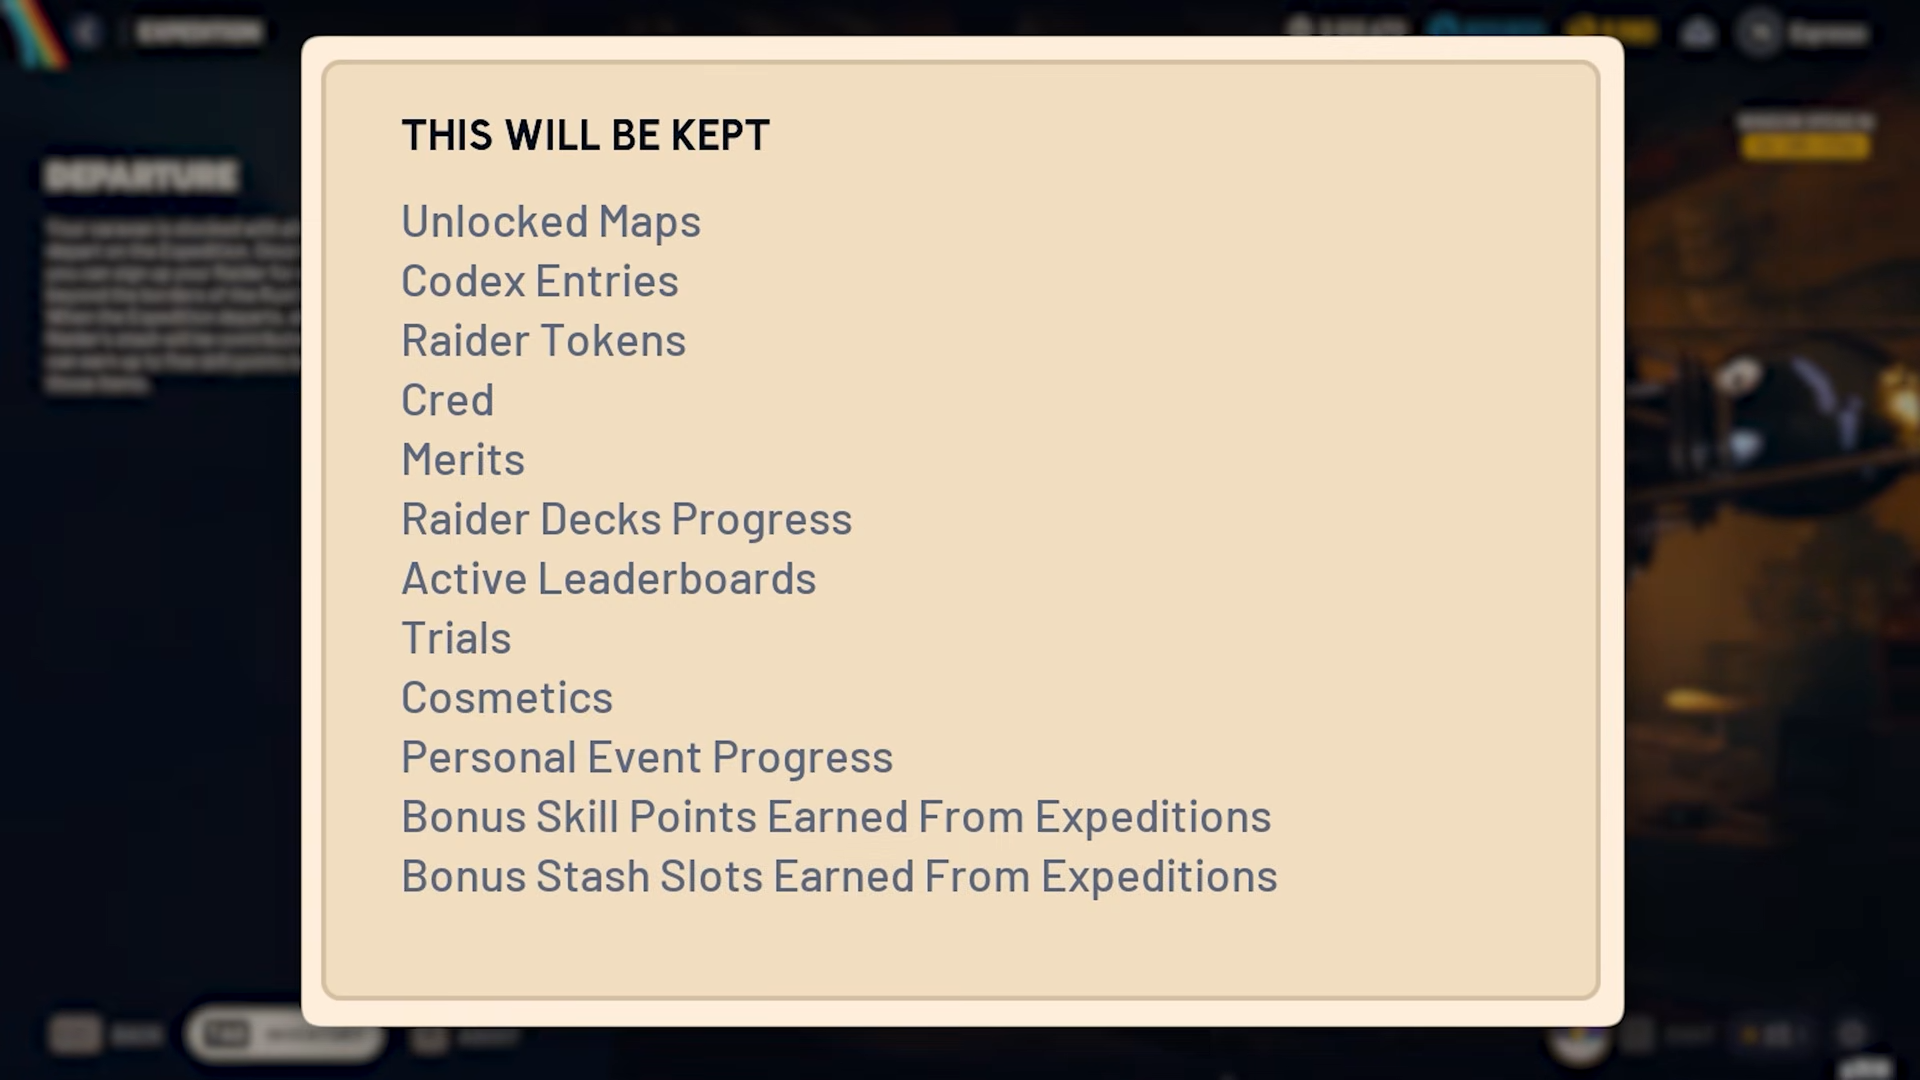
You keep:
- Unlocked maps and access, so you do not need to regain map entry from scratch.
- Codex entries and lore you have learned.
- Raider tokens and core currency types.
- Cred and merits tied to active events, up to the moment the event ends.
- Raider deck progress and active leaderboard status.
- All cosmetics you have earned.
- Personal event progress that is not explicitly reset by the expedition.
- Bonus skill points and stash slots unlocked from previous expeditions.
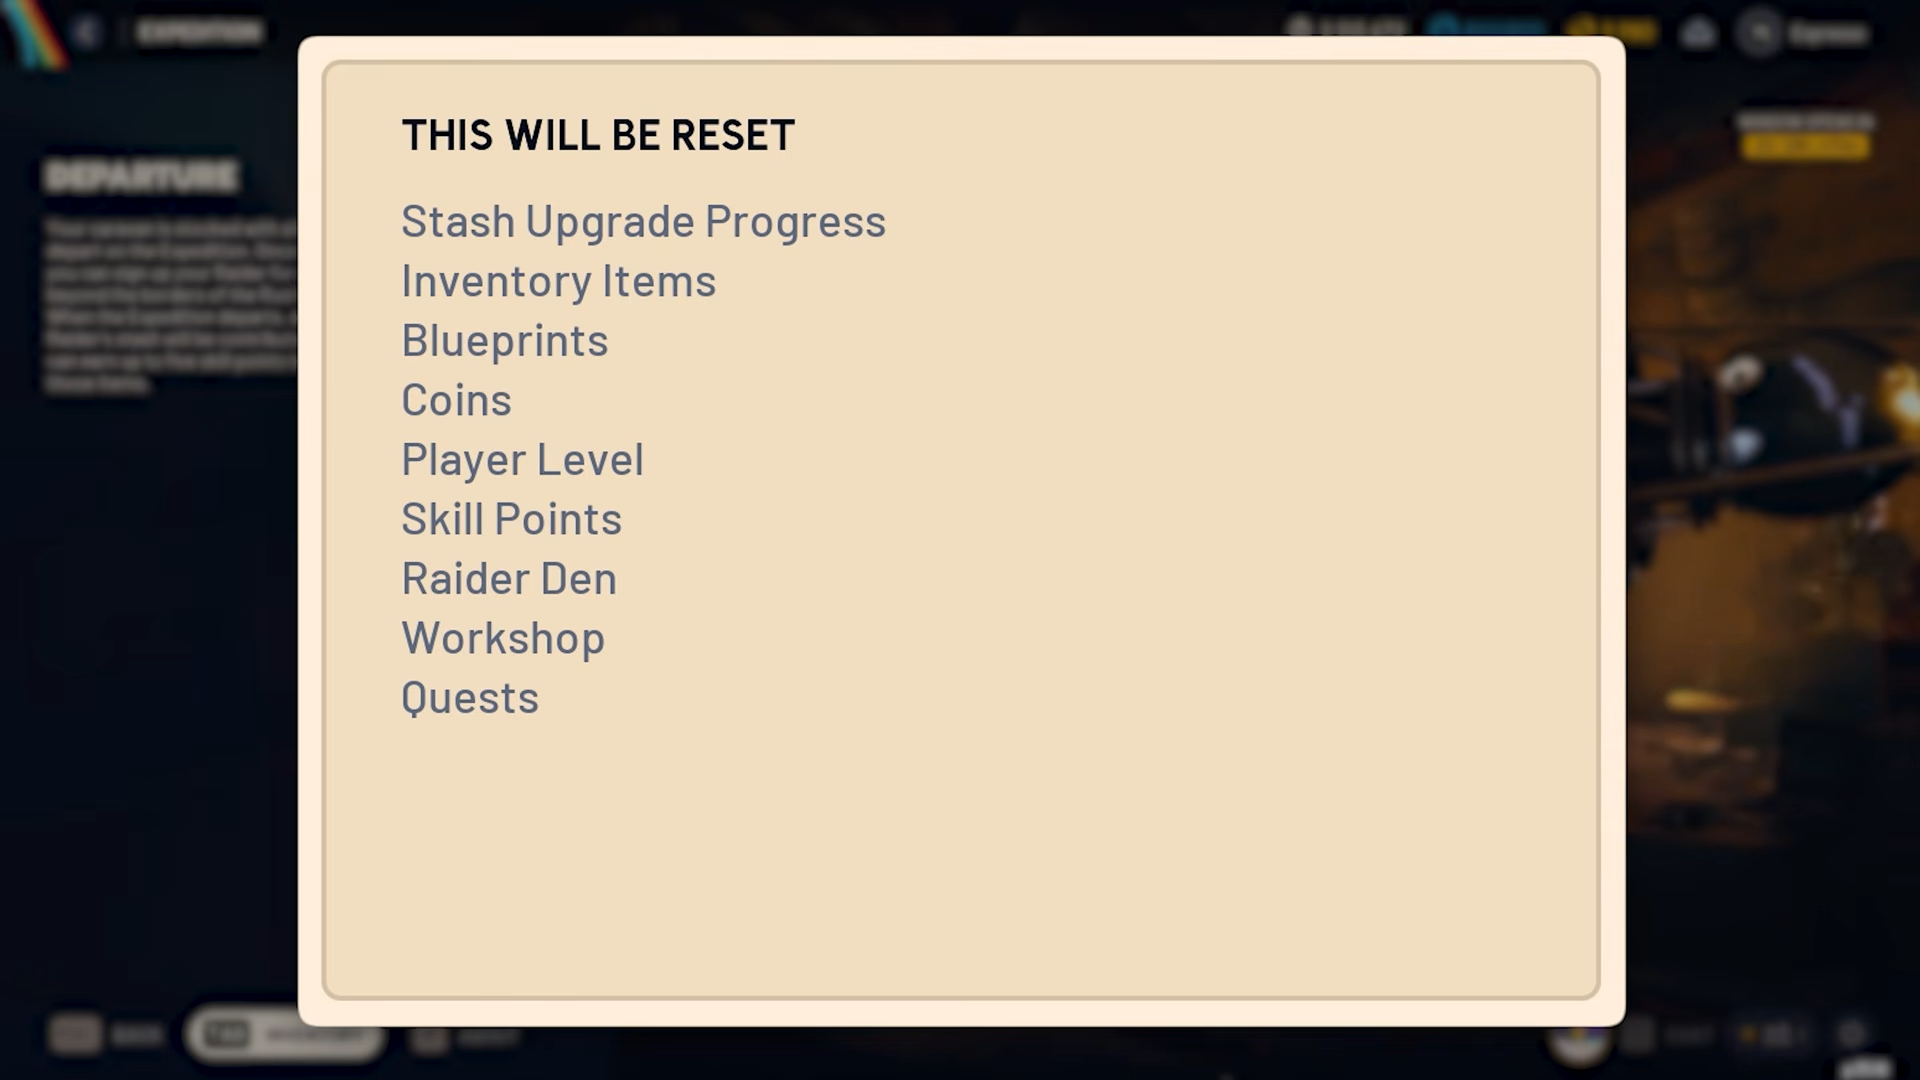
You lose:
- Stash upgrade levels beyond the base, aside from the bonus slots earned via expeditions.
- All items in your inventory and stash, resulting in a fresh inventory.
- All learned blueprints.
- Coins, player level, and your accumulated skill points.
- Raider den cosmetics earned specifically through the most recent season.
- Workshop and bench progress.
- Quest progression.
Weighing those lists against the expedition rewards is the key decision: more skill points, more stash space, and stronger buffs at the cost of almost everything else you currently hold.
How to use the trophy display event around the reset
The trophy display event is especially powerful right after a wipe because its rewards drop directly onto your fresh inventory. Turning in arc-related items to complete the display grants you a spread of useful items and several high level blueprints, including weapons that are otherwise hard to secure.
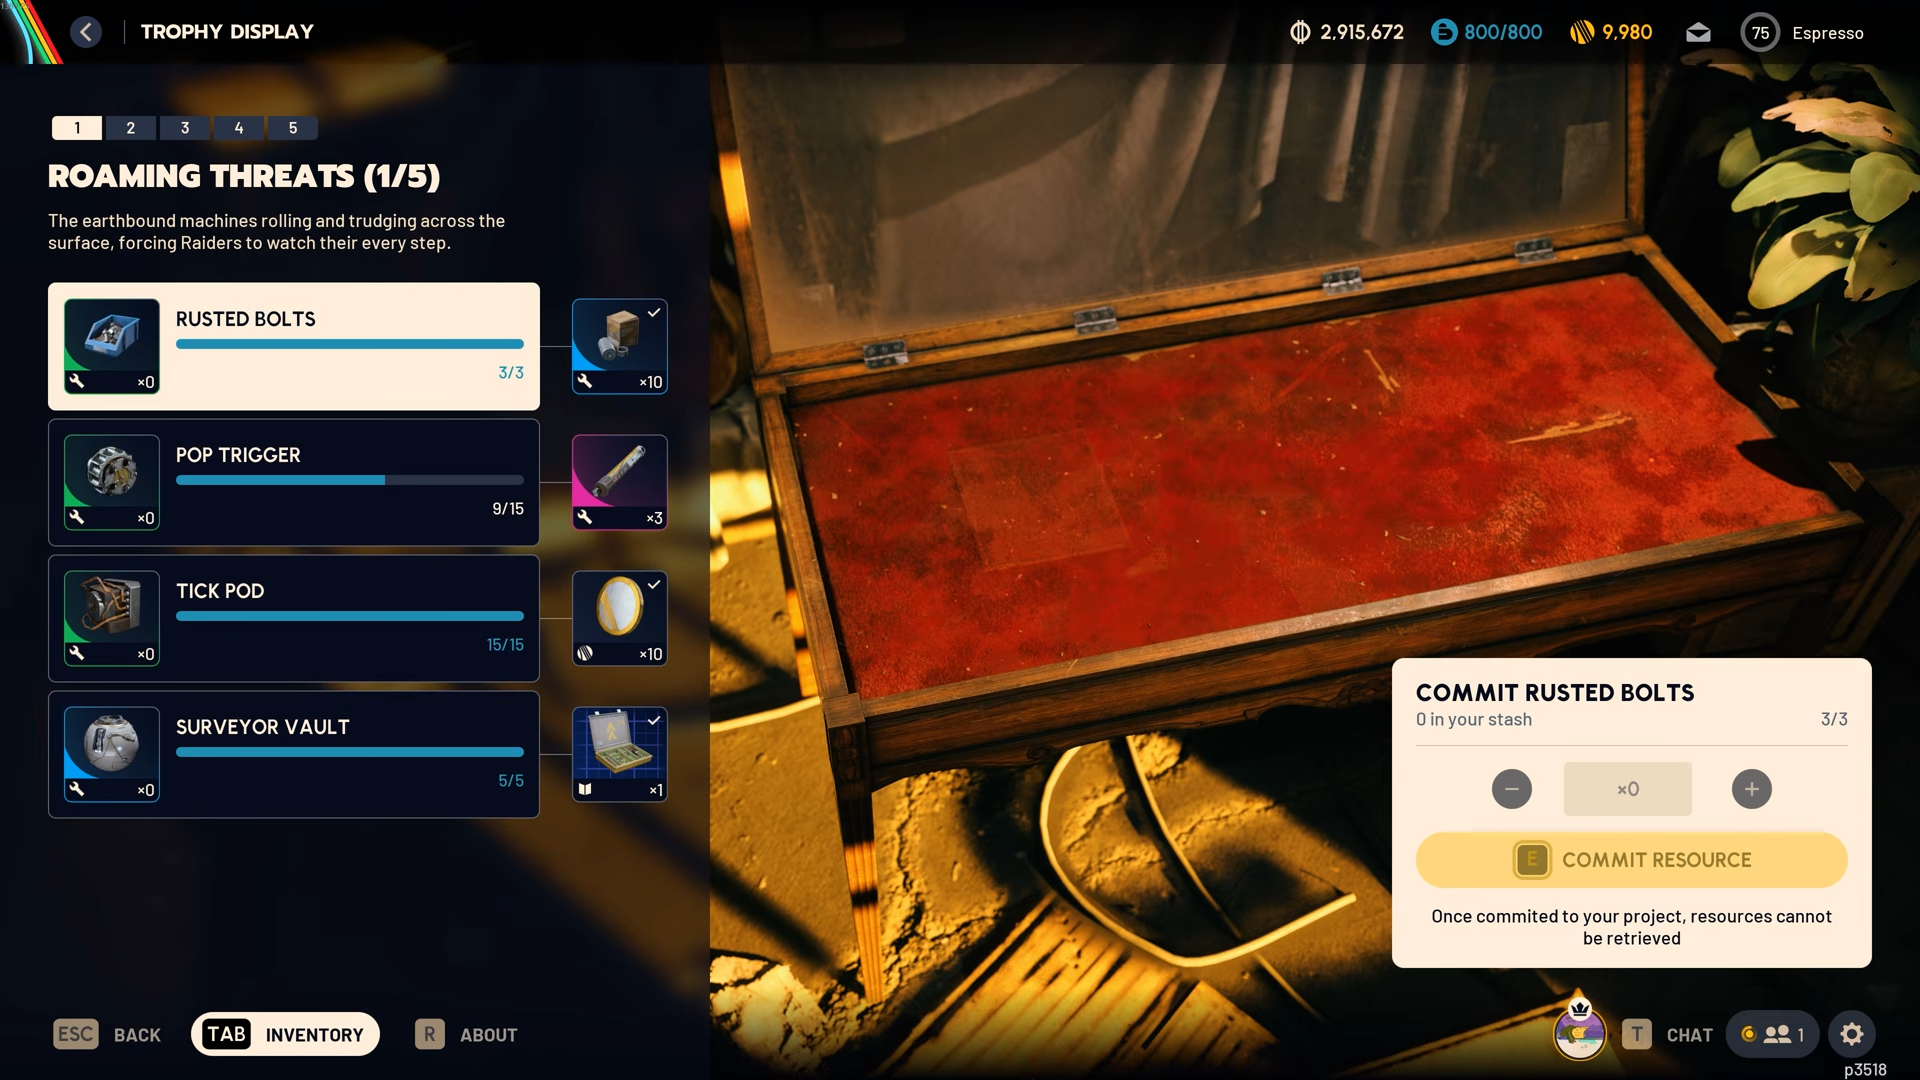
Two standout rewards are:
- A Bobcat blueprint granted by turning in queen reactors.
- A Snap Hook blueprint granted by turning in matriarch reactors.
Both blueprints sit late in the trophy display track and normally require specific conditions to find in regular play. If you delay completing the trophy display until after the expedition reset, you can instantly re-arm yourself with these strong options in the new cycle.
If you finish the event before the reset, those rewards are effectively spent inside the current season and will not carry forward, which makes its timing a crucial part of your expedition plan. Shared watch style events and other limited-time reward tracks, by contrast, do not usually bridge the gap into the post-expedition world and should be treated as bonuses for the existing season.
How blueprint loot pools and conditions really work
Blueprints in ARC Raiders are not fully random; they sit in defined loot pools tied to maps, modes, and container types. You cannot force a specific blueprint from a specific container every time, but you can narrow your search significantly by understanding these patterns.
There are three main axes:
- Map specific blueprints: Some weapons only drop on certain locations, such as Stella Montis, and nowhere else.
- Mode or condition specific blueprints: Others only appear under certain conditions like night raids, electromagnetic storms, cold snaps, or hidden bunkers.
- Container type specific blueprints: Different categories of containers, such as medical cabinets or raider caches, favor different blueprint types.
For example:
- Tempest: drops in night raid conditions.
- Wolfpack: also locked to night raids.
- Bobcat: appears behind locked gates and similar restricted areas.
- Volcano: tied to hidden bunker locations.
- Snap Hook: appears in electromagnetic storm conditions.
- Fireworks: found in cold snap conditions.
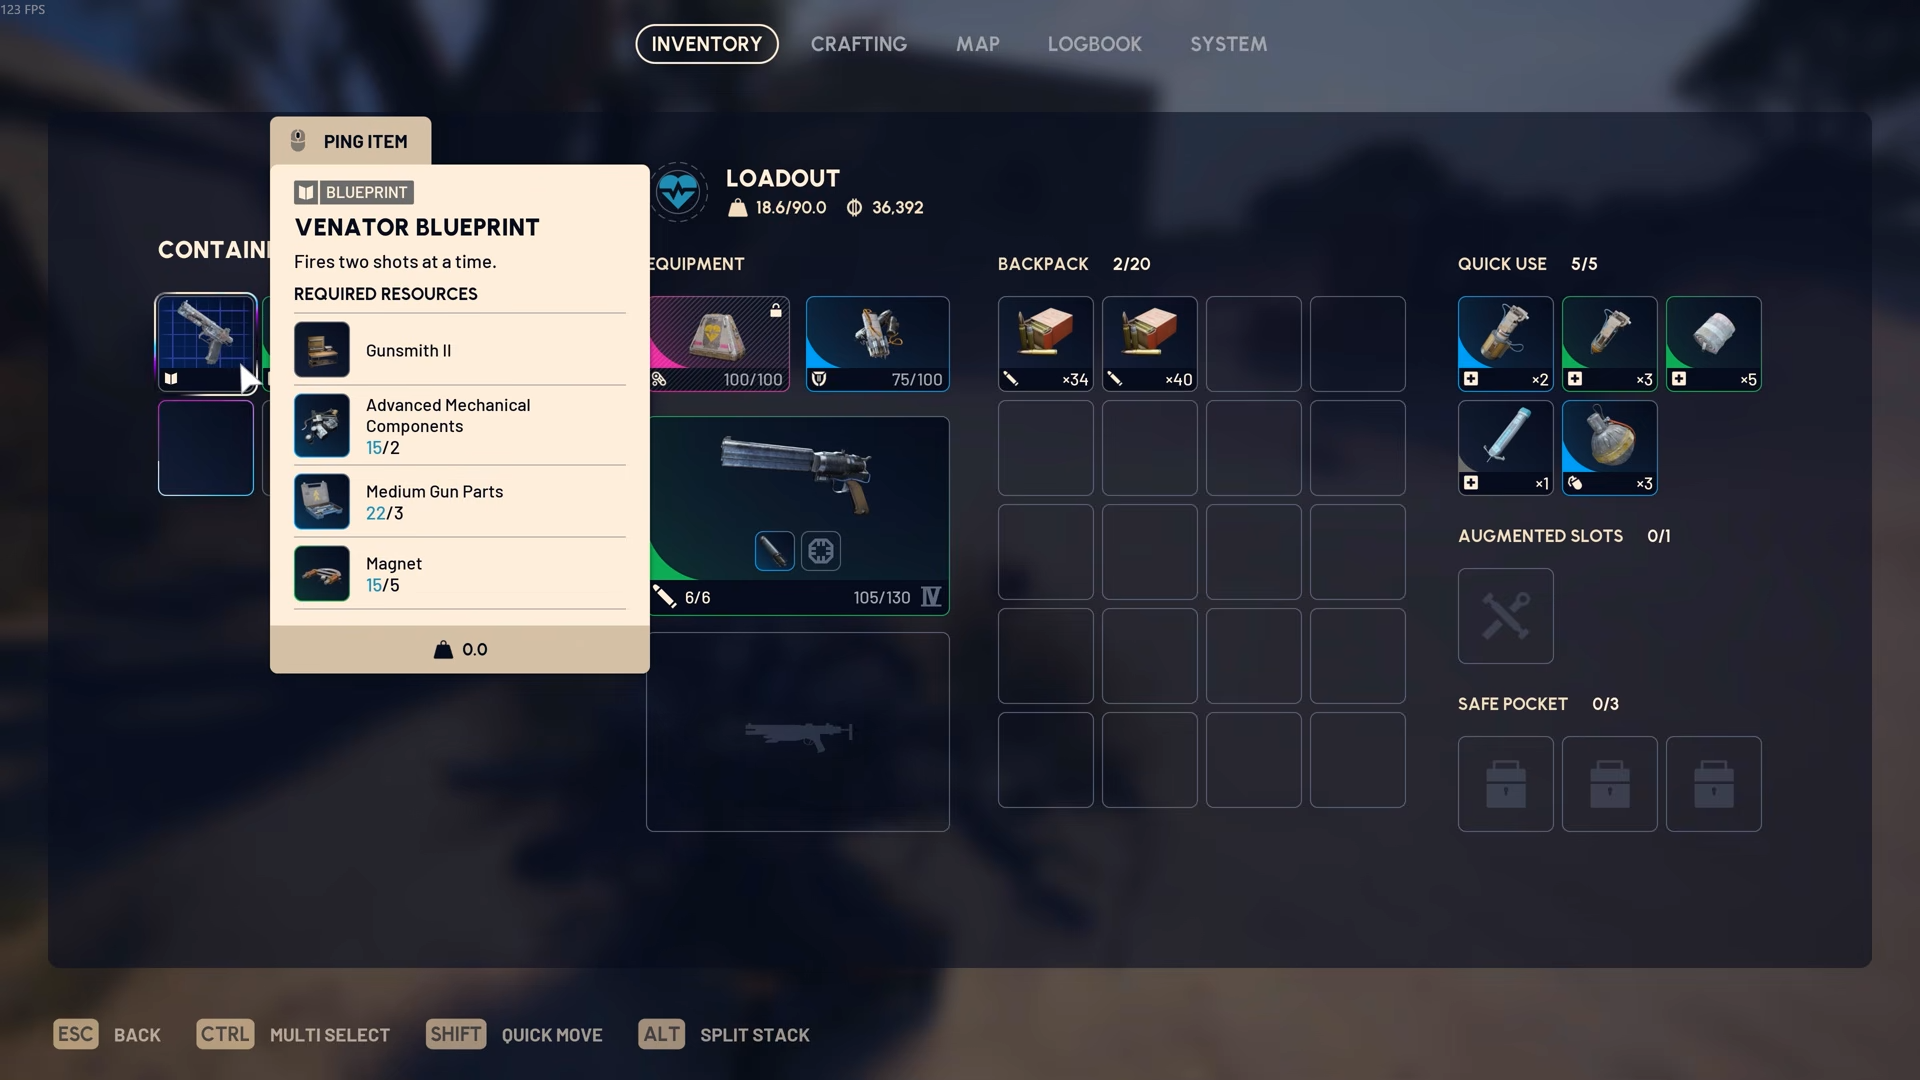
Augment blueprints such as Mark III survivor tend to appear in medical and augment containers, including blue medical drawers, white plastic-style boxes, and metallic augment crates seen in areas like Stella and Bluegate. Weapon blueprints like Ventor, Anvil, and Il Toro tend to lean toward raider-styled containers such as caches, weapon crates, and some ammo and medical crates.
Medical item blueprints like defibrillators, healing shots, and sprays are almost exclusively in medical containers. Some others, such as Deadline and Aelion, are strongly tied to specific maps like Stella Montis. Knowing these tendencies lets you grind with intent instead of wandering blindly.
How to approach blueprint grinding after the reset
Step 1
List the key weapons, augments, and medical items you want early in the new season. Prioritize pieces that unlock core parts of your build rather than chasing every blueprint at once.
Step 2
Match each desired blueprint to its known constraints. Identify which are map specific, which require certain weather or raid conditions, and which containers you should be opening.
Step 3
Plan focused sessions where you run only the map and condition that matches your current target, looting the container types most likely to hold the blueprint you want.
Step 4
Layer trophy display and similar guaranteed-reward systems into your plan to secure a baseline of powerful blueprints, then use targeted farming to fill the gaps that events do not cover.
Step 5
Accept that no spot is a guaranteed drop source. Treat each run as pushing the odds in your favor rather than expecting a specific container to deliver the item every time.
Where ARC Raiders expeditions are headed next
With Expedition 2, ARC Raiders is turning expeditions into a real seasonal backbone instead of a one-off novelty. The lower skill point cost, new catch up mechanic, and sharper distinction between consecutive and cumulative rewards all push you to think in longer arcs than a single stash or build.
If you treat each expedition window as a planning problem rather than a simple reset button, you can walk into each new season with more skill points, better buffs, and a clearer route to the blueprints and items you care about. The systems are stricter, but they also reward deliberate play more than ever.