
- What to know
- Quick overview of the fastest Ruin Guard strategy in Starsand Island
- Where you encounter the Ruin Guard in Starsand Island
- How to defeat the Ruin Guard using the stun-cycle method
- Rewards from defeating the Ruin Guard
- Applying the same tactic to other large bosses
- Mastering the Ruin Guard fight
What to know
- The fastest method relies on stun-locking with explosive arrows.
- Switch to normal arrows during the stun window to deal efficient damage.
- Rotate back to explosive arrows every few shots to re-trigger stagger.
- This same tactic works on all three large bosses in the game.
The Ruin Guard is one of the most intimidating large enemies in Starsand Island, but once you understand its stagger mechanics, the fight becomes highly controlled and surprisingly efficient. Instead of burning through expensive explosive arrows or risking close combat, you can leverage timed stuns to keep the boss vulnerable for most of the encounter. When executed correctly, this method dramatically reduces fight duration while conserving valuable materials.
Quick overview of the fastest Ruin Guard strategy in Starsand Island
| Aspect | Details |
|---|---|
| Recommended Weapon | Bow with explosive and normal arrows |
| Core Mechanic | Stun with explosive arrow, DPS with normal arrows |
| Risk Level | Low if distance is maintained |
| Resource Efficiency | High when explosive arrows are rotated strategically |
| Works On | Ruin Guard and other large bosses |
| Key Advantage | Continuous stagger control |
The Ruin Guard has a predictable aggression pattern. It advances, charges attacks, and attempts heavy melee or projectile strikes. However, its weakness lies in its susceptibility to stagger effects caused by explosive arrows. When stunned, it becomes temporarily immobile, giving you a safe damage window. By alternating between explosive and standard arrows instead of spamming high-cost ammunition, you maximize damage output while minimizing resource drain.
Where you encounter the Ruin Guard in Starsand Island
You typically find the Ruin Guard in ancient ruin zones surrounded by broken stone structures, glowing flora, and open courtyard-style arenas. These areas provide enough space to maintain distance, which is critical for executing the stun-rotation strategy safely. Fighting in confined areas reduces mobility and increases the risk of being hit during recovery animations.

How to defeat the Ruin Guard using the stun-cycle method
Step 1
Position yourself at mid-to-long range before initiating combat. You want clear line of sight and enough room to sidestep any forward charges. Make sure both explosive and normal arrows are equipped and easily switchable in your hotbar.
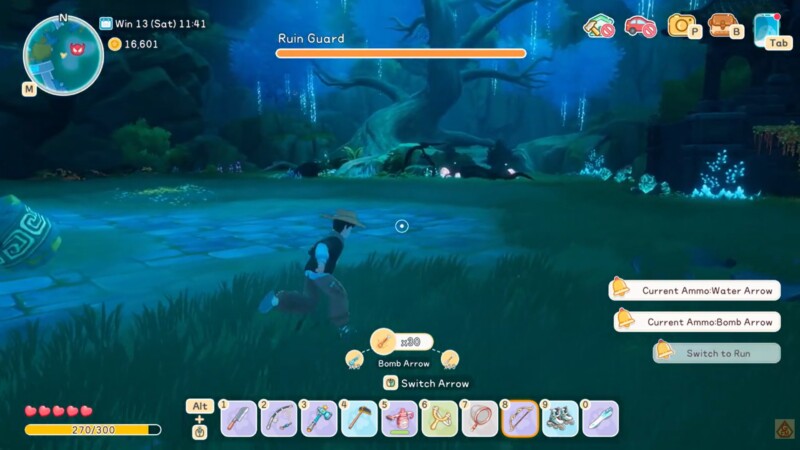
Step 2
Open the fight with a direct explosive arrow hit. Aim for center mass to ensure impact. This initial explosion triggers a stagger animation, briefly immobilizing the Ruin Guard and interrupting its attack sequence.
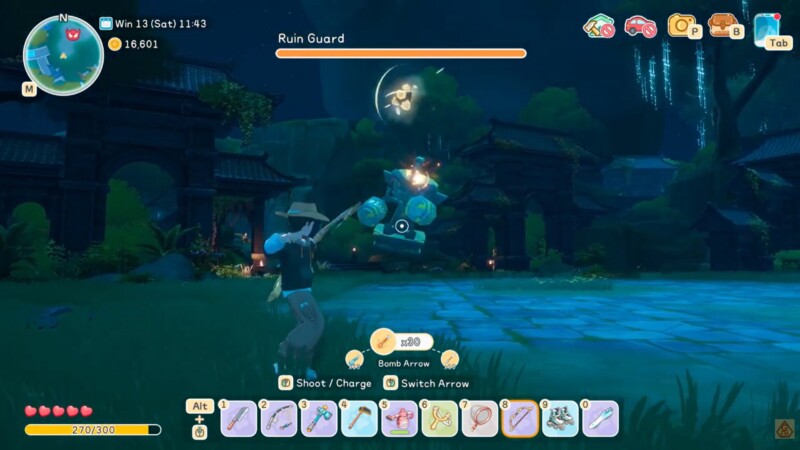
Step 3
Immediately switch to normal arrows and begin firing rapidly while the Ruin Guard is stunned. Focus on consistent, accurate shots. Do not waste time repositioning unless absolutely necessary. This is your highest damage window.

Step 4
After several normal arrow shots, watch for signs of recovery. Just before the Ruin Guard fully regains mobility, switch back to an explosive arrow and fire again. This re-triggers the stagger effect and prevents it from launching a counterattack.

Step 5
Repeat the rotation: explosive arrow for stun, normal arrows for sustained damage, then another explosive arrow before full recovery. The goal is to create a near-continuous stagger cycle. When timed correctly, the Ruin Guard spends most of the encounter unable to act.
Step 6
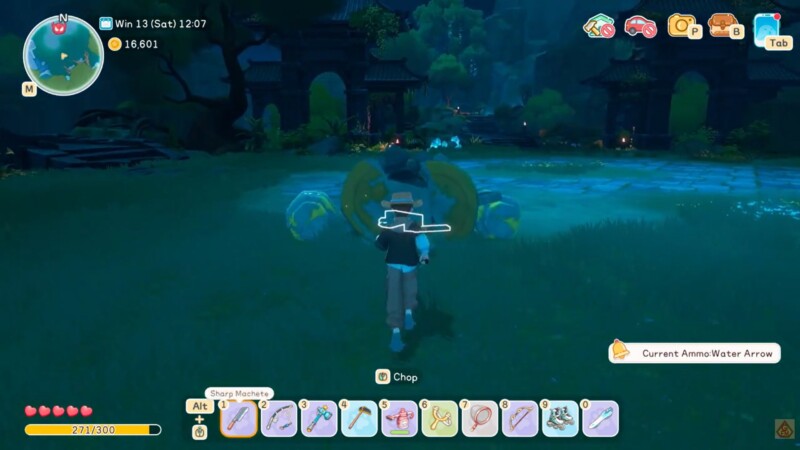
Maintain spacing throughout the fight. If you miss a stun window and the Ruin Guard begins an attack animation, prioritize dodging over shooting. Reset distance, then reapply the explosive stun and resume the cycle.
This approach allows you to conserve explosive arrows significantly compared to spamming them. Instead of using them as primary damage, you use them as control tools, turning a chaotic boss battle into a controlled DPS loop.
Why this method is resource-efficient
Explosive arrows are among the more expensive consumables in Starsand Island. Crafting or purchasing them requires materials that are often better saved for later upgrades. By using only one explosive arrow per stun cycle and filling the damage gap with normal arrows, you reduce overall explosive consumption while maintaining high total damage.
Over time, this results in better profit margins when farming the Ruin Guard repeatedly. Since the boss can be defeated quickly using this rotation, players can optimize farming runs without exhausting rare crafting components.
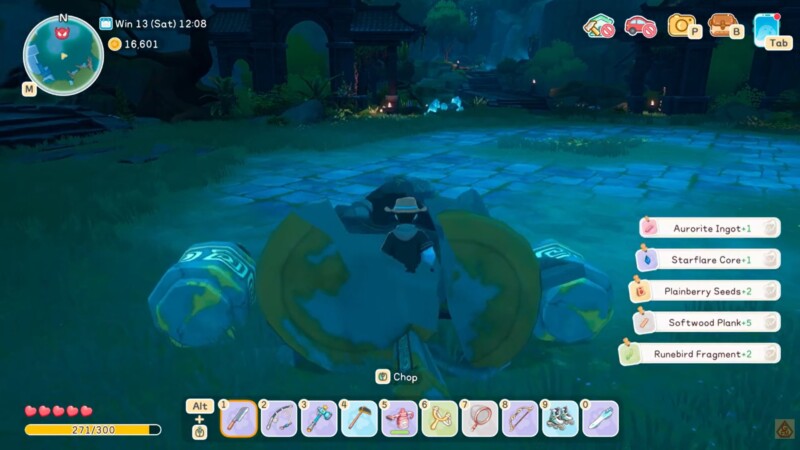
Rewards from defeating the Ruin Guard
The Ruin Guard provides valuable crafting and upgrade materials that justify repeated encounters. Based on the observed drops, the rewards include:
| Reward Item | Quantity |
|---|---|
| Aurorite Ingot | 1 |
| Starflare Core | 1 |
| Plainberry Seeds | 2 |
| Softwood Plank | 5 |
| Runebird Fragment | 2 |
These drops make the Ruin Guard particularly worthwhile for players progressing into mid-to-late game crafting tiers. Starflare Cores and Aurorite Ingots are especially important for advanced gear upgrades, while Runebird Fragments contribute to higher-tier crafting recipes. The inclusion of Softwood Planks and Plainberry Seeds adds supplementary utility for base progression.
Applying the same tactic to other large bosses
The stagger-rotation method is not exclusive to the Ruin Guard. The same explosive-to-normal arrow cycle works effectively on the other two large bosses in Starsand Island. As long as the enemy reacts to explosive impact with a stun or stagger animation, you can replicate the control loop.
This makes the technique one of the most versatile combat strategies currently available. Mastering the timing once allows you to carry the skill across multiple high-tier encounters, improving efficiency across the board.
Mastering the Ruin Guard fight
Defeating the Ruin Guard quickly is less about raw damage and more about control. By treating explosive arrows as stun triggers rather than primary damage dealers, you transform the fight into a predictable rhythm. Once you internalize the rotation, boss farming becomes faster, safer, and far more economical. If you are aiming to optimize your progression in Starsand Island, mastering this stun-cycle method is one of the smartest combat investments you can make.