What to know
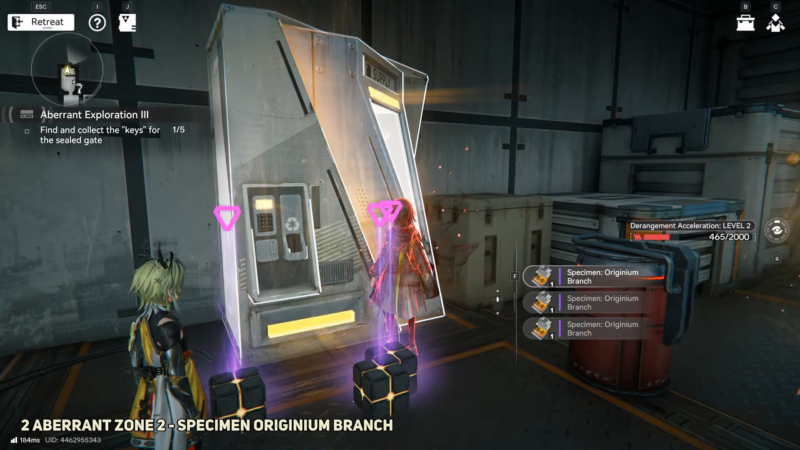
- The item is “Specimen: Originium Branch,” a distinct specimen collectible.
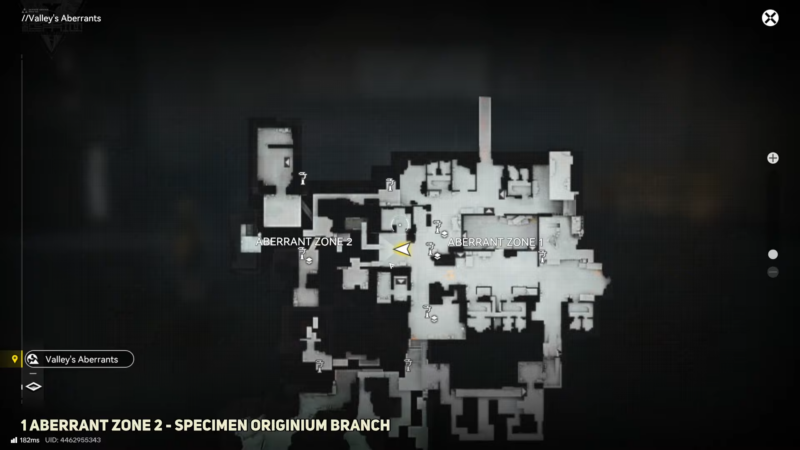
- The commonly shared route is split into two short segments within Aberrant Zone 2.
- If a pickup is missing, it’s often because it was already collected or the character is slightly off the correct interact point.
- An alternate acquisition path may exist via an auto-vendor source associated with Aberrant Zone 2.
In Arknights: Endfield, the game focuses on the two commonly shown collection points for Specimen: Originium Branch in Aberrant Zone 2, and how to make the pickups register cleanly. It’s written for quick navigation and easy screenshot capture with timestamps on each step.
Quick reference for the two known pickups
| Pickup | Zone | What to do | When it matters |
|---|---|---|---|
| Specimen: Originium Branch (pickup #1) | Aberrant Zone 2 | Follow the first short route and interact at the endpoint | Use this when only one branch has been collected so far |
| Specimen: Originium Branch (pickup #2) | Aberrant Zone 2 | Follow the second short route and interact at the endpoint | Use this if the first pickup is already done or if tracking requires both |
| Fallback source (if pickups don’t show) | Aberrant Zone 2 | Check the zone’s auto-vendor-related source for the item | Useful when the world pickup is unavailable |
Where the item is found and why it’s “two locations”
The “Specimen: Originium Branch” is treated as two separate collection points inside Aberrant Zone 2 rather than a single static spawn. That usually means there are two distinct interactables (or two distinct endpoints) that players visit one after the other.
If the goal is completion or meeting a requirement tied to collecting specimens, it helps to assume both pickups may be needed. Even when only one is required, grabbing both prevents having to backtrack later.
How to collect both locations (with timestamps)
Step 1 — First Specimen: Originium Branch pickup route
Enter Aberrant Zone 2 and start with the first location route. Follow the path shown for the first segment until reaching the endpoint, then sweep the immediate area for an interaction prompt.
If nothing triggers, reposition slightly and check nearby edges of the endpoint area (interact prompts can be picky when standing a step too far away). After interacting, pause briefly to ensure the pickup registers before leaving.
Step 2 — Second Specimen: Originium Branch pickup route
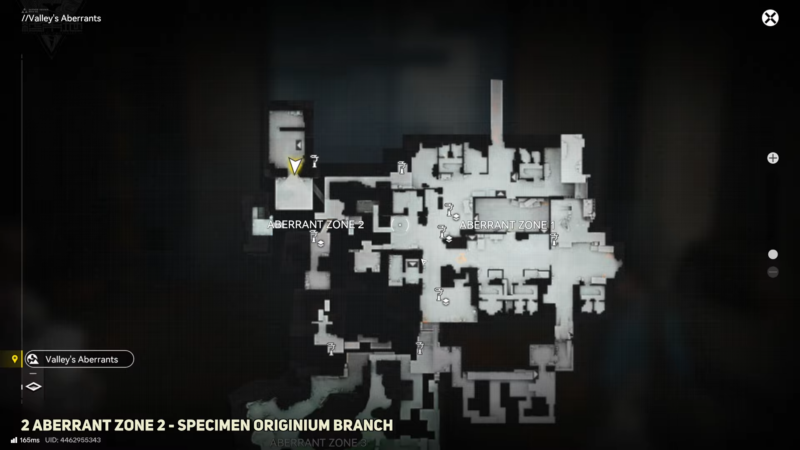
Move to the second location within Aberrant Zone 2 and follow the route shown for the second segment. At the endpoint, look for the same kind of interact behavior and confirm the item is received.
If it doesn’t appear at the second endpoint, confirm whether it was already collected earlier. In many games, once a world collectible is taken, it won’t be available again immediately (or it may require a reset condition), so the absence of the interactable can simply mean it’s already done.
Common issues and fixes that save time
Here are the fastest checks that usually resolve the “can’t find it” problem without restarting the run:
- Wrong micro-location: Re-check the exact endpoint spot; a small positioning difference can prevent the interact prompt.
- Already collected: Verify inventory and any tracking objective; the pickup may be complete even if the object isn’t visible anymore.
- Zone confusion: Ensure it’s actually Aberrant Zone 2 (not a similarly named area or an adjacent transition).
- Progress state mismatch: If a related objective expects the pickup during a certain activity state, try returning after switching activities or reloading the area.
- Vendor fallback: If the game supports it for this item, check the zone’s auto-vendor-related acquisition source.
How to verify the pickup is complete
After each pickup, confirm the item appears in inventory under its proper name. If tracking is involved, also verify that the relevant objective counter (if present) updates after each interaction.
If only one pickup was completed and the objective still looks incomplete, assume the second location is required and proceed to the 2nd segment.

Finishing notes for a clean run
Doing both pickups in a single pass through Aberrant Zone 2 is the most reliable way to avoid extra travel. If screenshots are needed, the two timestamps make it straightforward to capture each route segment and each endpoint interaction without clutter.